

Understand the metrics you will track
The table below shows how Cometly tracks the key Maxweb metrics.- View Content: visitors to your Maxweb VSL/TSL.
- Purchase: visitors who purchased, and your commission amount.
- Upsell Purchase: the number of purchases that are upsells during checkout.
- Upsell Revenue: the part of your sales revenue that comes from upsells in your funnel, or from extra items added to a purchase.
- Gross Revenue is the total revenue generated. Upsell Revenue is automatically included in Gross Revenue.
- Cost Per Upsell: the average ad spend needed to generate one upsell purchase. It is the total amount spent on ads divided by the number of upsell purchases.
- LP CTR: landing page click-through rate. It is the total number of View Content events divided by the number of link clicks.
Pro tip: Now that you know the metrics you will use, configure your Ads Manager to show them.
Step 1: Add the Cometly Postback URL to Maxweb
In this step you get the Maxweb Postback URL from your Cometly space (the workspace that holds one business’s tracking data) and add it to your Maxweb account.- In Cometly, click Integrations in the sidebar.
-
Find the Maxweb card (it is in the Payments category) and click Connect.
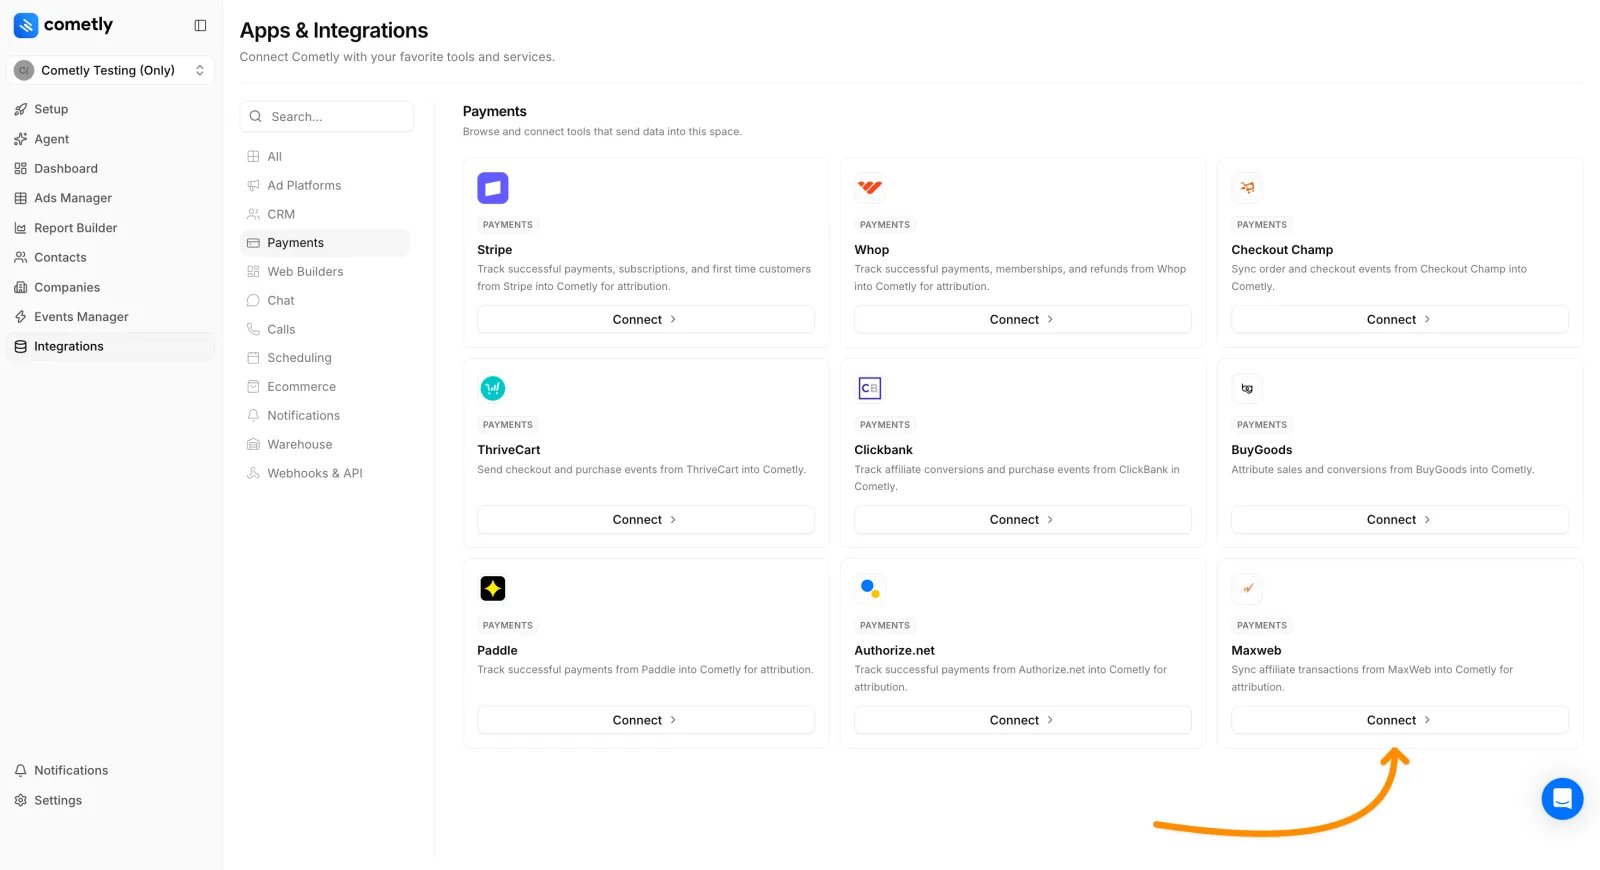
- Click Activate Maxweb. This generates your Postback URL.
- Under Copy the Postback URL, click Copy.
- Log in to your Maxweb account and go to your AffOverview page: https://backoffice.maxweb.com/affoverview
- In the top right corner, click your name, then click Postback pixels.
-
On the Postback pixels page, click Add new.
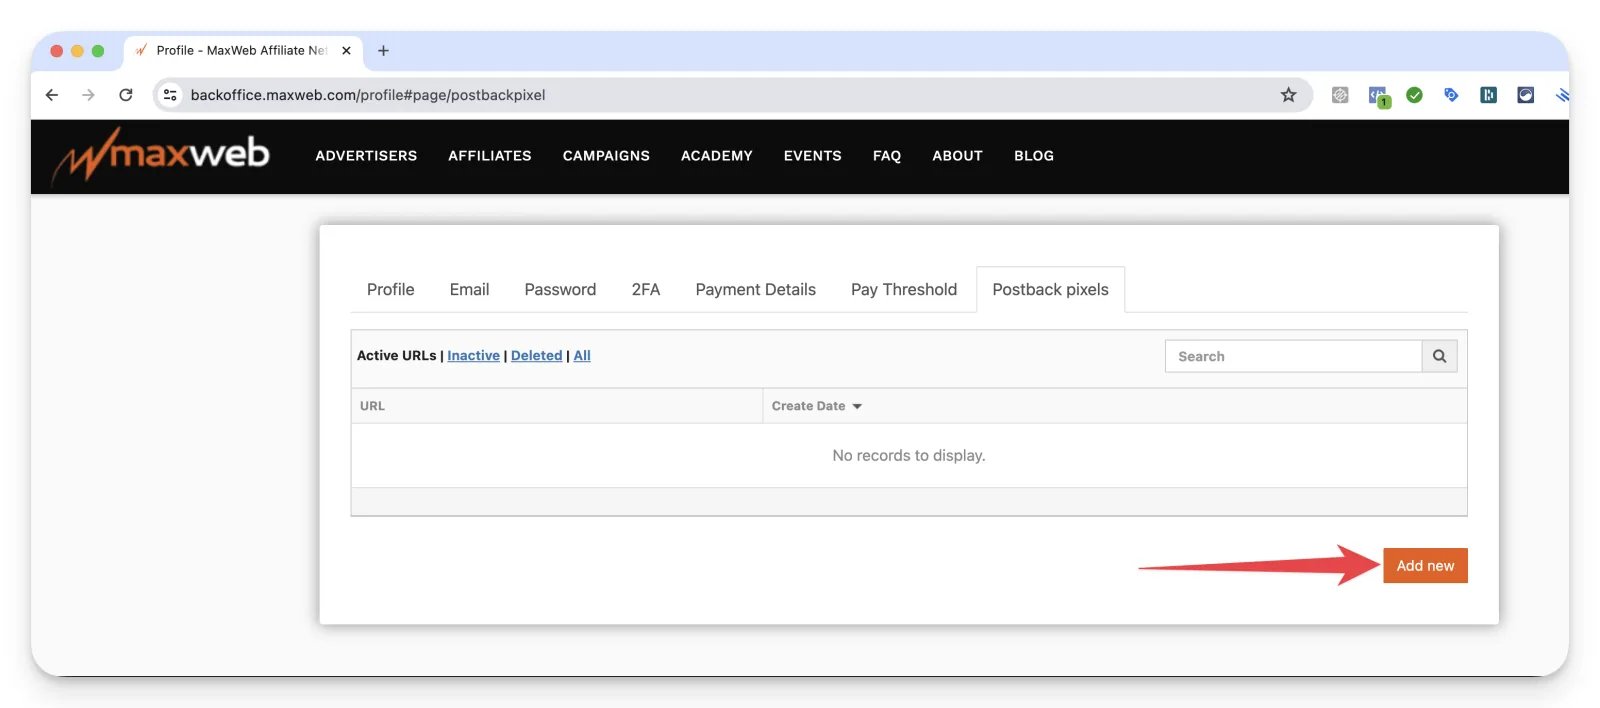
- Paste the Cometly Postback URL, set Status to Active and Event to Purchase, then click Save.
Step 2: Add scripts to your landing page
You need to add the scripts below to your landing page. You can use any landing page builder as long as it lets you add scripts to the<head> and to the <footer> or <body> of the page. You also edit your offer URL in this step to set up the Maxweb conversion API.
The Cometly tracking pixel is designed to automatically capture the source of traffic by detecting the referring host. This lets it identify where visitors come from, such as their landing page or referral source, without additional setup. The pixel can work on its own, but it works best when URL parameters are also in place, which gives you detailed attribution for ad performance.
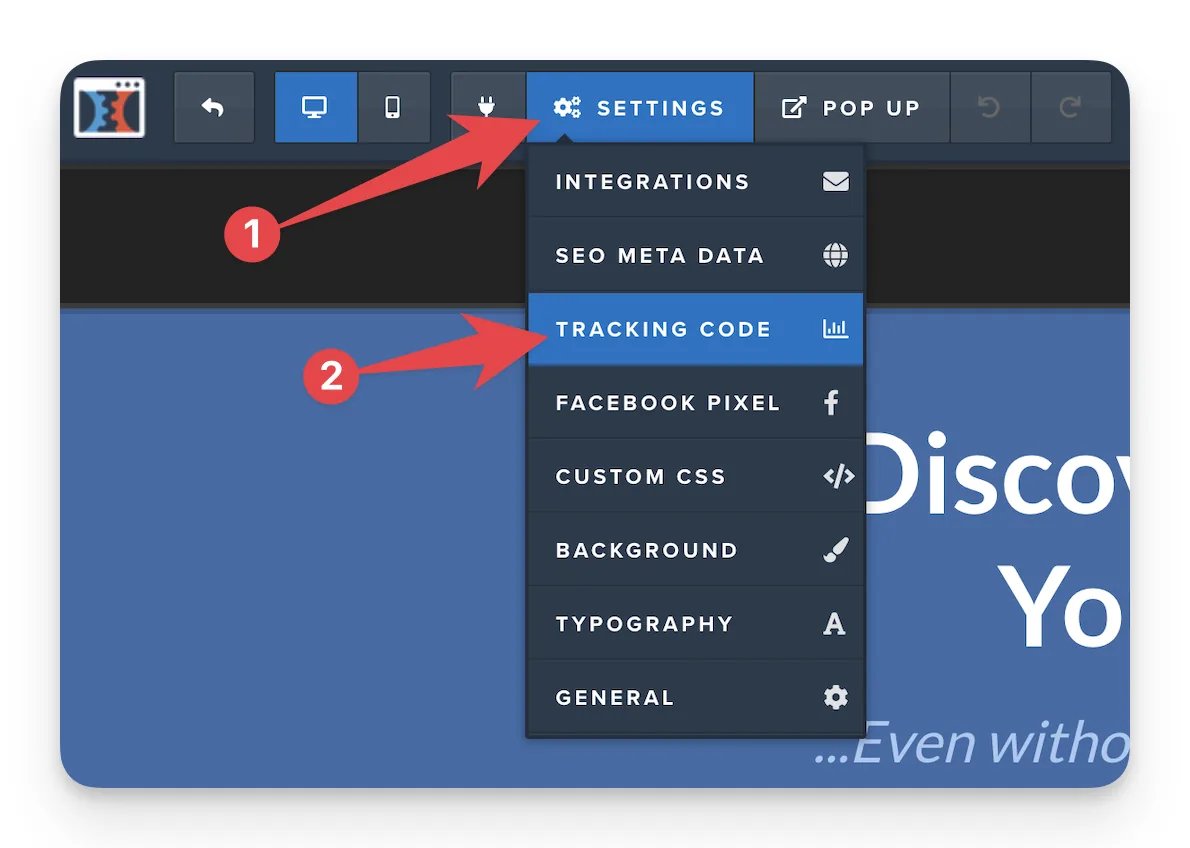
If you use ClickFunnels for your landing page, open the editor for the funnel step and click Settings > Tracking Code.
Footer codes
Add the three scripts below to the FOOTER CODE section. This script passes the parameters to the VSL offer page: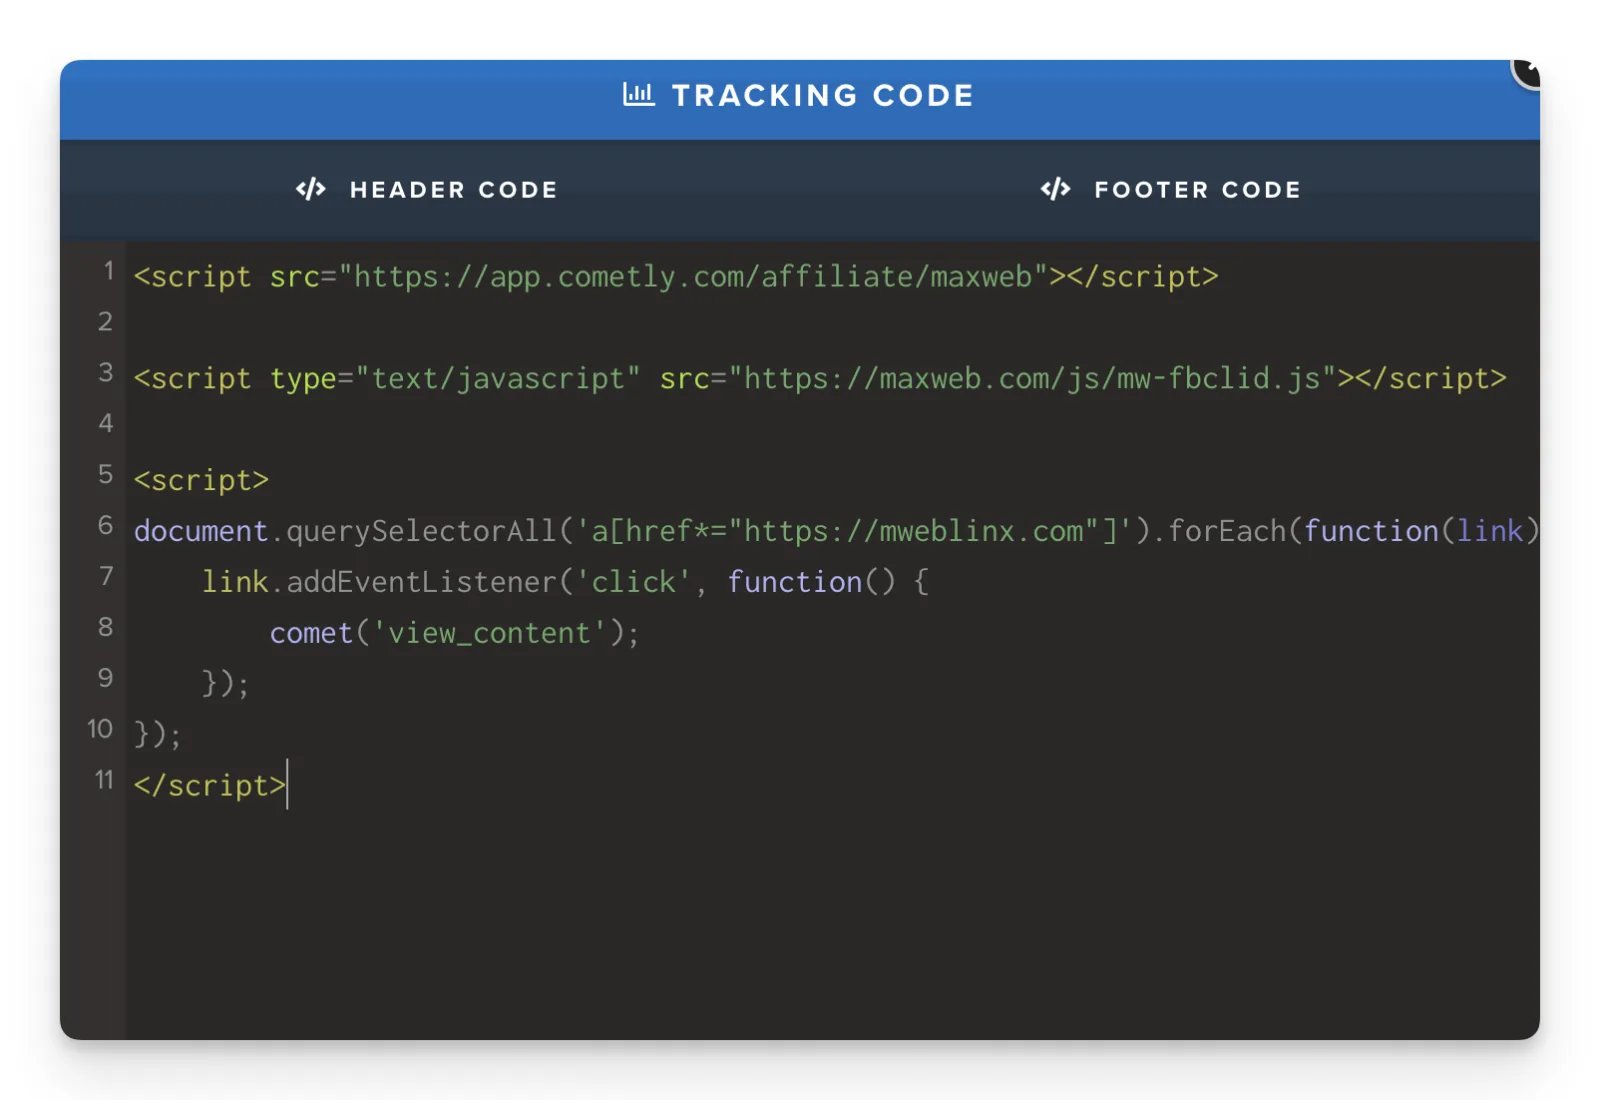
Header codes
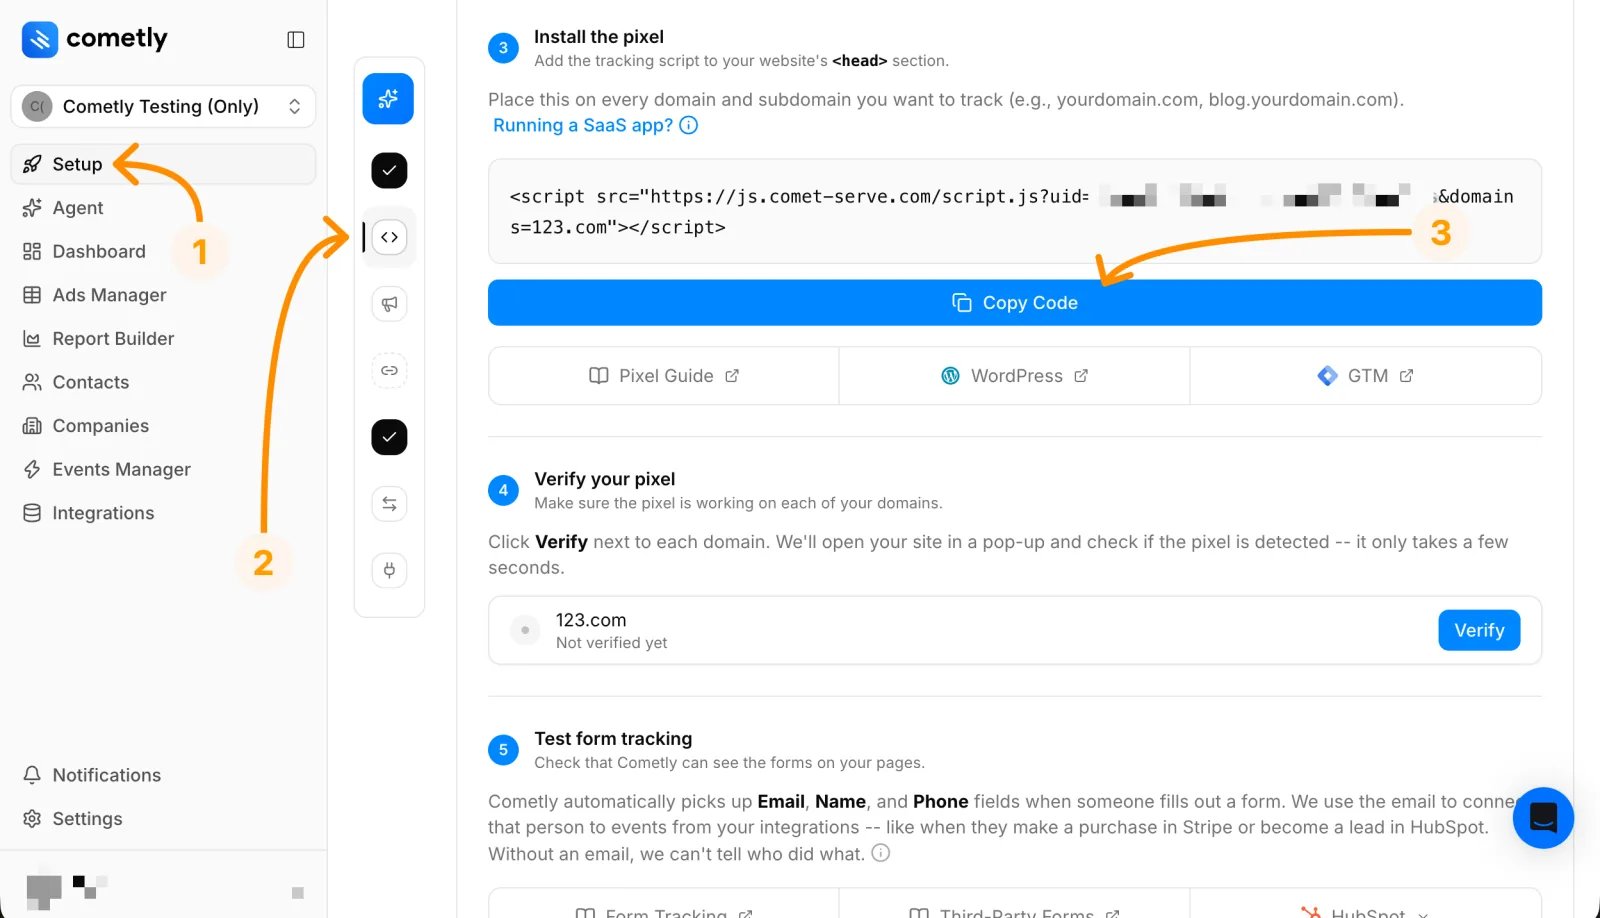
Add your Cometly pixel and your Meta pixel code to the HEADER CODE section.- In Cometly, click Setup in the sidebar and open step 2, Install the Cometly pixel.
-
Under Install the pixel, click Copy Code.
-
Paste the Cometly pixel into the
<head>section of your landing page.
Set up the conversion API parameter to send the fbclid (Facebook click ID)
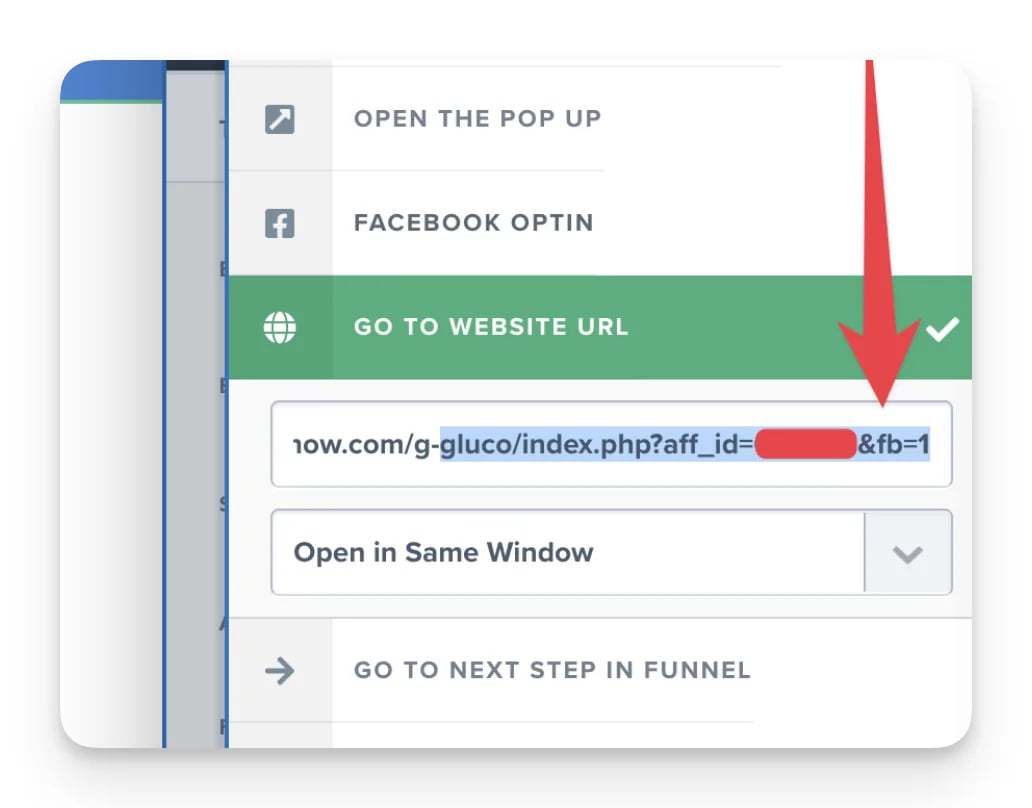
Apply the change below everywhere your offer URL appears. That includes every button and image on your landing page that links to the offer URL. To set up the conversion API in Step 6, add&fb=1 to your offer URL.
Here is an example. Do not add this link to your landing page, it only shows what your link should look like:
Install the Meta pixel in the <head> code of your landing page
Make sure the Meta pixel is installed in the <head> code of your landing page. The Meta pixel should be ABOVE the Cometly pixel.
Step 3: Add URL parameters to your ads for traffic going to Maxweb offers
Maxweb uses specific URL parameters, listed in this step. Use these, not the standard Cometly URL parameters.
Meta
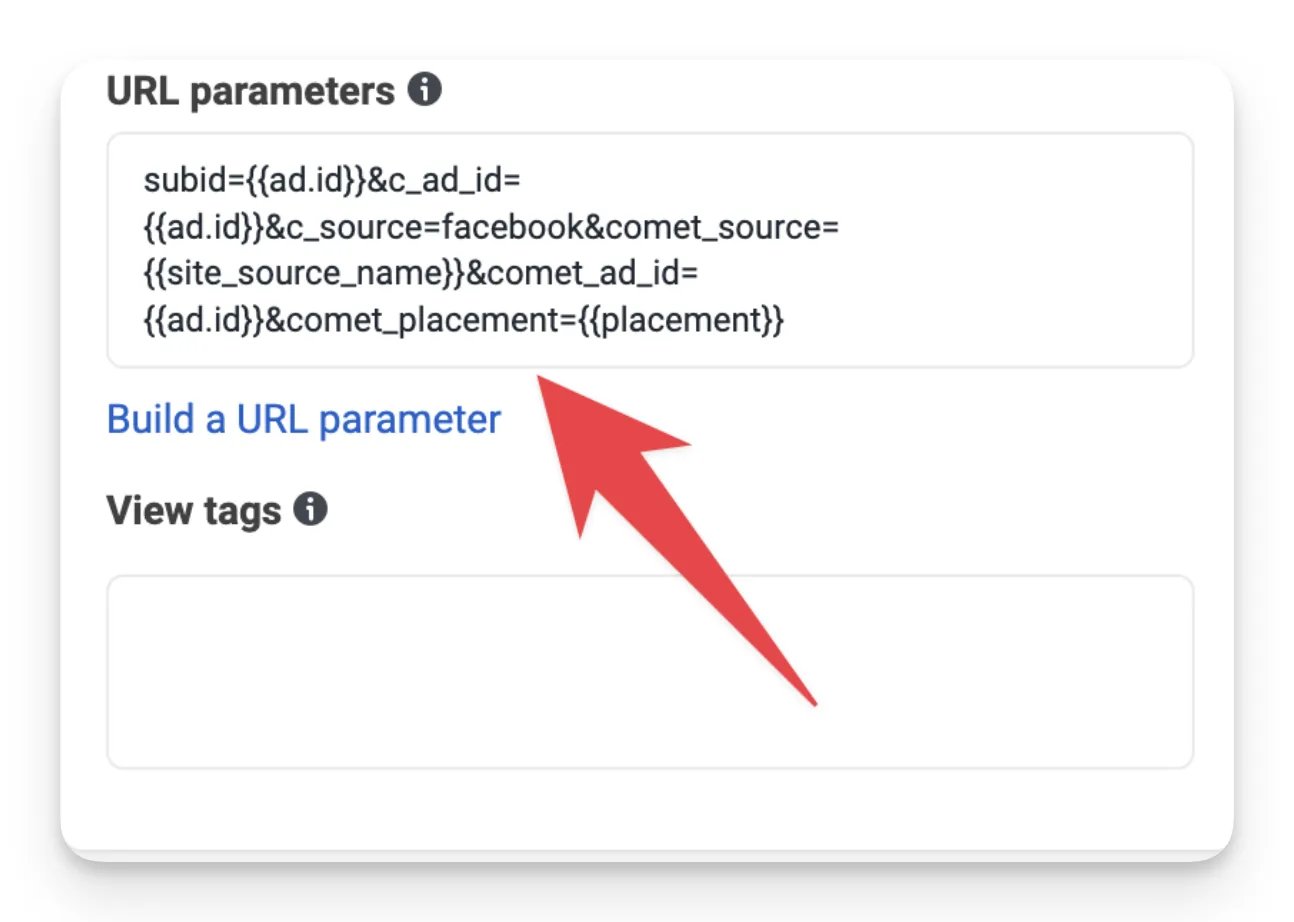
Copy and paste the URL parameters below into the URL parameters box in the Tracking section at the ad level of your Meta ads:
TikTok
Add the following URL parameters to your Website URL:
Cometly needs the following tracking template in the Tracking template section of each of your regular Google ad campaigns that are not Smart Campaigns:
Best practices for combining pixel tracking and URL parameters
- Add the URL parameters to all ad links and check the formatting.
- Verify the Cometly pixel is installed correctly on your website.
- Regularly check the data collected by the pixel to make sure it matches your campaign objectives.
Troubleshooting common issues
- Issue: Traffic is attributed to “organic” rather than to specific ads. Resolution: Make sure the URL parameters were added correctly to your ad links.
- Issue: The pixel is not capturing traffic sources. Resolution: Double-check your pixel installation and test it across your website.
Step 4: Connect your ad accounts
Connect your profile to Cometly
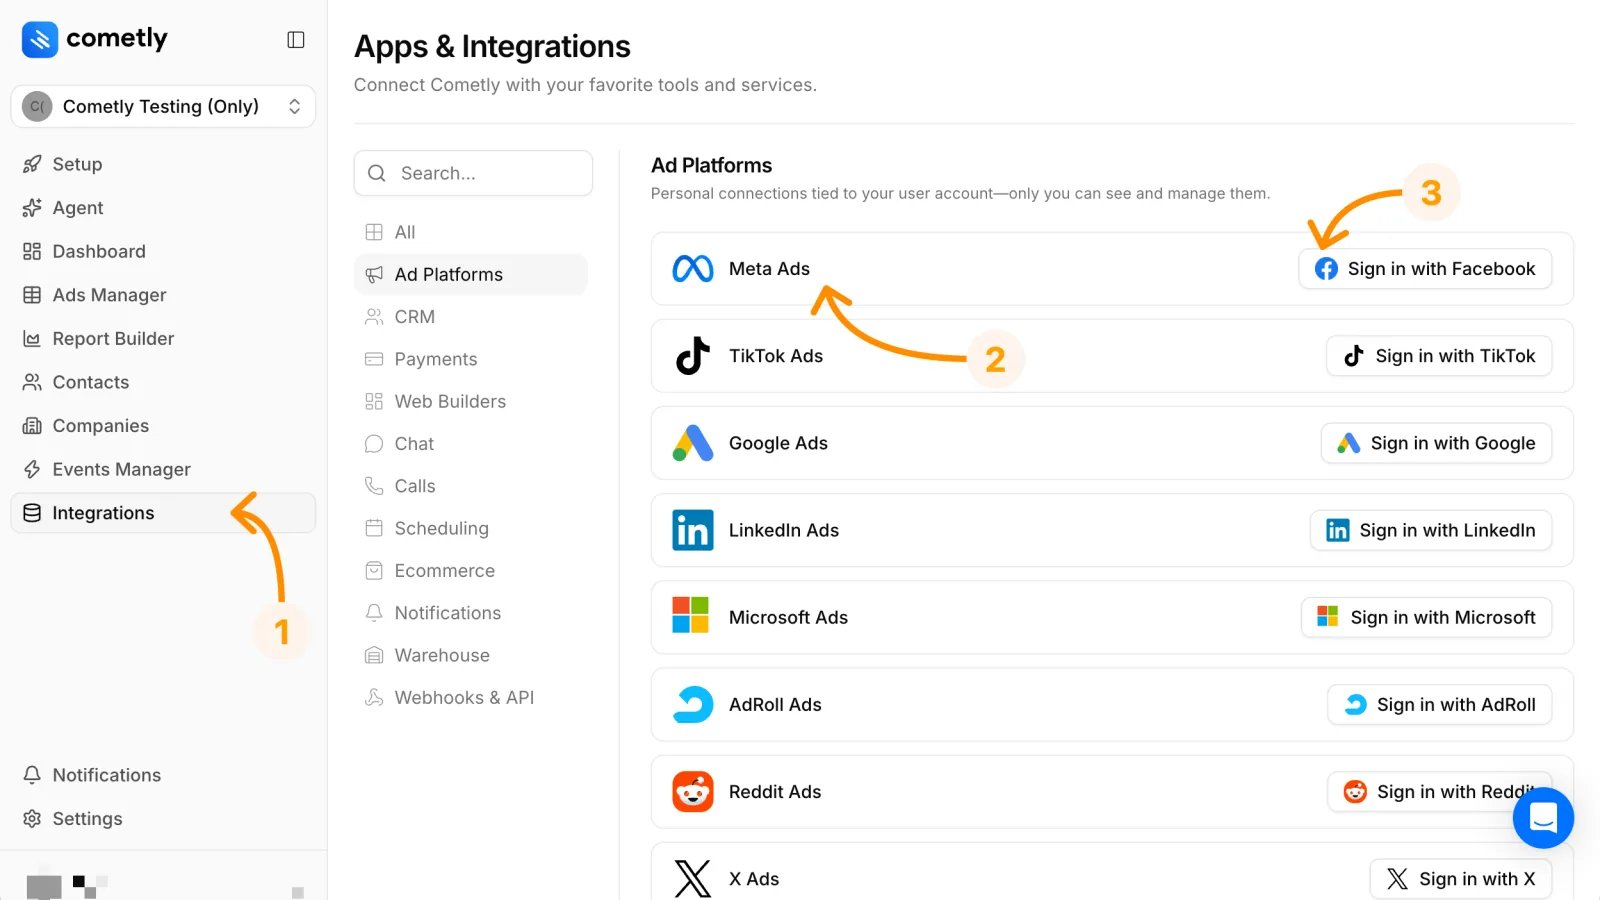
Connecting your personal profile lets Cometly access the ad accounts you have permission to use. Once your profile is connected, you can link those ad accounts to your space for tracking and reporting.- In the sidebar, click Integrations.
- Under Ad Platforms, find the row of the ad platform you want to connect (for example Meta Ads, Google Ads, TikTok Ads or LinkedIn Ads).
- Click the sign-in button on that row (for example Sign in with Facebook) and follow the prompts to connect your profile.
Connect ad accounts to your space
After your profile is connected, the expanded row lists the ad accounts you have access to. These connections are tied to your user account, so only you can see and manage them. Click Connect & Sync Data next to the ad account you want to add to the space. Once connected, the ad account appears in the connected ad accounts card for that platform (for example Connected Meta Ad Accounts) and is visible to all team members in the space. For the full walkthrough, see Connect your ad platforms.Step 5: Data expectations after connecting ad accounts
- After you connect your ad account, it takes up to 60 minutes for data to refresh and appear in Cometly.
- During this time, active campaigns do not show in the Cometly Ads Manager. Once the data refreshes within the 60-minute window, all active campaigns appear automatically.
- Ad and event conversion data starts displaying from the moment tracking is enabled. Past data cannot be retrieved retroactively.
Step 6: Configure the Conversion API to send Purchase data to the ad platforms
The Conversion API is how Cometly sends the conversions it tracks back to an ad platform. Turning on the Conversion API in your Cometly space automatically sends event data back to Meta.Set up the Cometly Conversion API
- In Cometly, click Events Manager in the sidebar, then open the Conversion API tab.
- Expand Meta.
- Under Master Data Sharing Settings, select Send only attributed events, then click Save.
Set up the Maxweb conversion API
Follow the steps in the Maxweb help article to finish setting up the conversion API inside Maxweb. This must be set up to send enhanced Purchase conversions to Meta and Google.Check it worked
In Cometly, go to Integrations > Maxweb. The page shows Maxweb activated and your Postback URL. After your next Maxweb sale that comes from an ad click, go to Events Manager > Events Log. Every postback Maxweb sends is recorded there, so you should see a row from Maxweb around the time of the sale. The sale then shows as a Purchase on the matching ad in the Ads Manager.Frequently asked questions
Does Cometly track Maxweb upsells?
Yes. When Maxweb reports a sale as an upsell, Cometly records it as an upsell purchase, so it counts toward Upsell Purchase and Upsell Revenue. Upsell revenue is also included in Gross Revenue.Why is a Maxweb sale missing from Cometly?
Cometly only records a Maxweb purchase when the postback carries the ID of the ad that produced it. A sale that did not start from an ad click with the URL parameters from Step 3, or that passed through a landing page without the footer scripts from Step 2, arrives without an ad ID and is not saved as a Purchase. Open Events Manager > Events Log to see the postback and its error.Do I need a different Maxweb Postback URL for each Cometly space?
Yes. Each space has its own Postback URL, and a sale only reaches the space whose URL Maxweb calls. If you work in several spaces, switch to the right one, go to Integrations > Maxweb, and compare the Postback URL with the one saved in Maxweb.Next steps
- Configure your Ads Manager to show the Maxweb metrics
- Configure the Meta Conversion API
- Use the Events Log to inspect incoming Maxweb postbacks
- Connect ad platforms and ad accounts
- Install the Cometly pixel