

- Leads: triggers when a new lead is created in Pipedrive.
- Deal Created: triggers when a new deal is created in Pipedrive.
- Deal Closed Won: triggers when a deal is moved to your won stage in Pipedrive.
Send lead events
1
Get your Cometly webhook URL
- In Cometly, open Events Manager and click Create Event.
- Under App / Integration, choose Webhooks.
- Pick the event you want to track (for example Lead), or click Create New Event, then click Create.
- On the page that opens, click Copy next to Your webhook URL.
2
Add an automated webhook in Pipedrive
- Log in to your Pipedrive account.
-
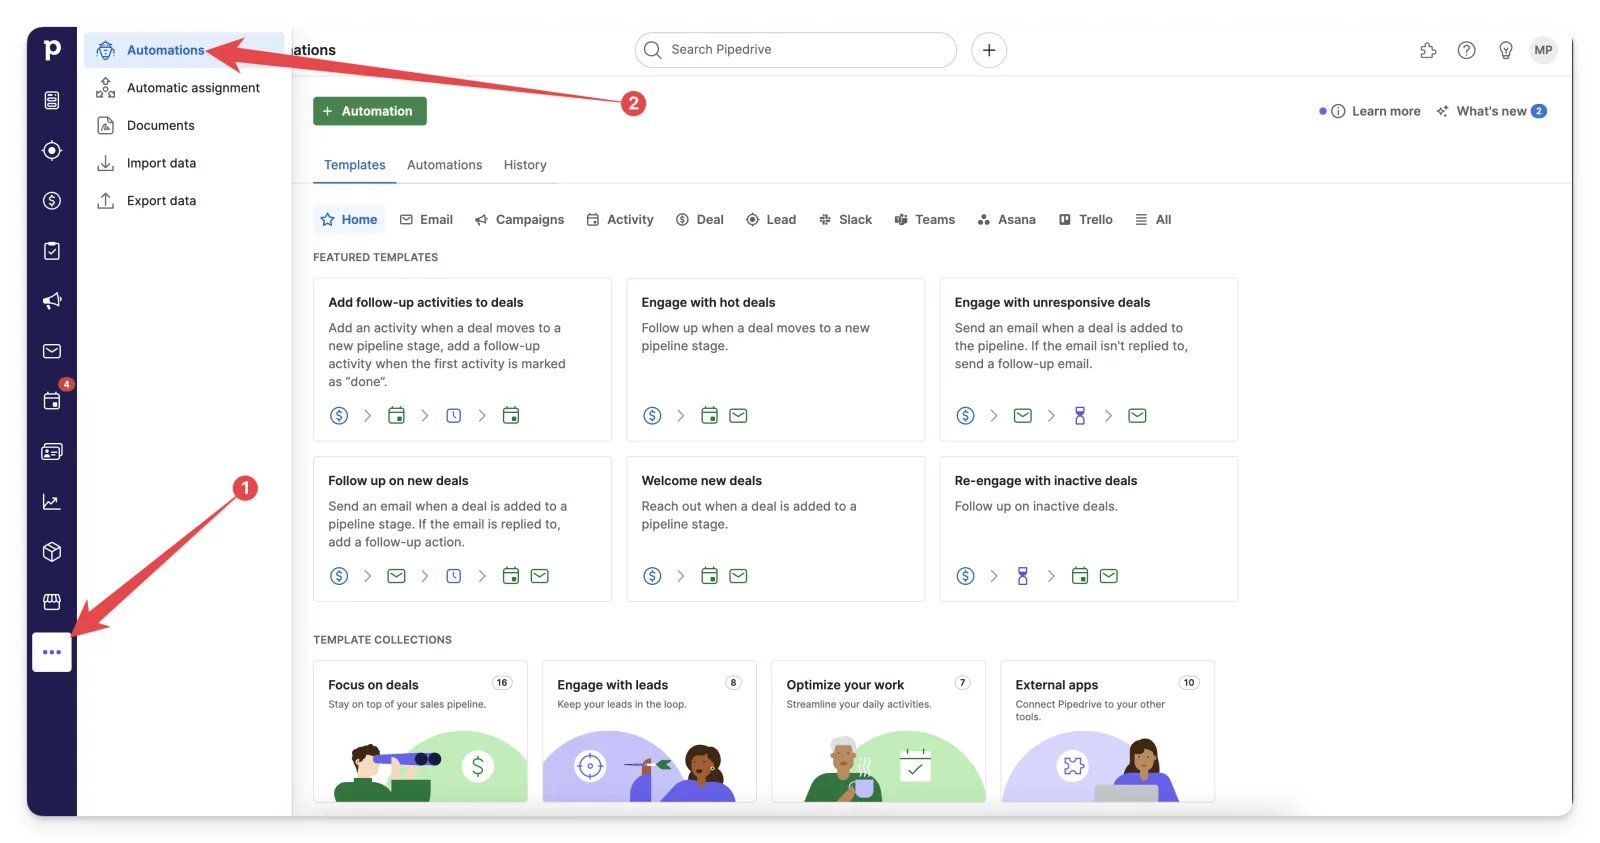
Open the Tools and apps section in the left-hand menu and click Automations.
-
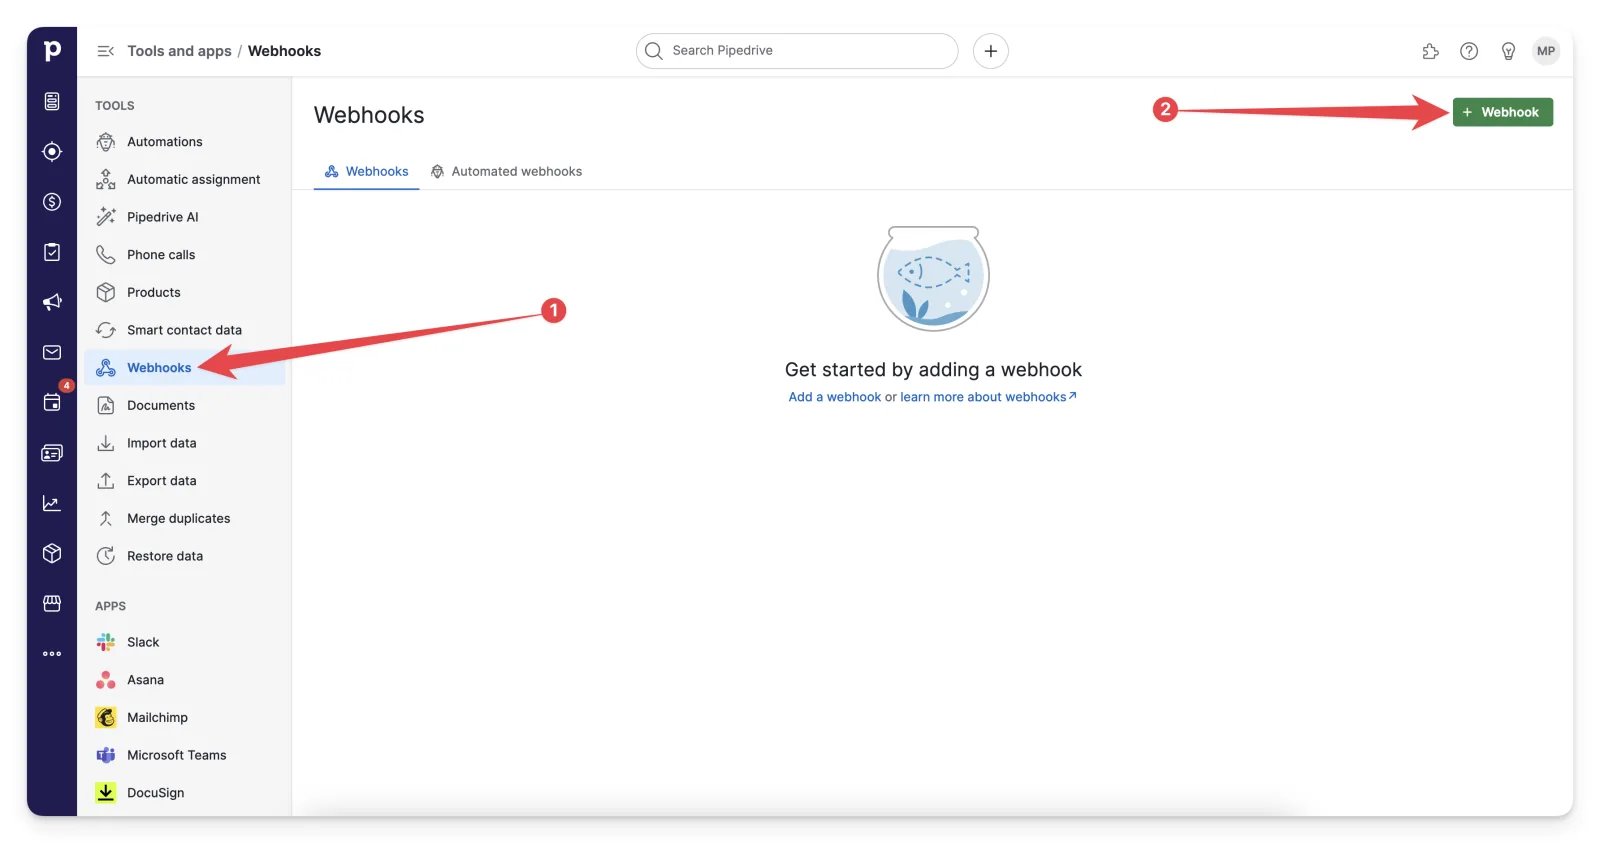
Click Webhooks under Tools, then click + Webhook in the top right.
-
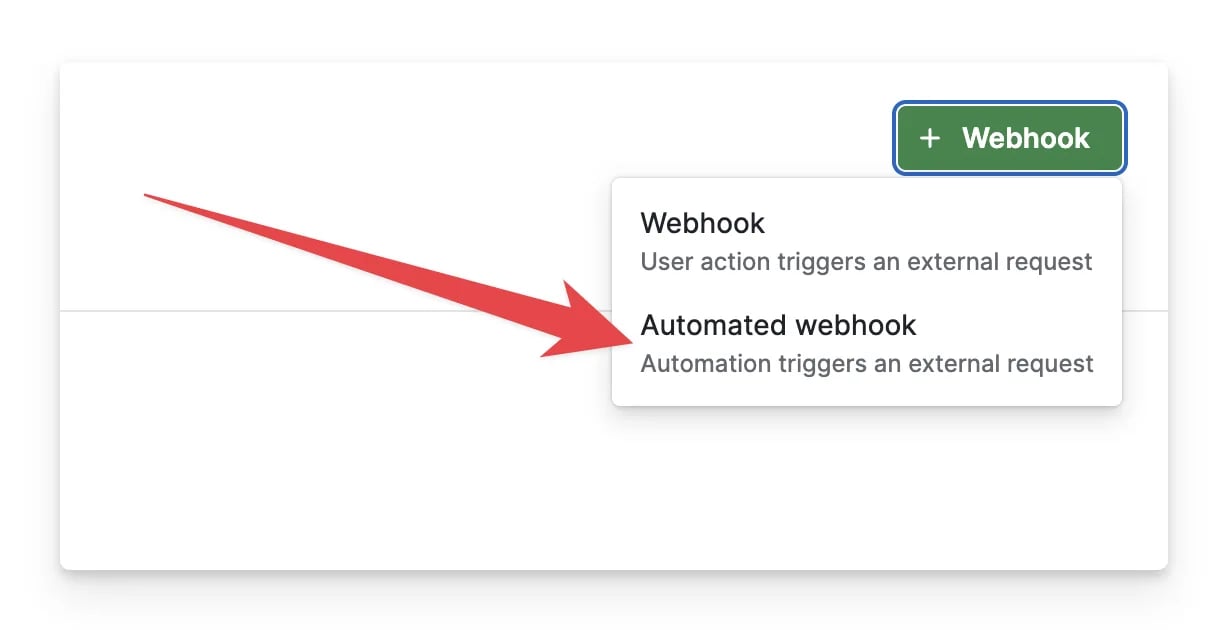
From the dropdown menu, select Automated webhook (for automation-based triggers).
-
Enter a Webhook name (for example
Cometly - Leads) and paste your Cometly webhook URL into Endpoint URL. Leave HTTP Auth username and HTTP Auth password blank. Click Save.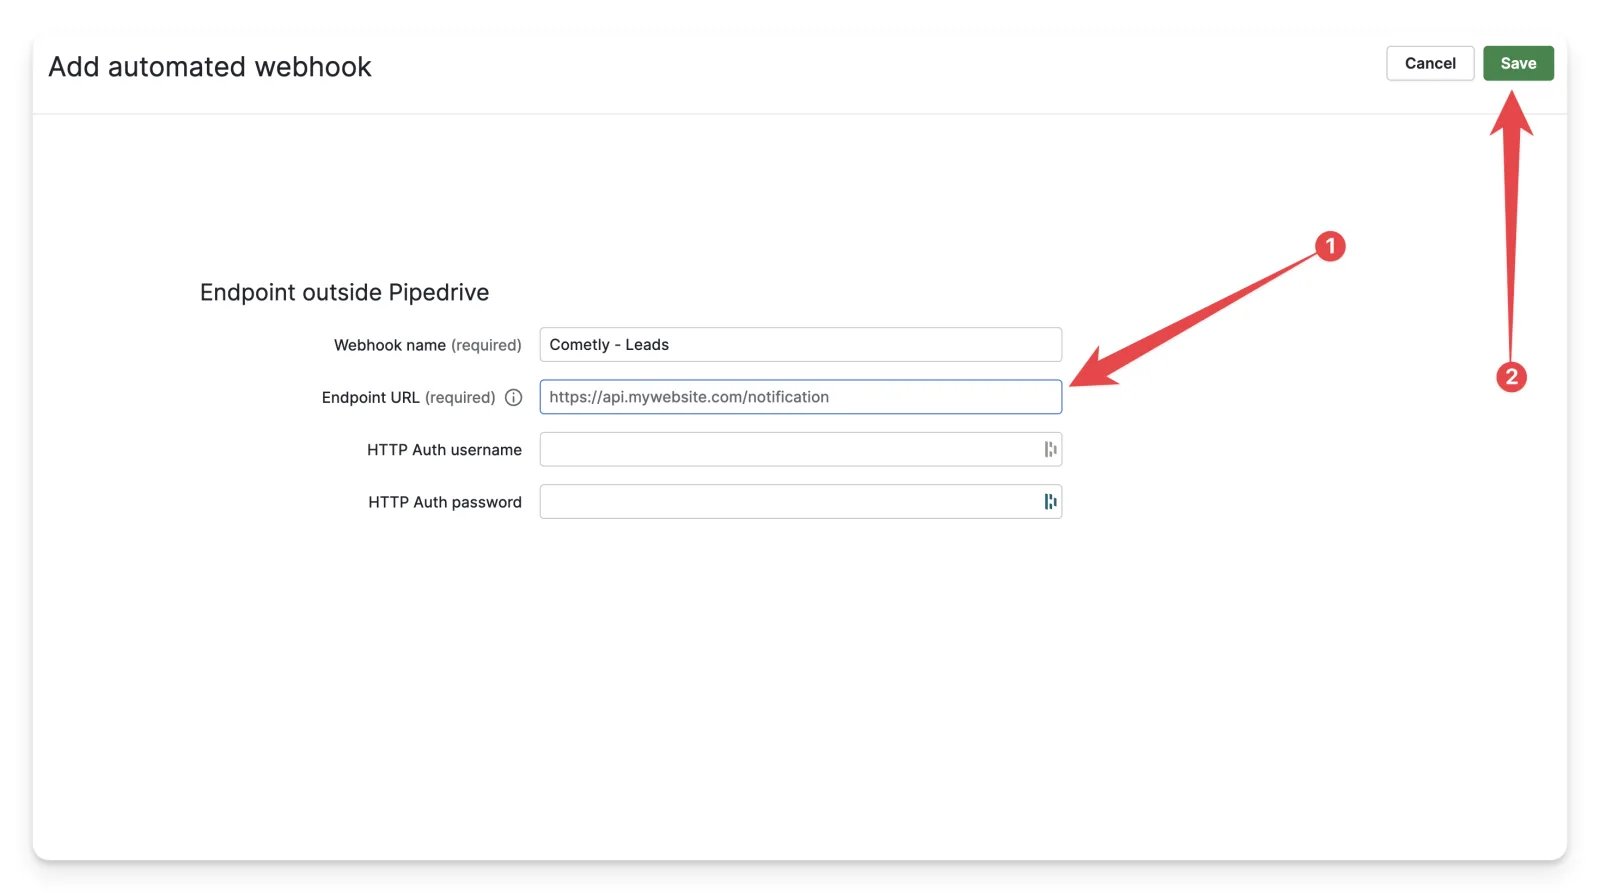
-
If Pipedrive shows the error URL must end with /, &, ?, or = when you add the Cometly webhook URL, add a
/to the end of the URL.
3
Create the automation in Pipedrive
- After you have created your webhook, click Automations.
-
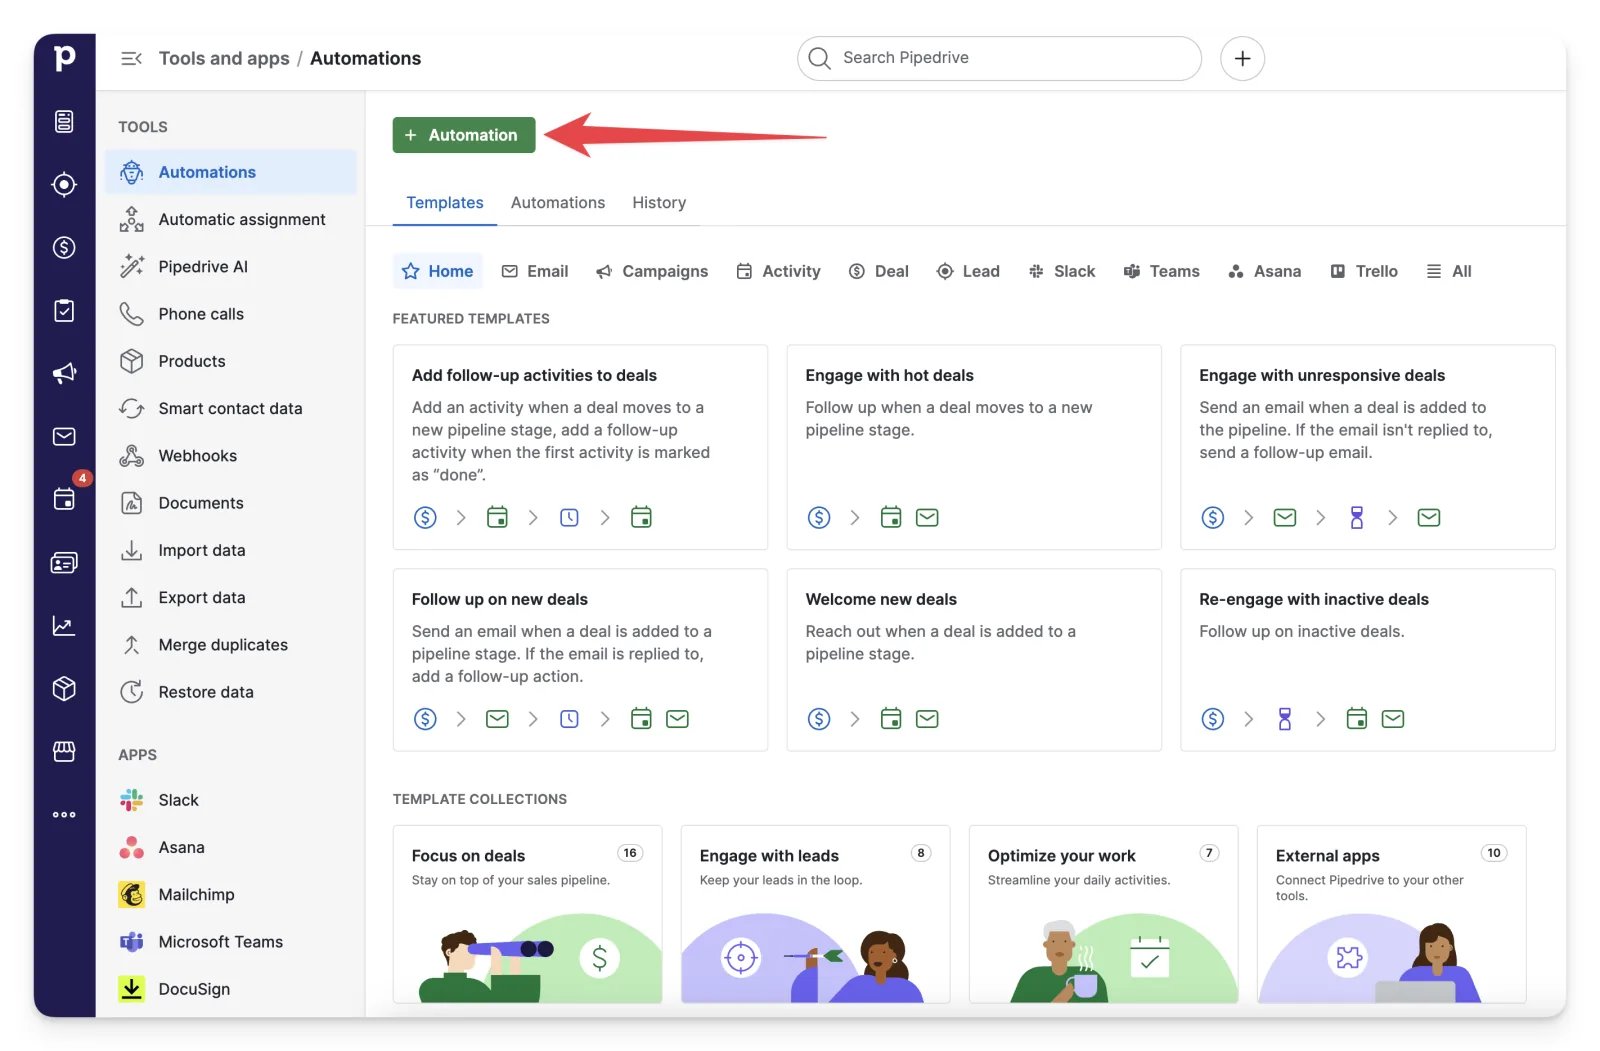
Click + Automation.
-
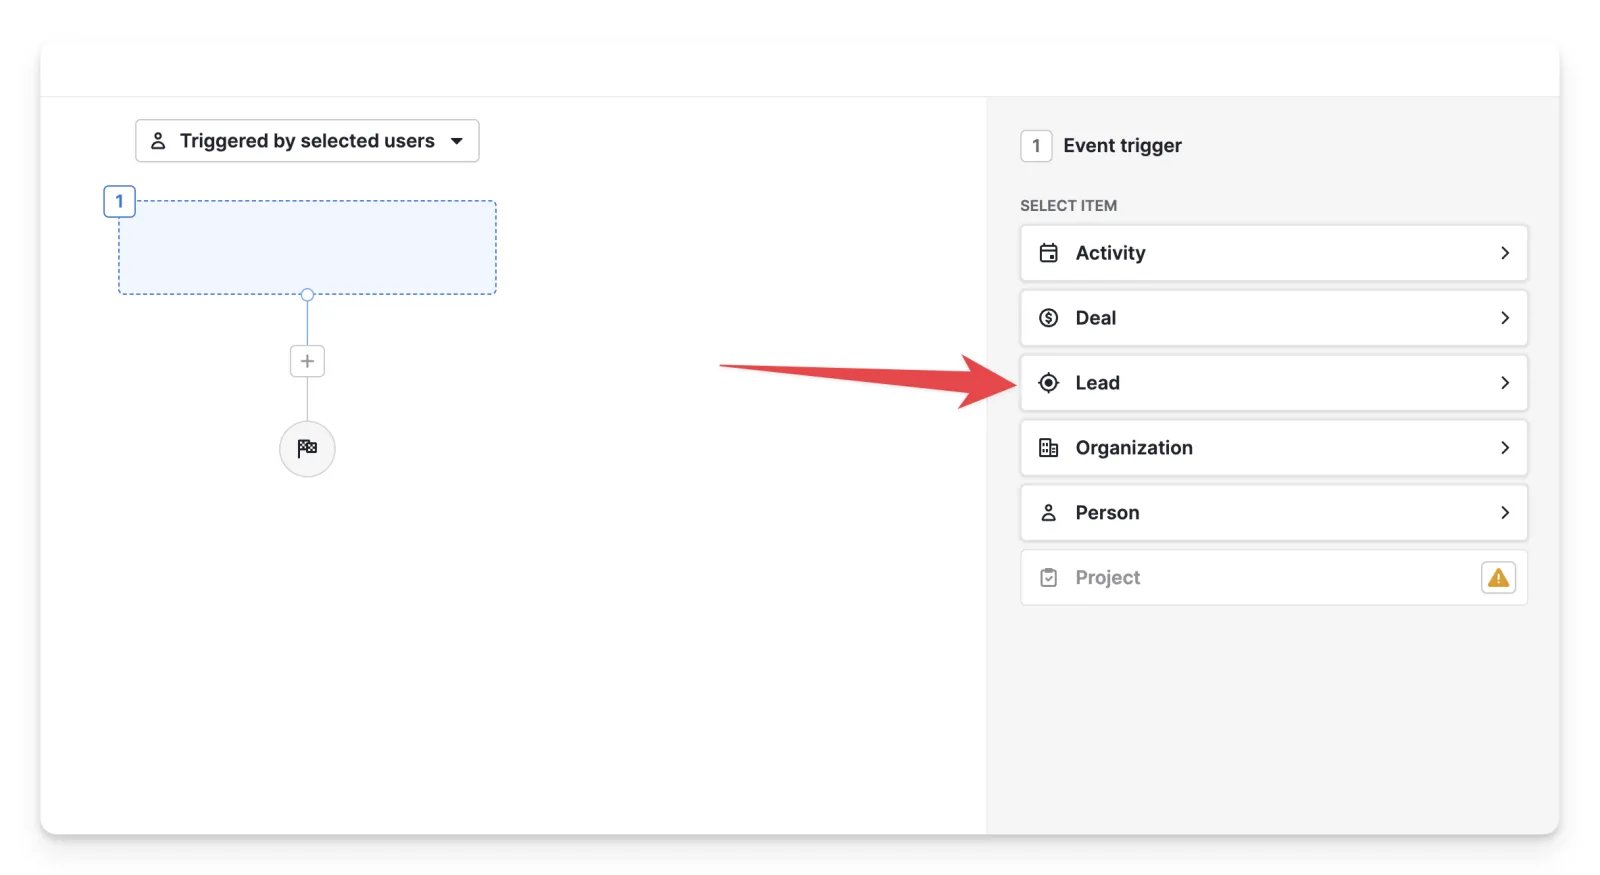
Choose Lead as the event trigger.
-
Set up the event trigger:
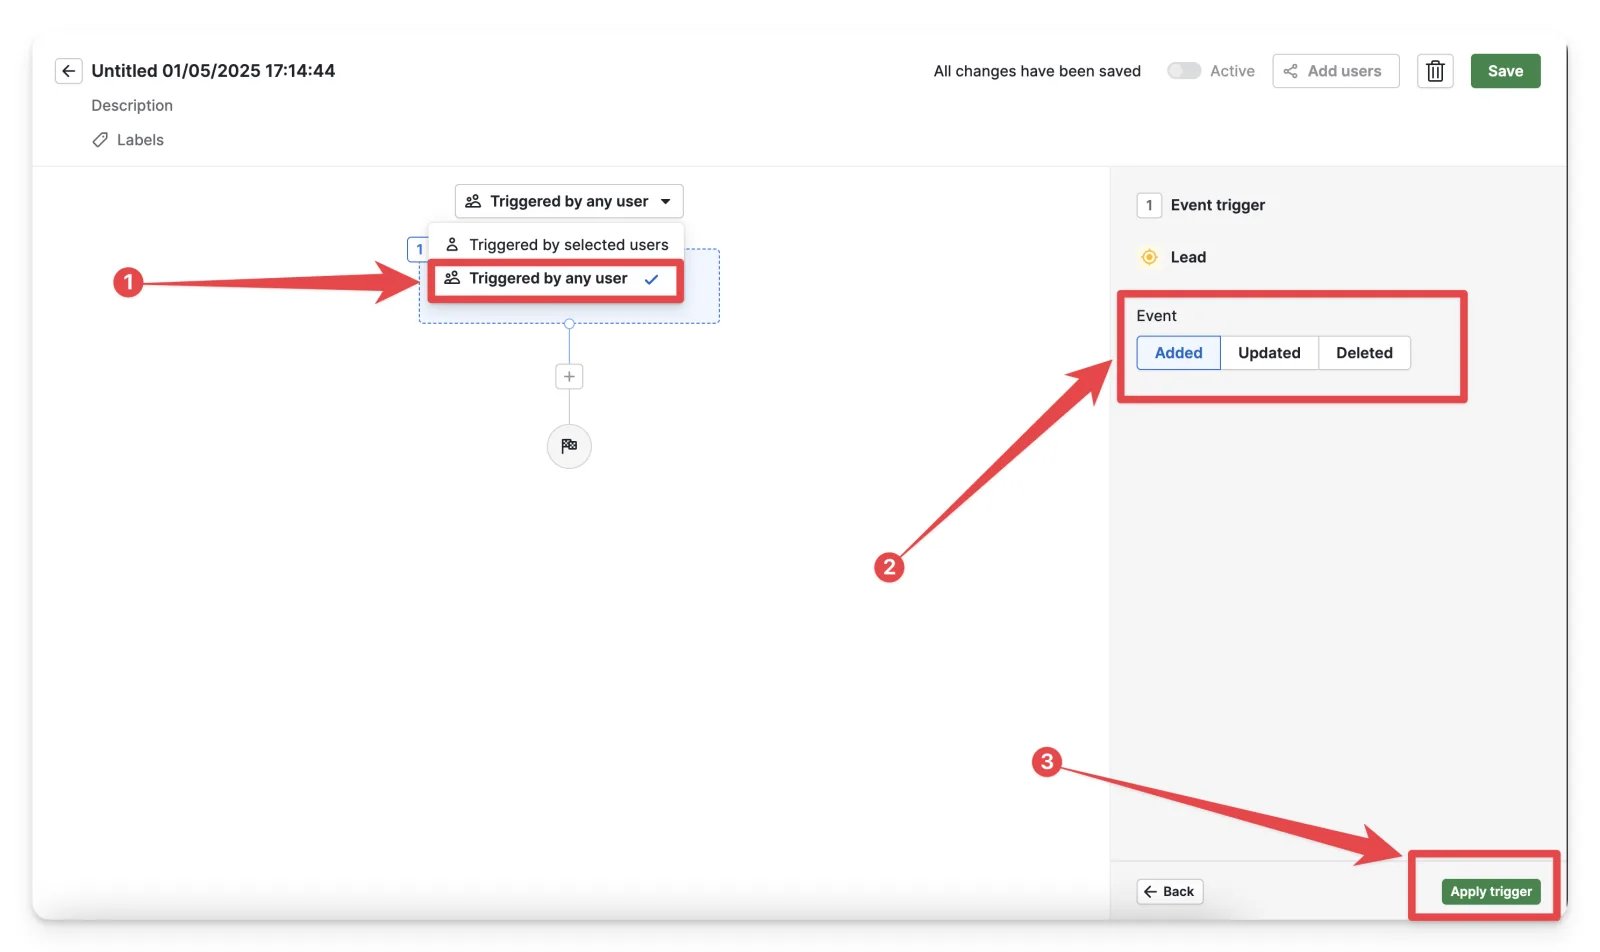
- Select Triggered by any user.
- Select Added for the Event.
- Click Apply trigger.
- Instant conditions: if you have multiple pipelines, configure the conditions to target the specific pipeline you want to send events to Cometly from.
-
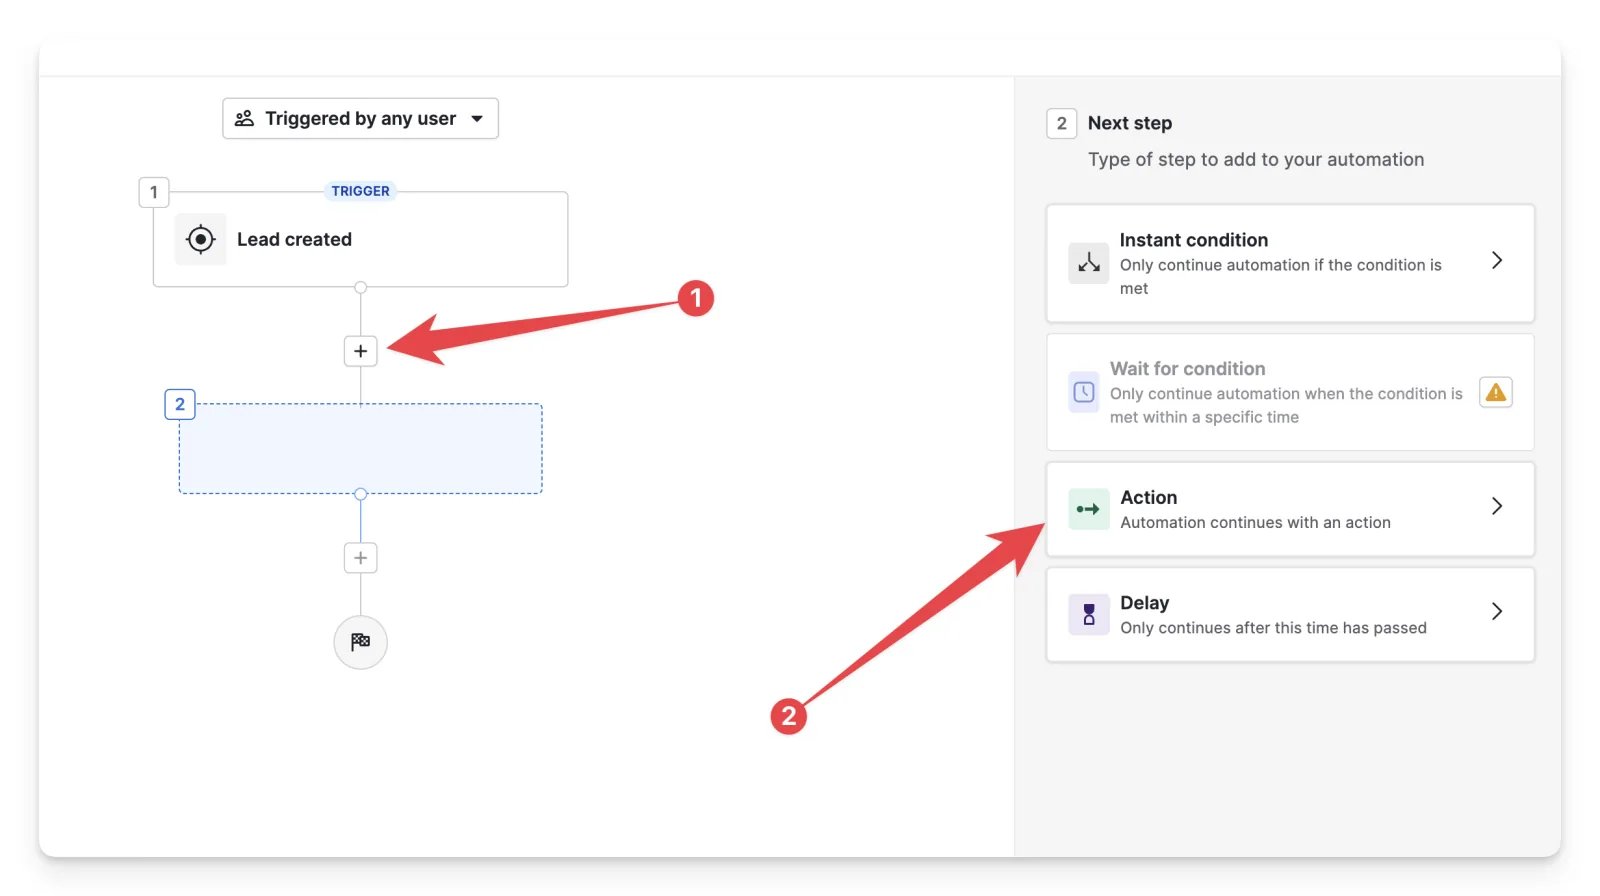
Click the (+) sign to add a step, then click Action.
-
Choose Webhook.
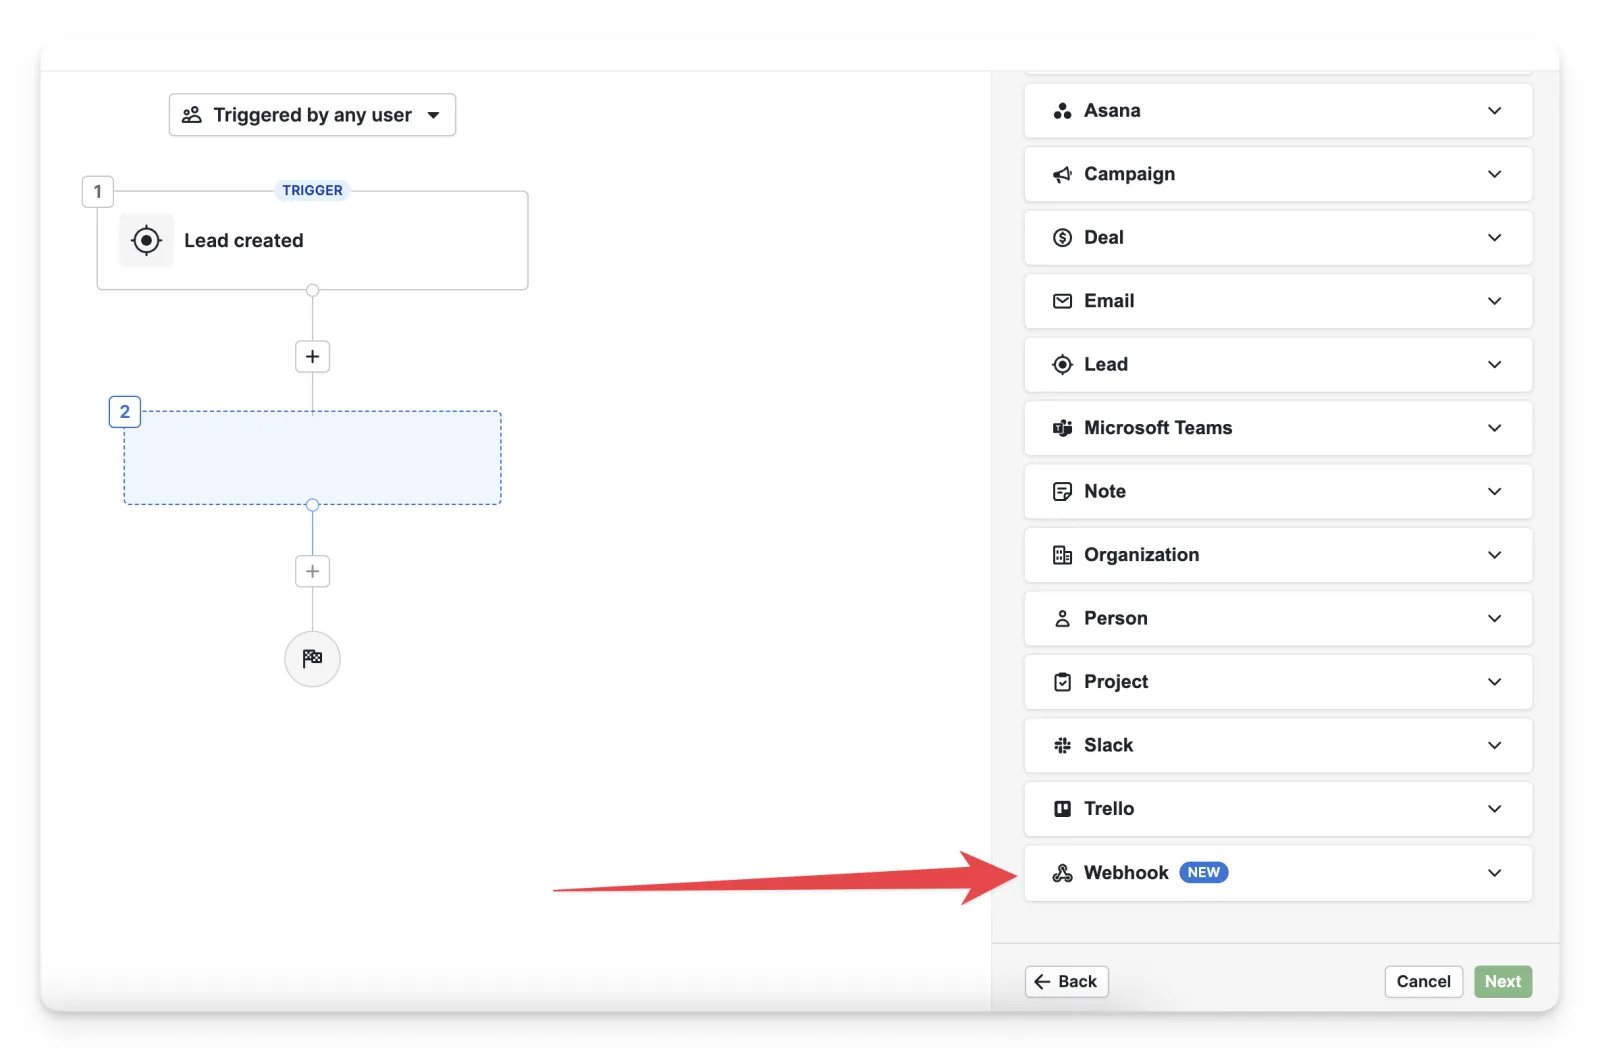
-
Choose Send webhook request.
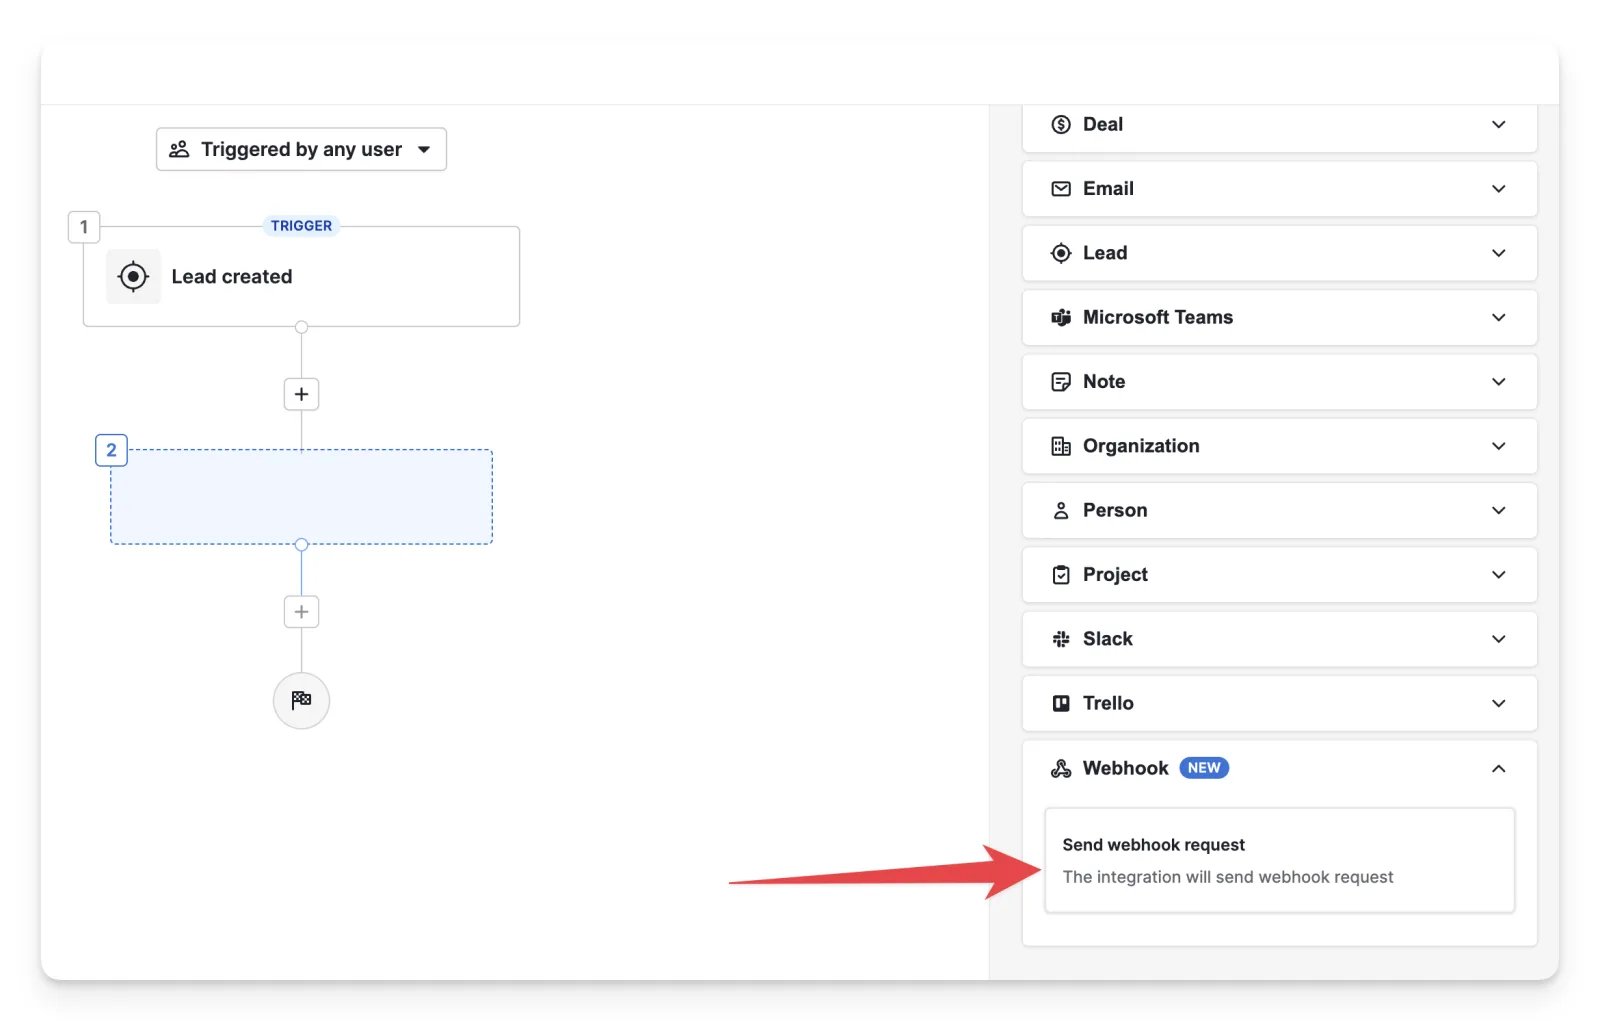
-
The following fields are selected automatically. Click Next.
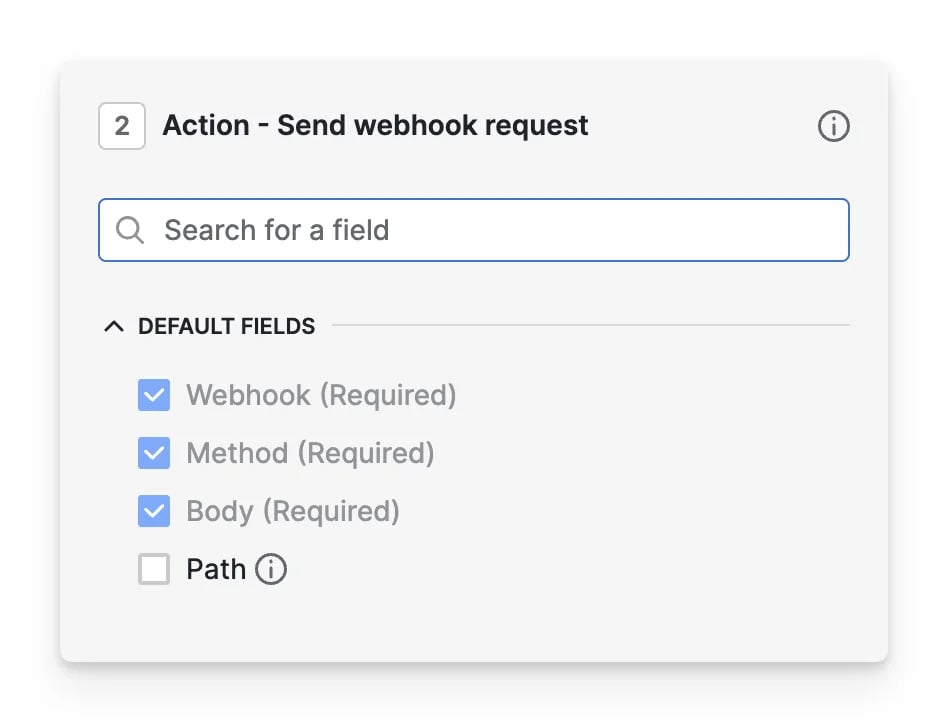
-
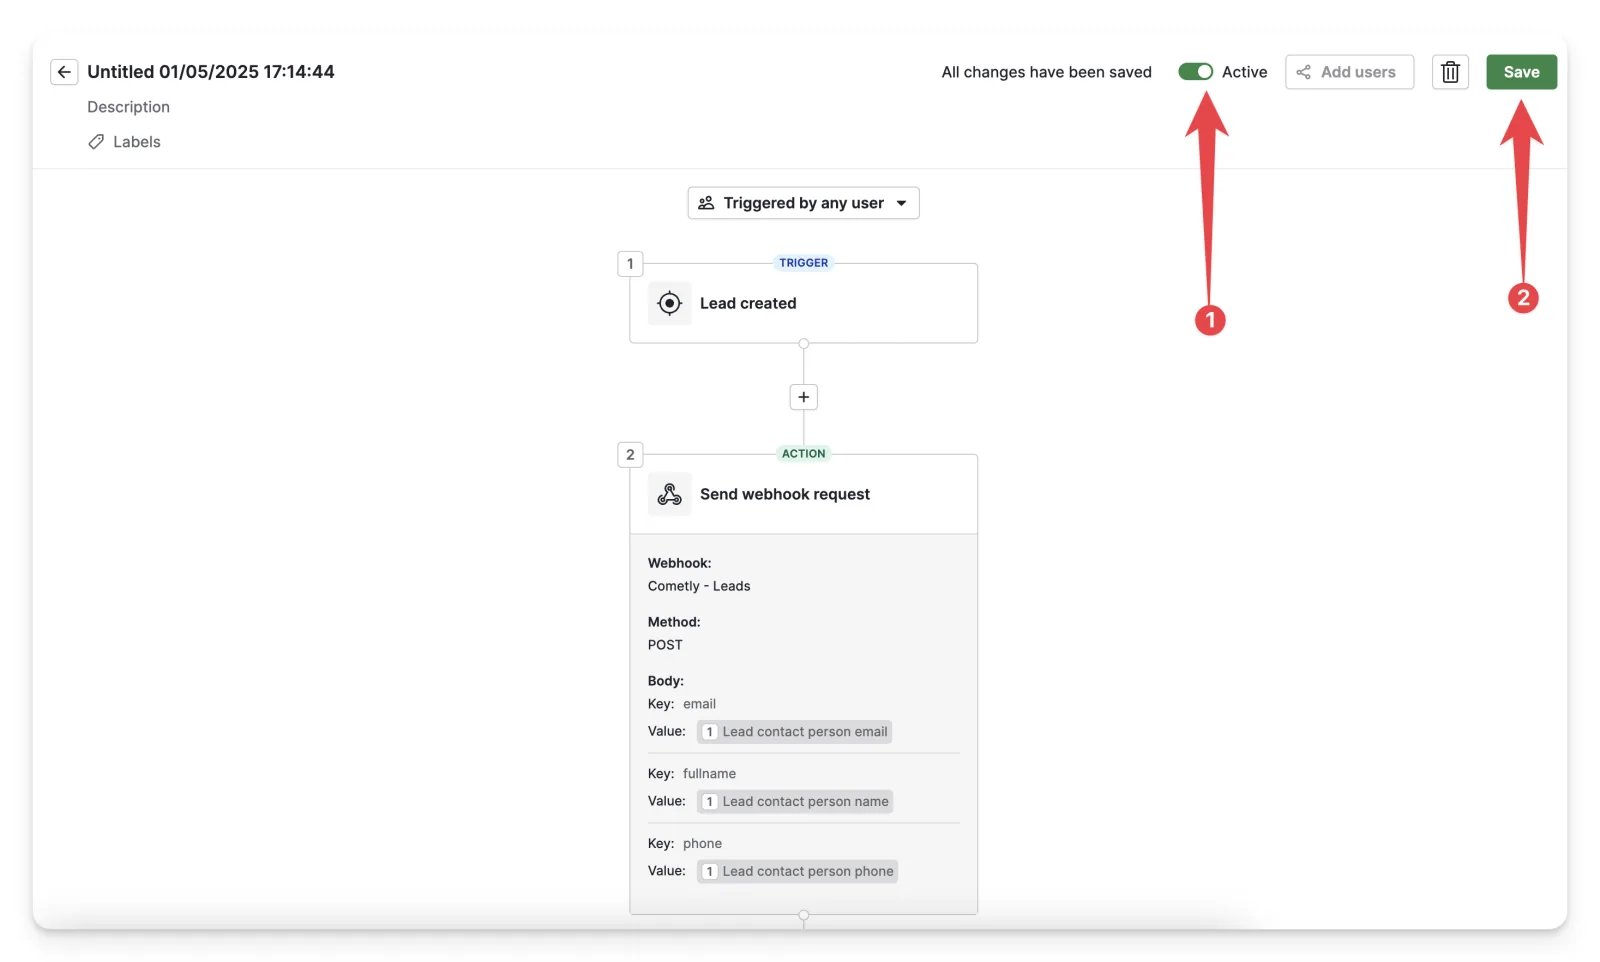
Choose the webhook you created for Webhook (Required) and choose POST for Method (Required).
For Body (Required), select Key-value and add these entries:
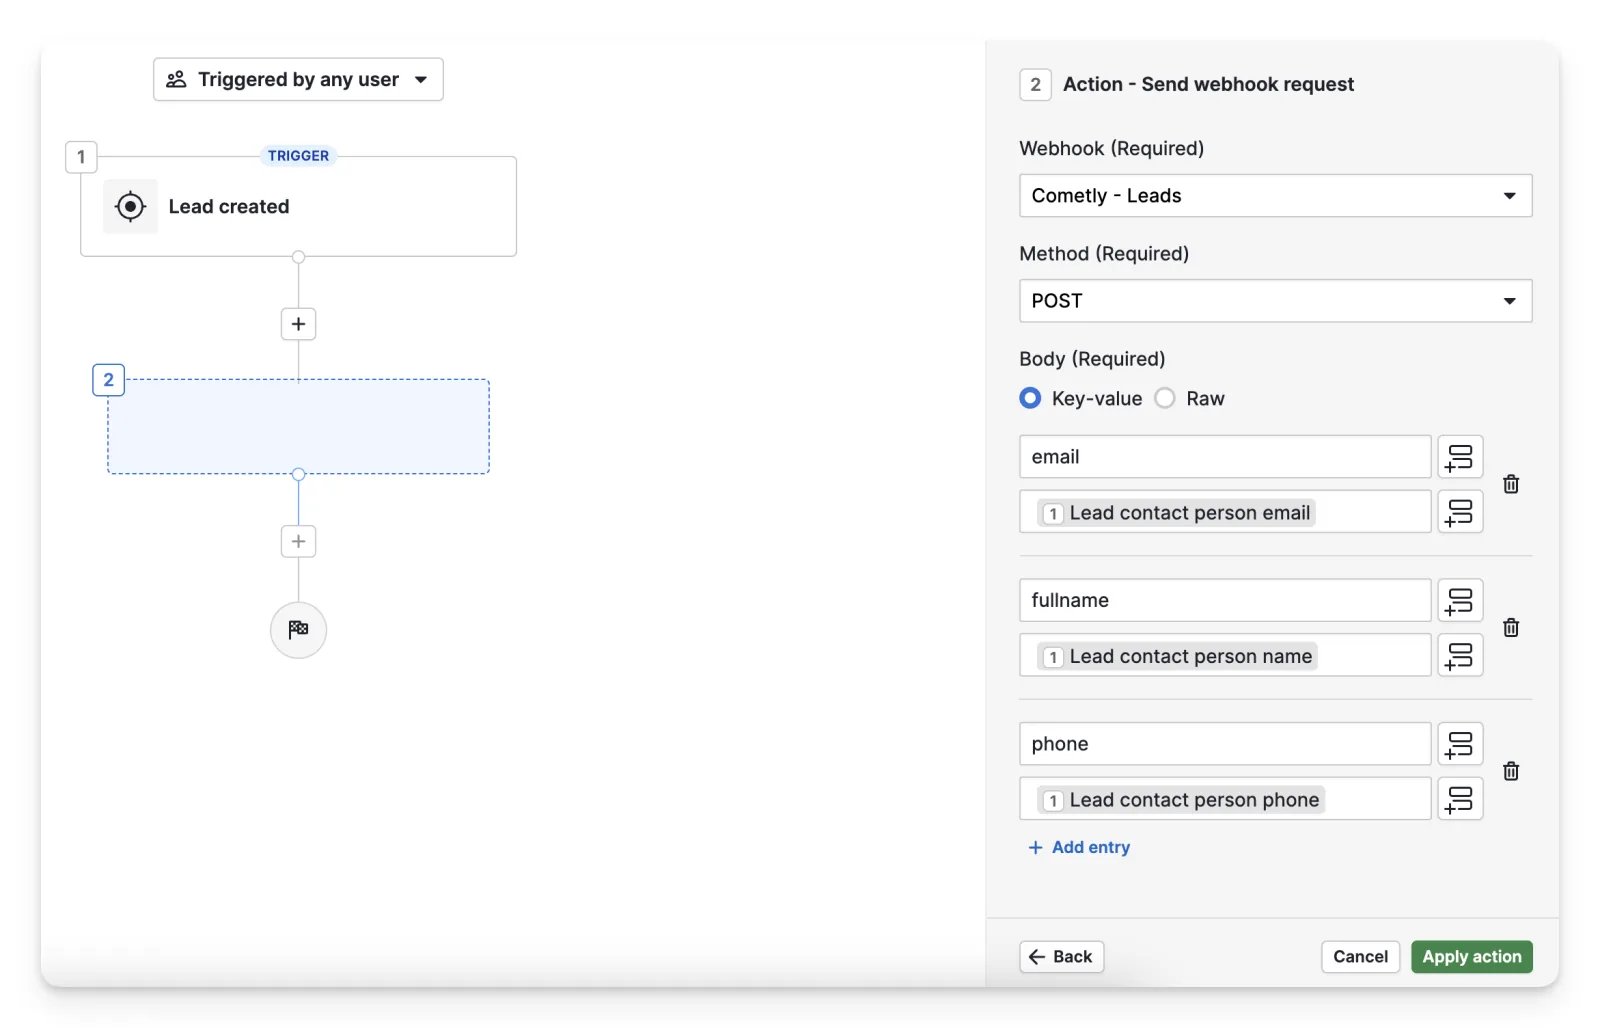
- Click Apply action.
-
Turn the toggle on so the automation is Active, then click Save.
4
Send data and finish the webhook in Cometly
- Create a new lead in Pipedrive. The automation sends its data to Cometly.
- Back in Cometly, click Check for Data, select the record Pipedrive sent and click Continue With Selected Record.
- Map the fields:
emailto Email,fullnameto Full Name andphoneto Phone. The body above has no event time, so set Event Time to The time we receive the event. - Set up filters if you only want some of the data tracked, then click Activate.
Send deal created events
1
Get your Cometly webhook URL
- In Cometly, open Events Manager and click Create Event.
- Under App / Integration, choose Webhooks.
- Pick the event you want to track, or click Create New Event (for example an event named Deal Created), then click Create.
- On the page that opens, click Copy next to Your webhook URL.
2
Add an automated webhook in Pipedrive
- Log in to your Pipedrive account.
- Open the Tools and apps section in the left-hand menu and click Automations.
- Click Webhooks under Tools, then click + Webhook in the top right.
- From the dropdown menu, select Automated webhook (for automation-based triggers).
-
Enter a Webhook name (for example
Cometly - Deal Created) and paste your Cometly webhook URL into Endpoint URL. Leave HTTP Auth username and HTTP Auth password blank. Click Save.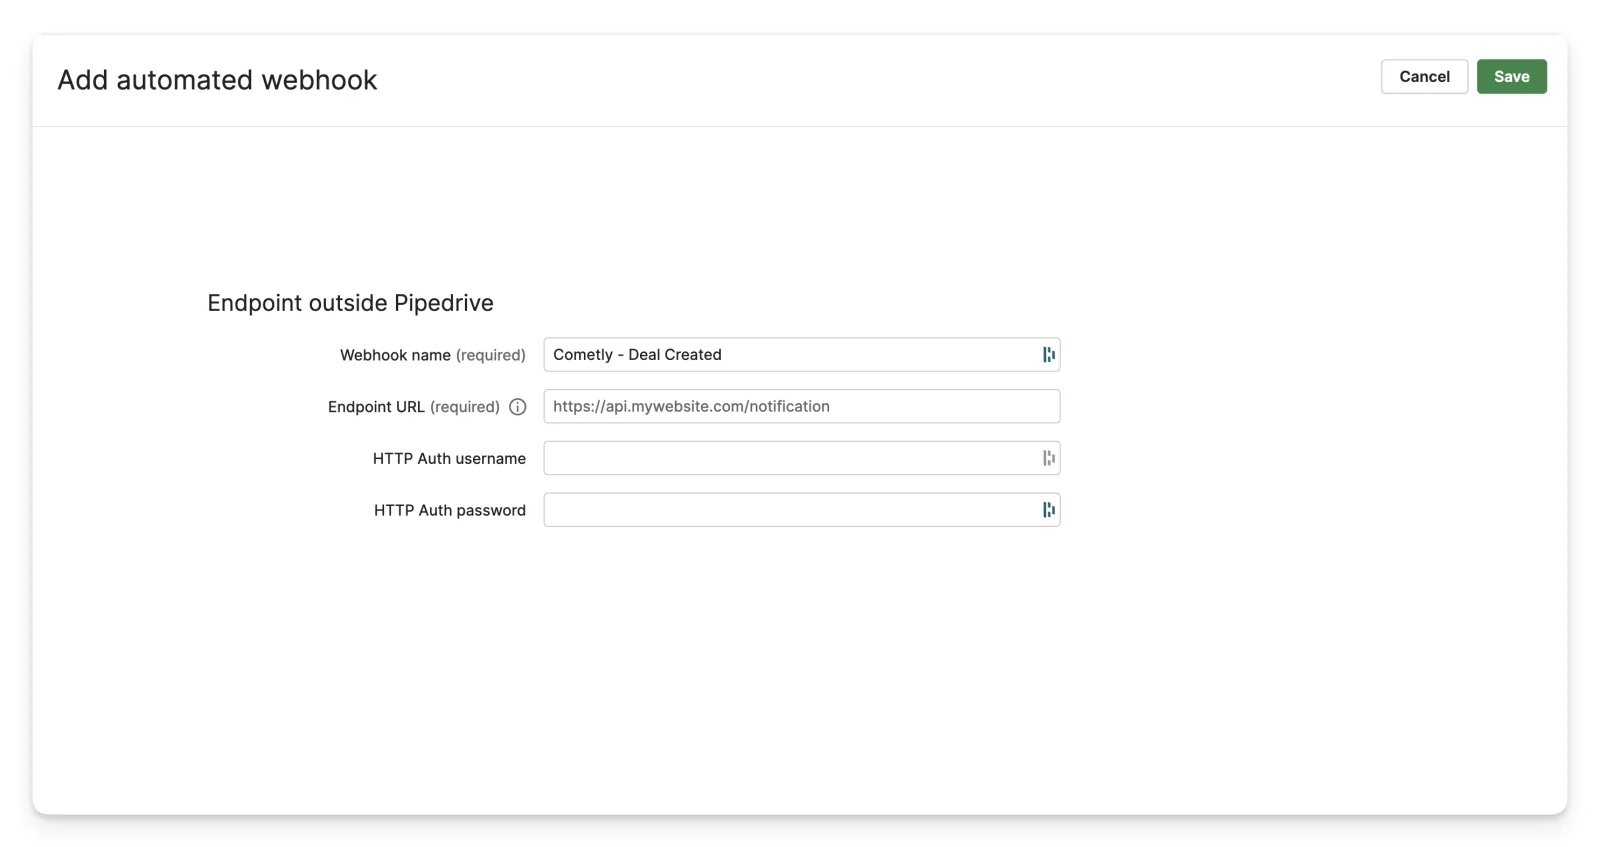
-
If Pipedrive shows the error URL must end with /, &, ?, or = when you add the Cometly webhook URL, add a
/to the end of the URL.
3
Create the automation in Pipedrive
- After you have created your webhook, click Automations.
- Click + Automation.
-
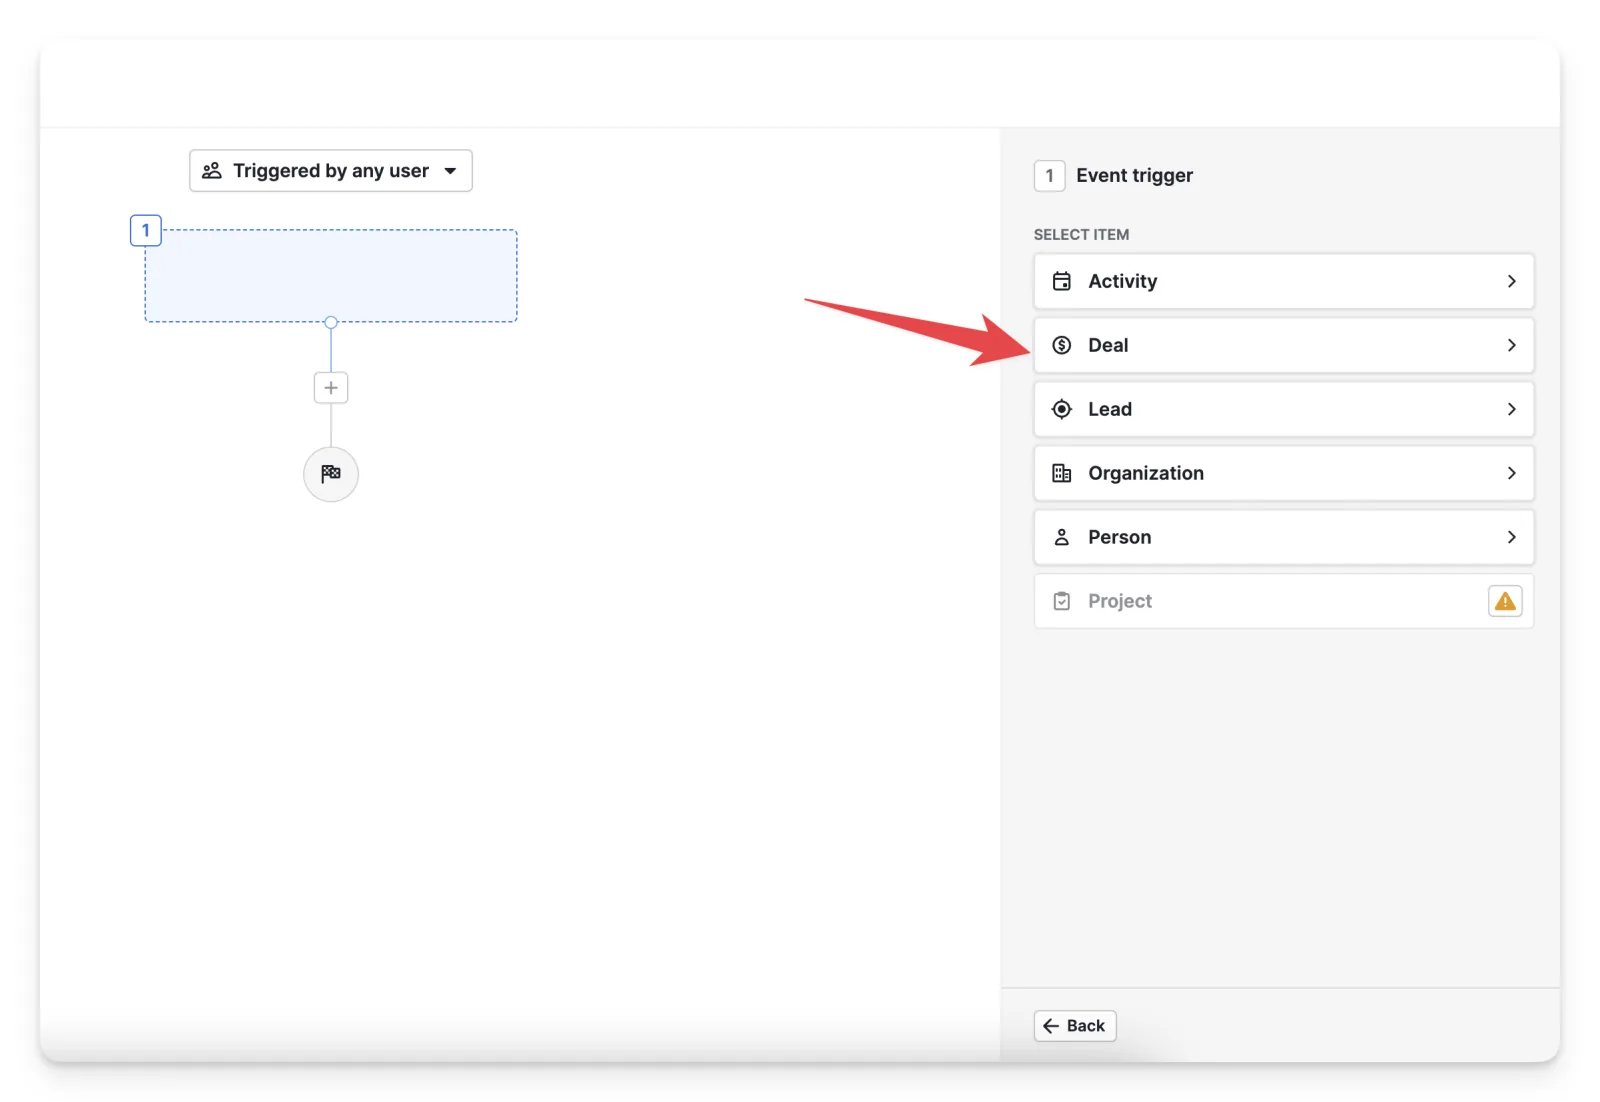
Choose Deal as the event trigger.
-
Set up the event trigger:
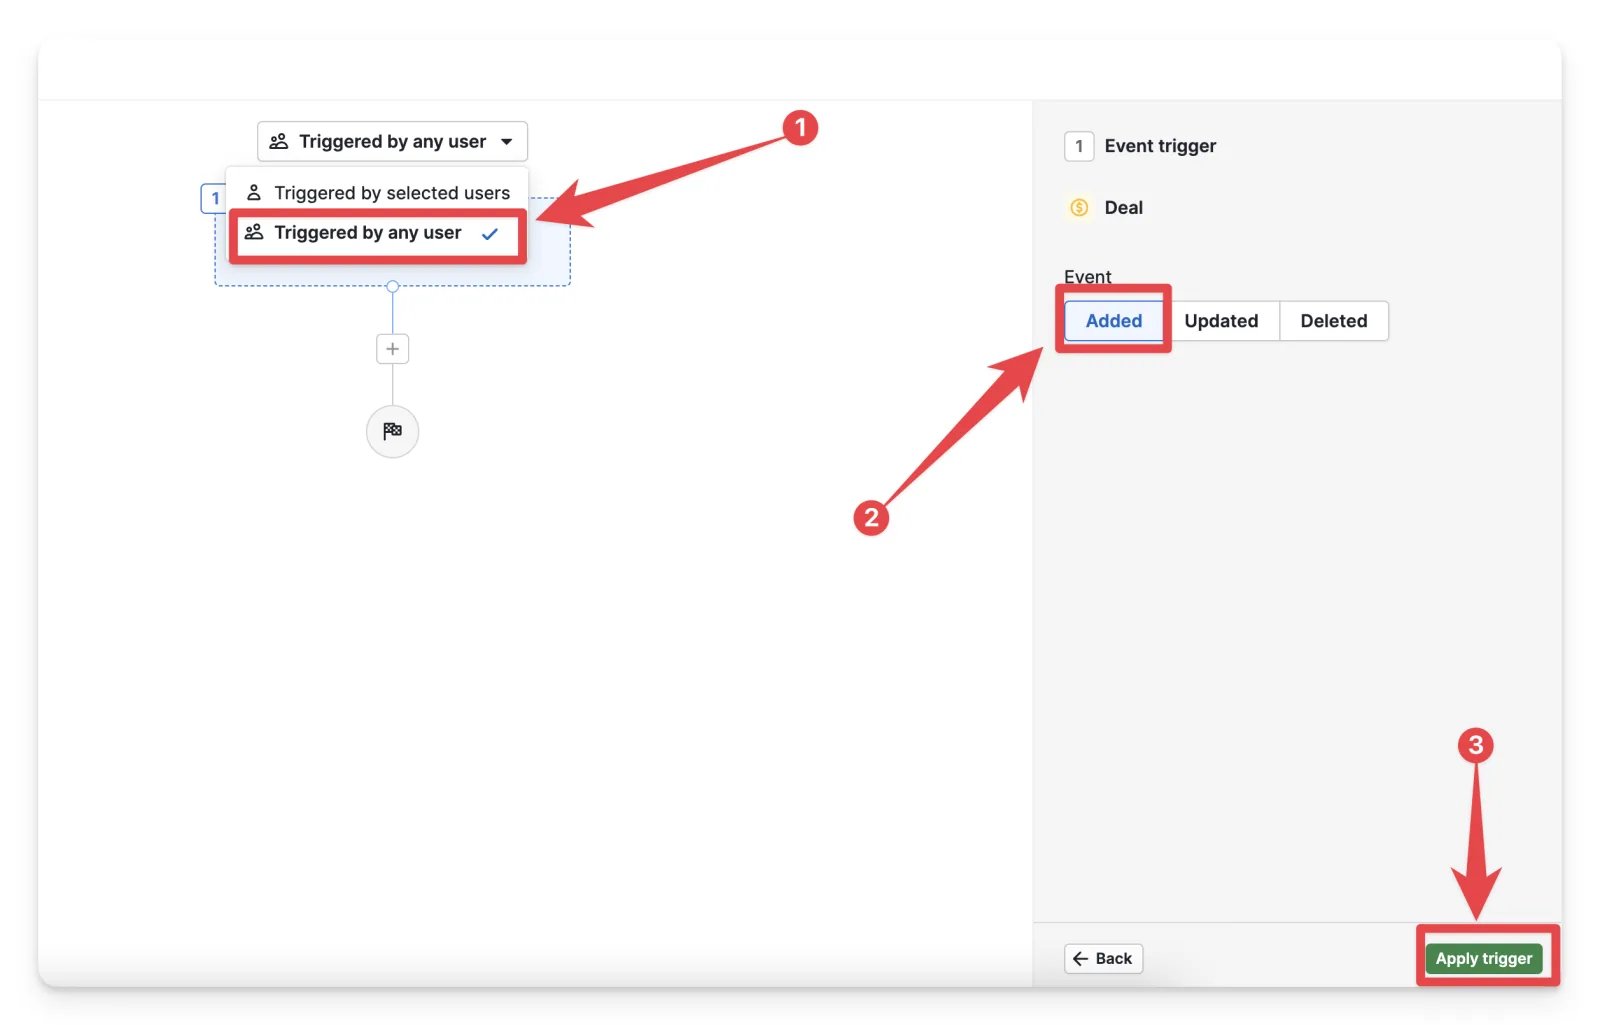
- Select Triggered by any user.
- Select Added for the Event.
- Click Apply trigger.
-
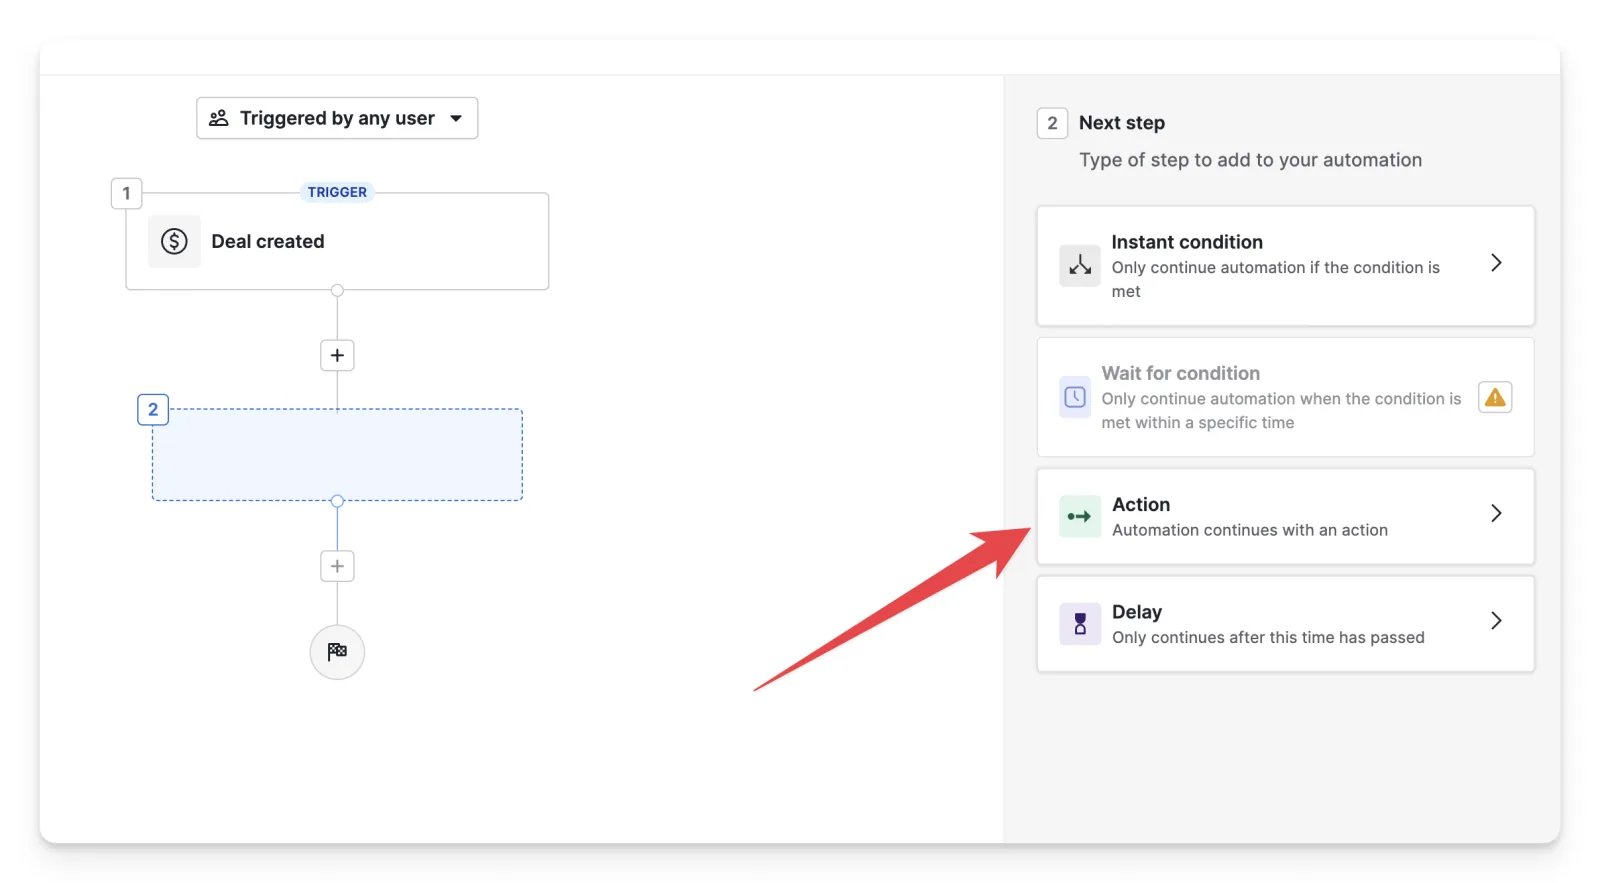
Click the (+) sign to add a step, then click Action.
-
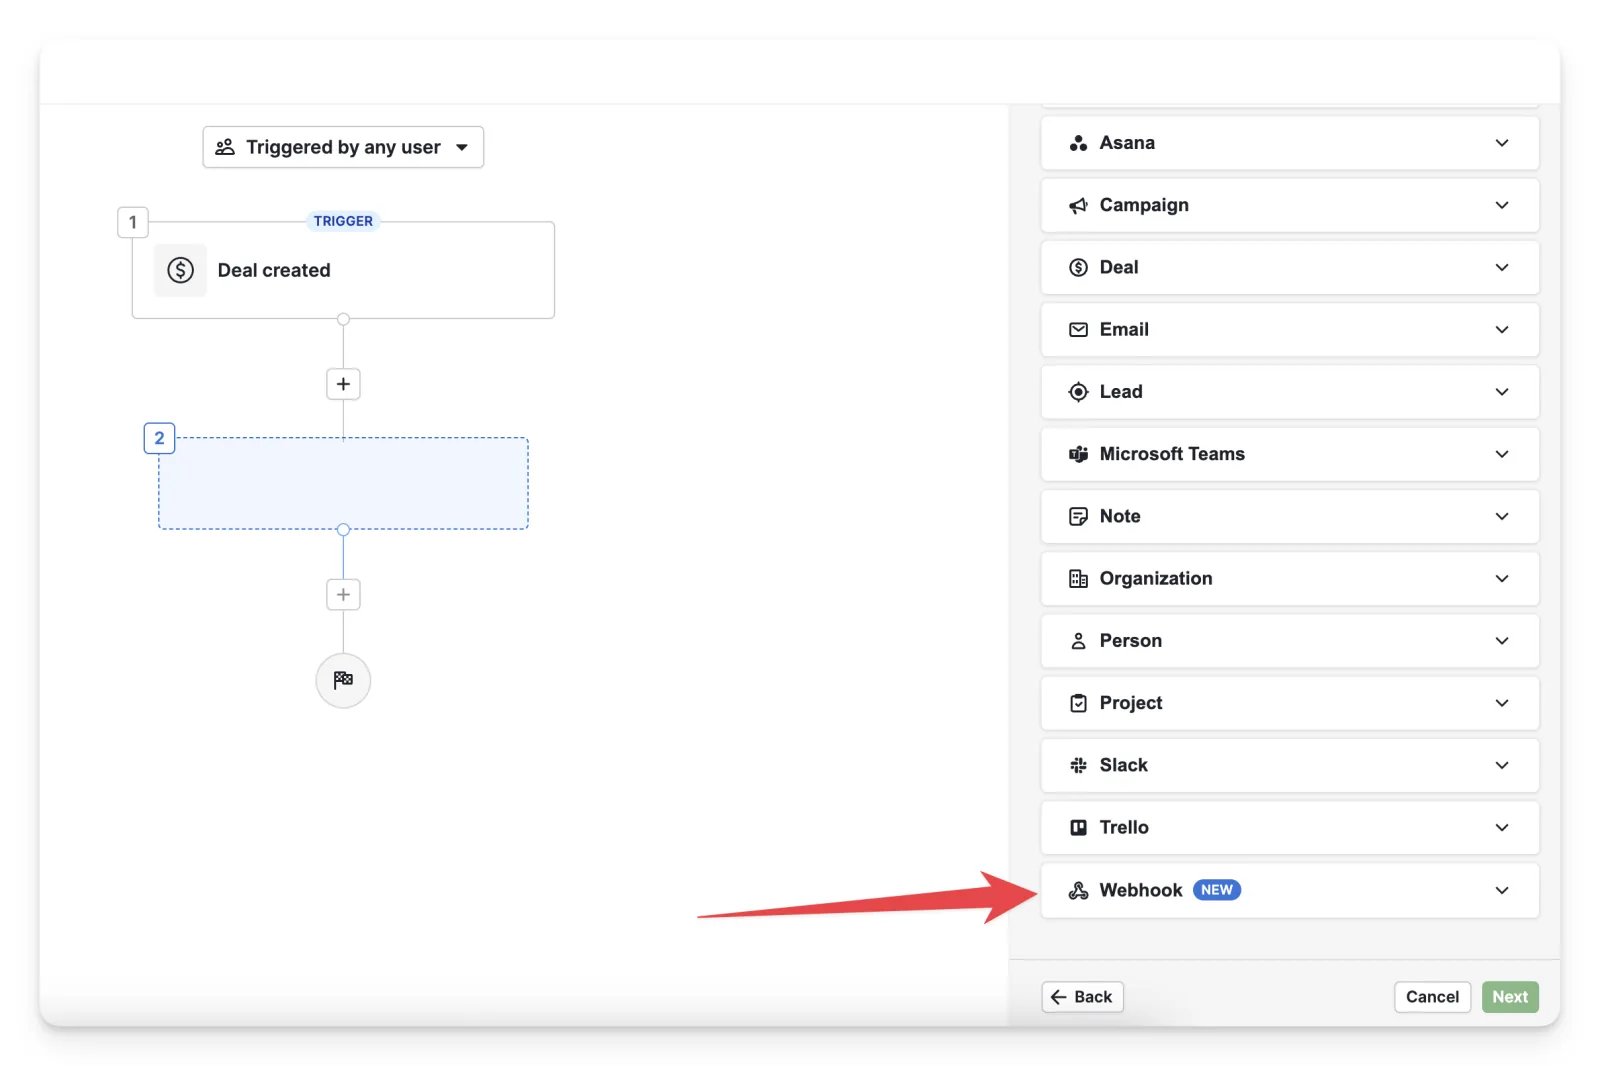
Choose Webhook.
-
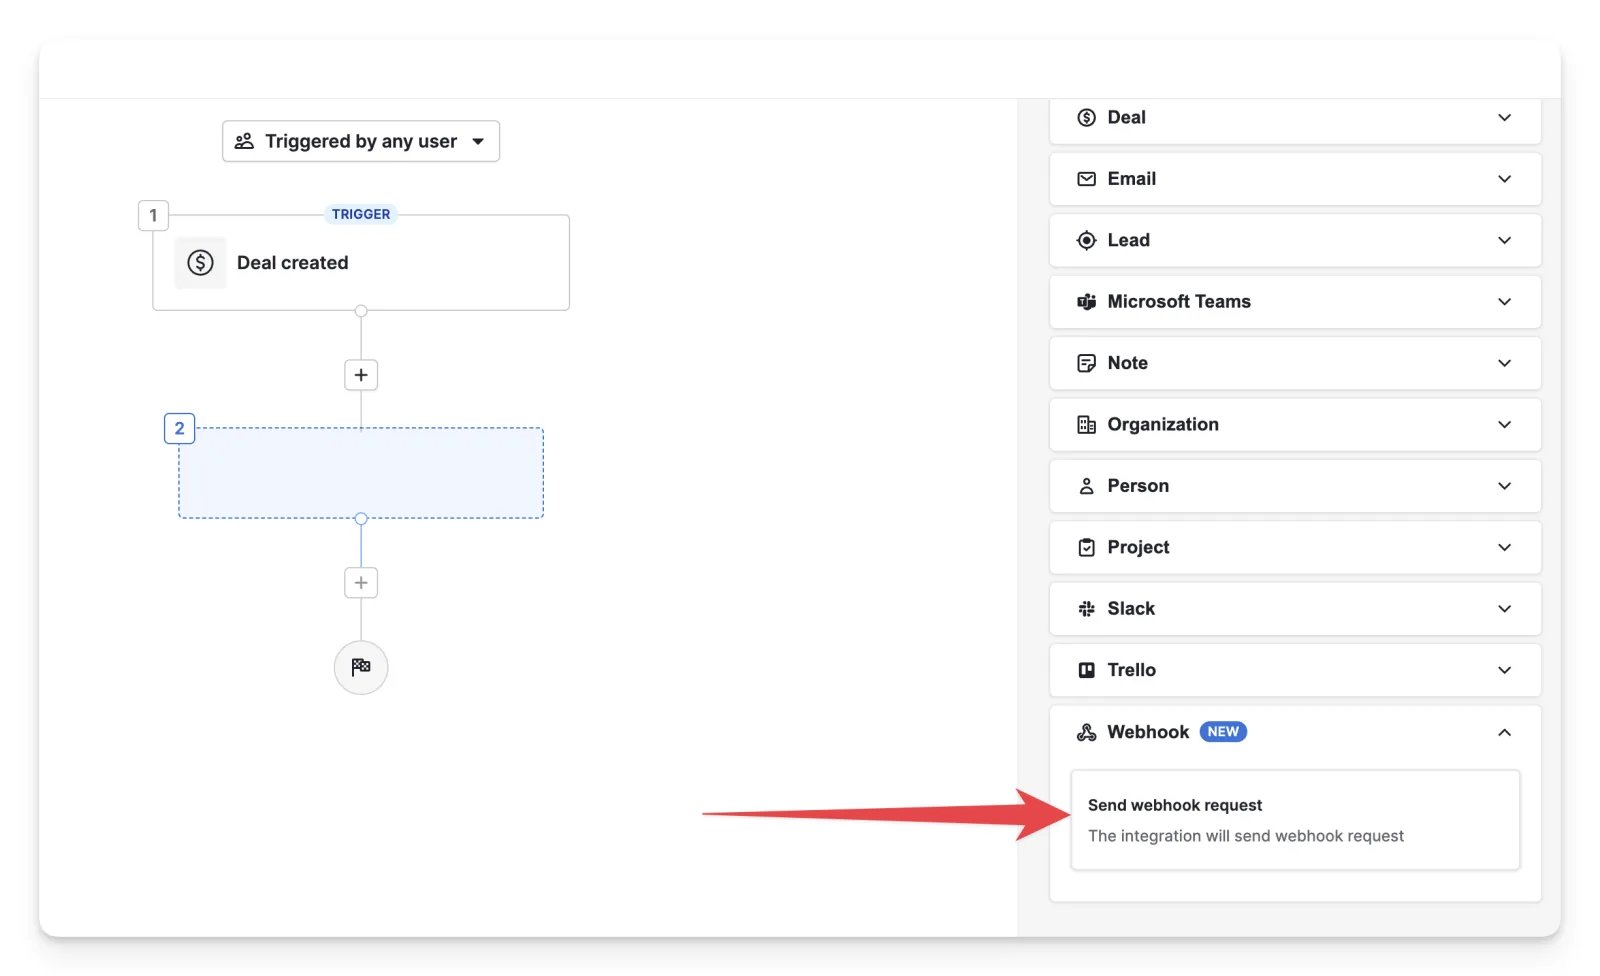
Choose Send webhook request.
- The following fields are selected automatically. Click Next.
-
Choose the webhook you created for Webhook (Required) and choose POST for Method (Required).
For Body (Required), select Key-value and add these entries:
- Click Apply action.
-
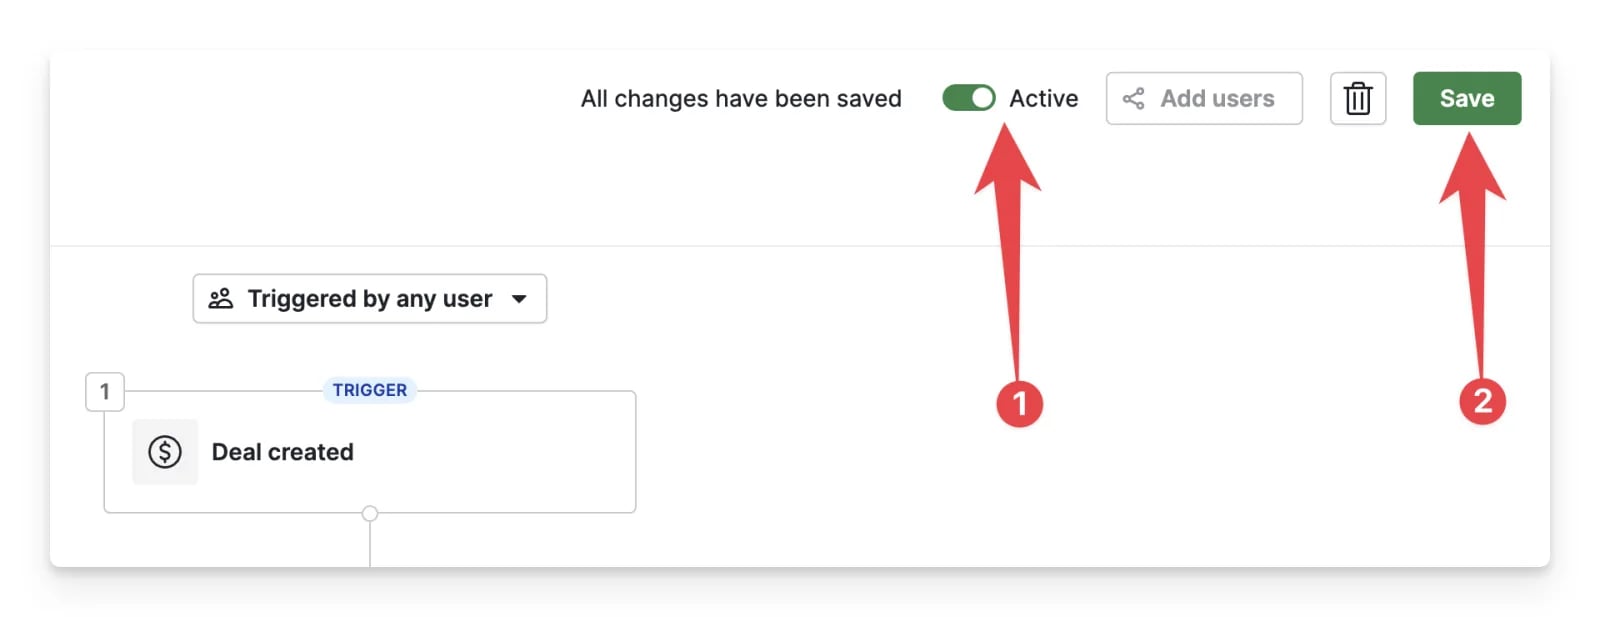
Turn the toggle on so the automation is Active, then click Save.
4
Send data and finish the webhook in Cometly
- Create a new deal in Pipedrive. The automation sends its data to Cometly.
- Back in Cometly, click Check for Data, select the record Pipedrive sent and click Continue With Selected Record.
- Map the fields:
emailto Email,fullnameto Full Name andamountto Amount. The body above has no event time, so set Event Time to The time we receive the event. - Set up filters if you only want some of the data tracked, then click Activate.
Send deal closed won events
1
Get your Cometly webhook URL
- In Cometly, open Events Manager and click Create Event.
- Under App / Integration, choose Webhooks.
- Pick the event you want to track, or click Create New Event (for example an event named Deal Closed Won), then click Create.
- On the page that opens, click Copy next to Your webhook URL.
2
Add an automated webhook in Pipedrive
- Log in to your Pipedrive account.
- Open the Tools and apps section in the left-hand menu and click Automations.
- Click Webhooks under Tools, then click + Webhook in the top right.
- From the dropdown menu, select Automated webhook (for automation-based triggers).
-
Enter a Webhook name (for example
Cometly - Deal Closed Won) and paste your Cometly webhook URL into Endpoint URL. Leave HTTP Auth username and HTTP Auth password blank. Click Save.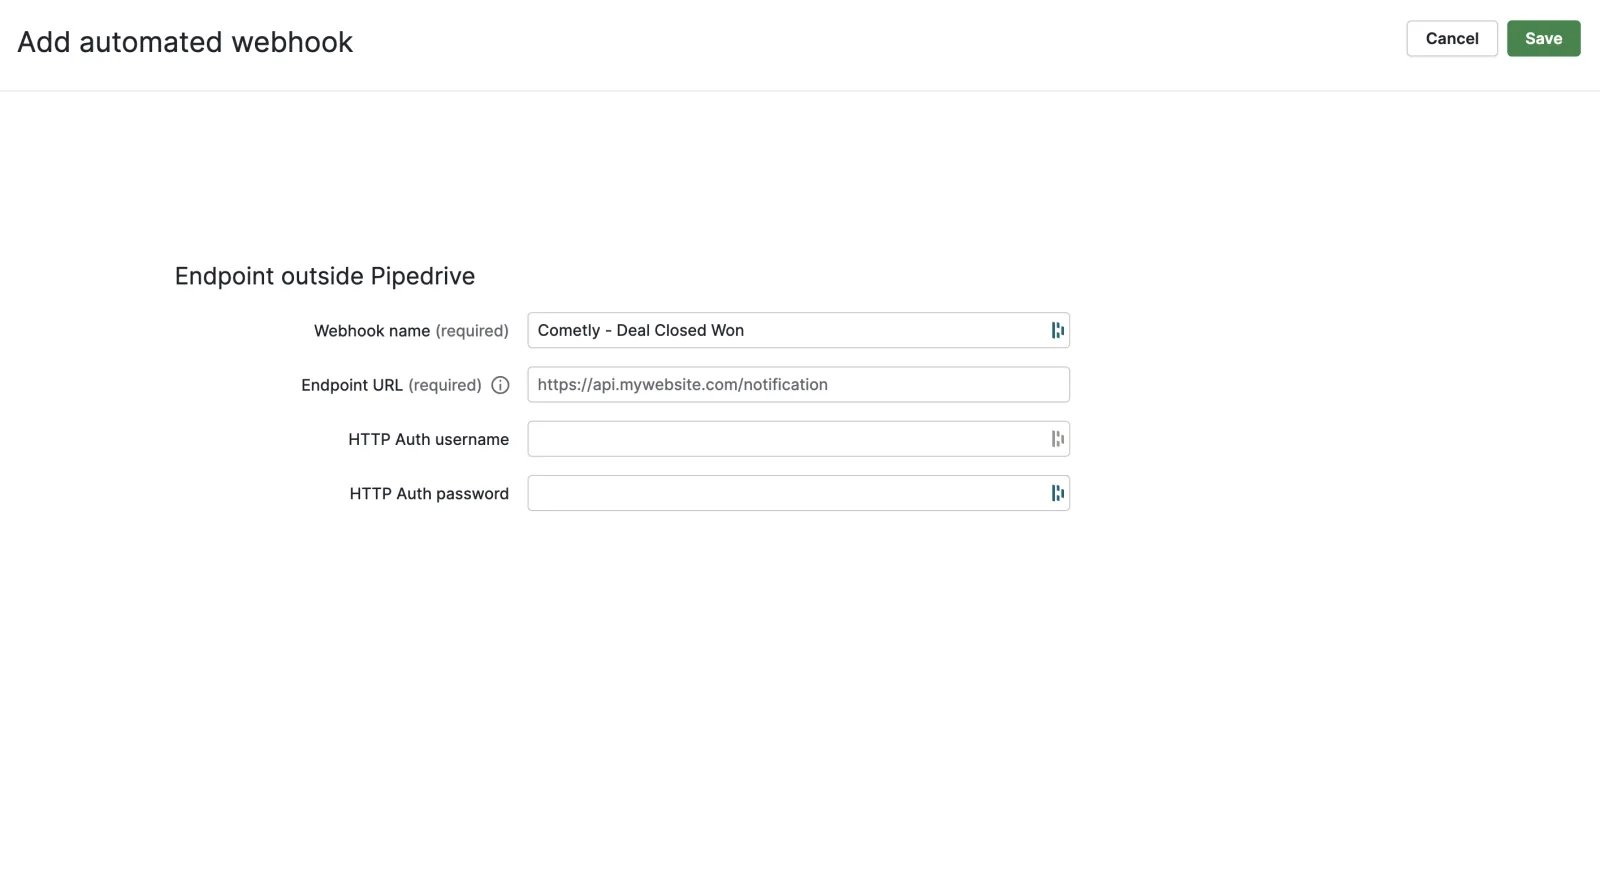
-
If Pipedrive shows the error URL must end with /, &, ?, or = when you add the Cometly webhook URL, add a
/to the end of the URL.
3
Create the automation in Pipedrive
- After you have created your webhook, click Automations.
- Click + Automation.
- Choose Deal as the event trigger.
-
Set up the event trigger:
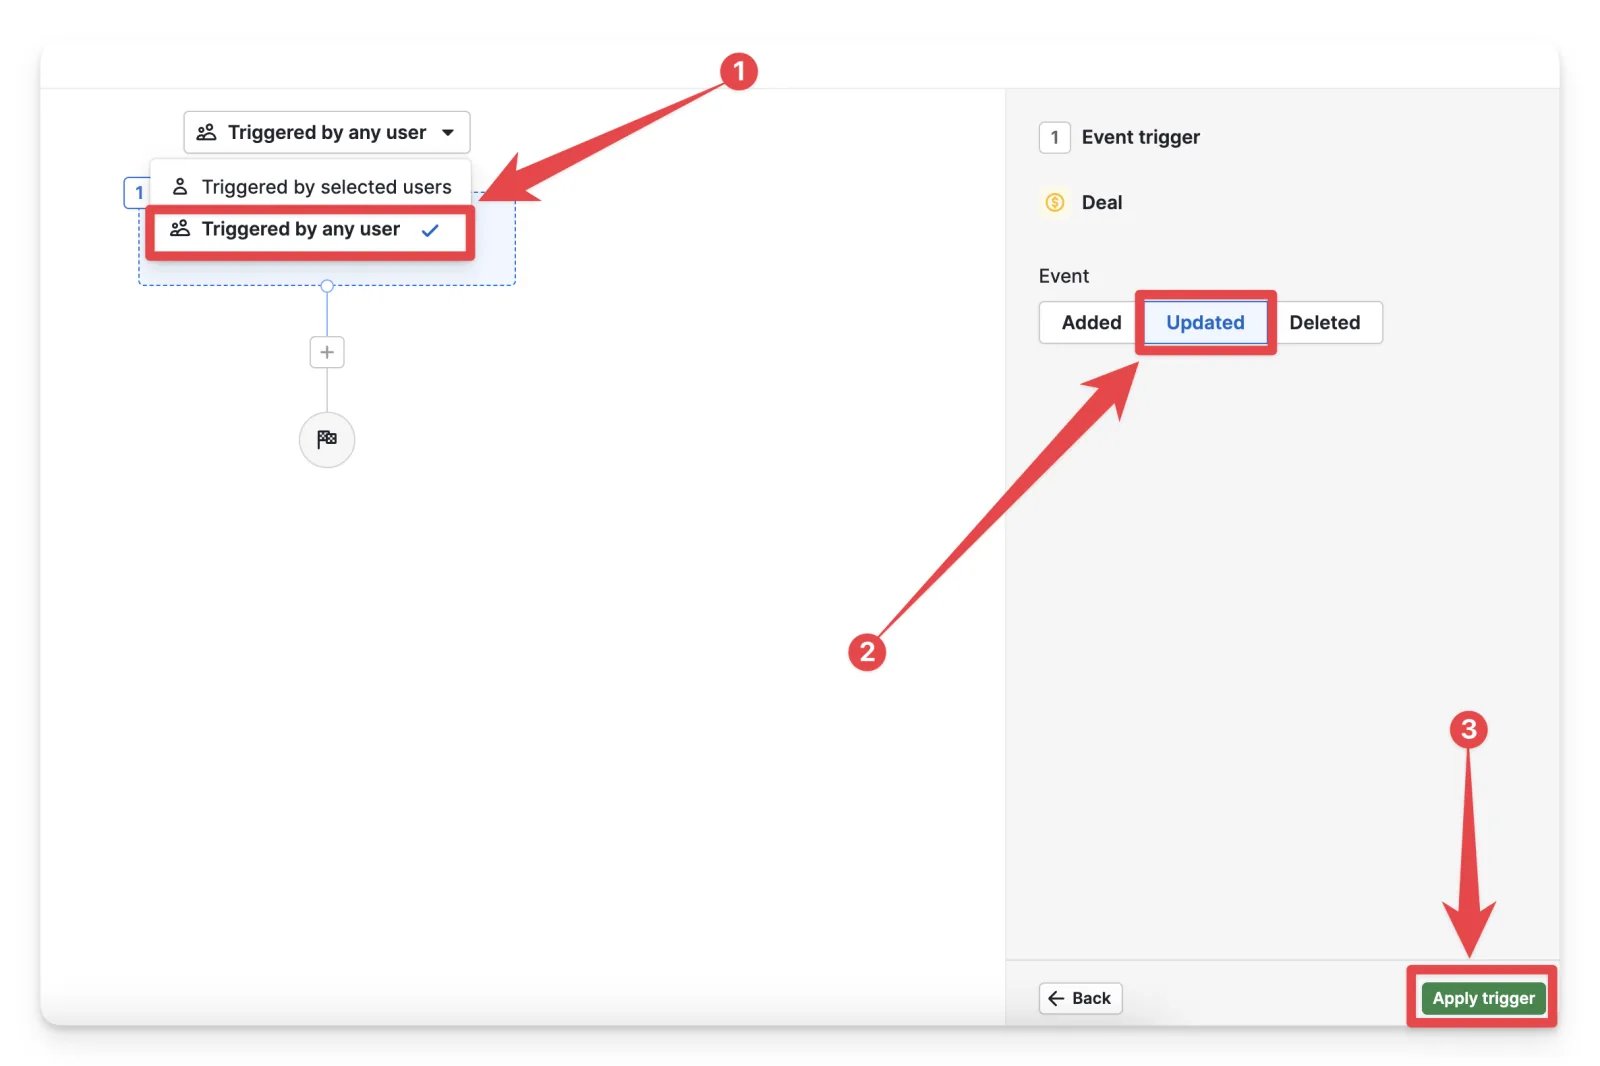
- Select Triggered by any user.
- Select Updated for the Event.
- Click Apply trigger.
-
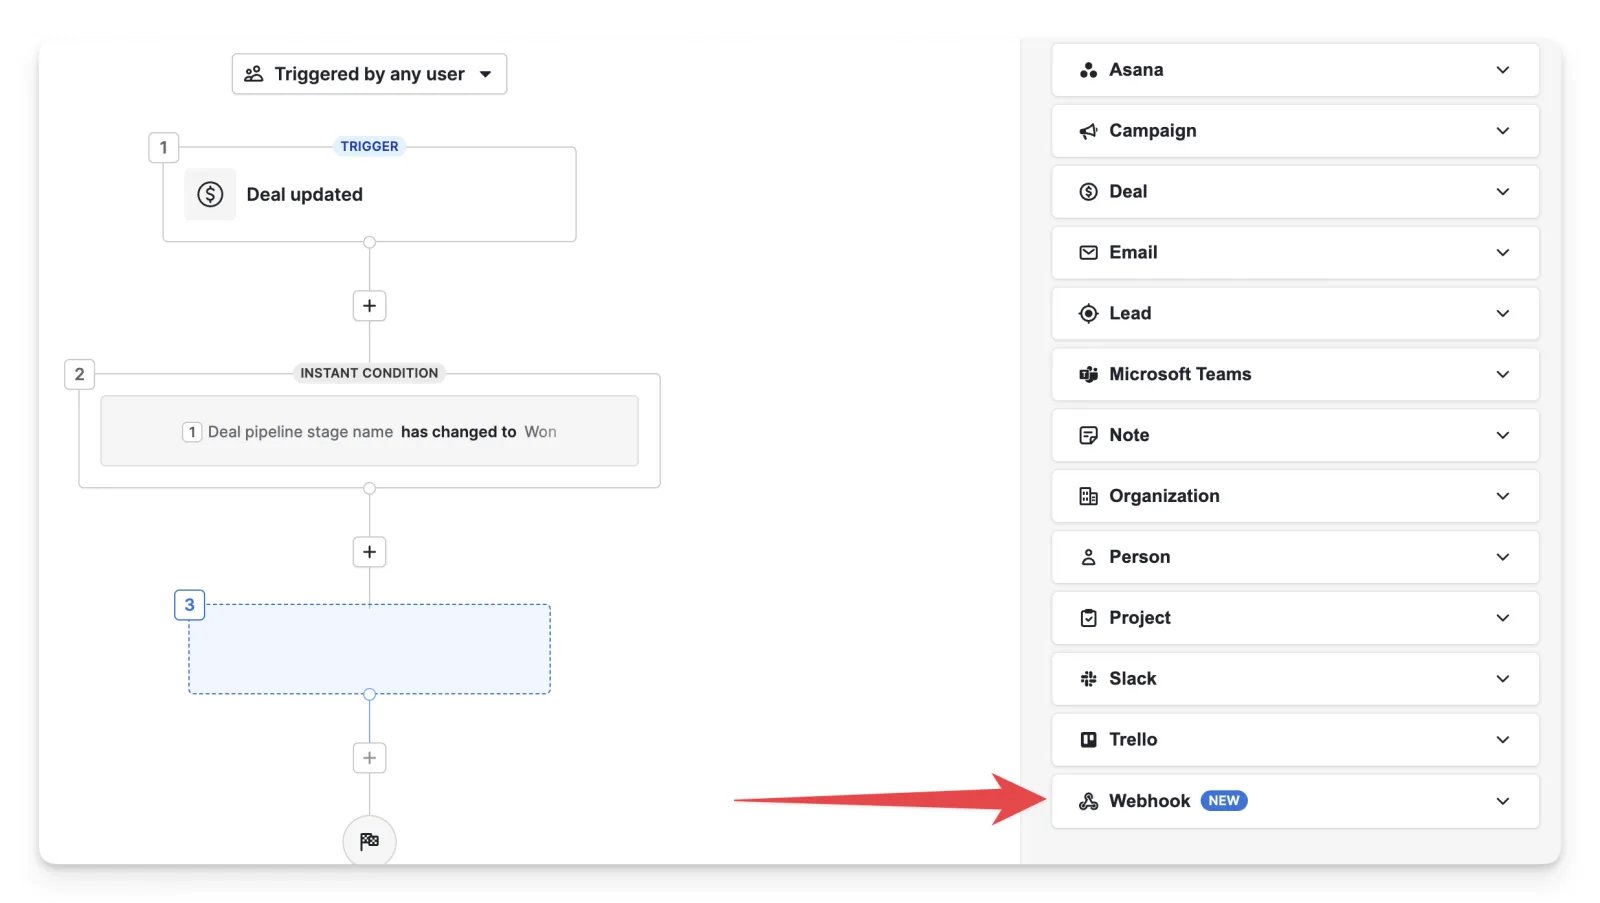
Add a condition so the automation continues only when Deal pipeline stage name has changed to
Won, then click Apply conditions. ReplaceWon(the example stage in the image) with the name of the stage that represents closed won deals in your pipeline. If you have multiple pipelines, configure the conditions to target the specific pipeline you want to send events to Cometly from.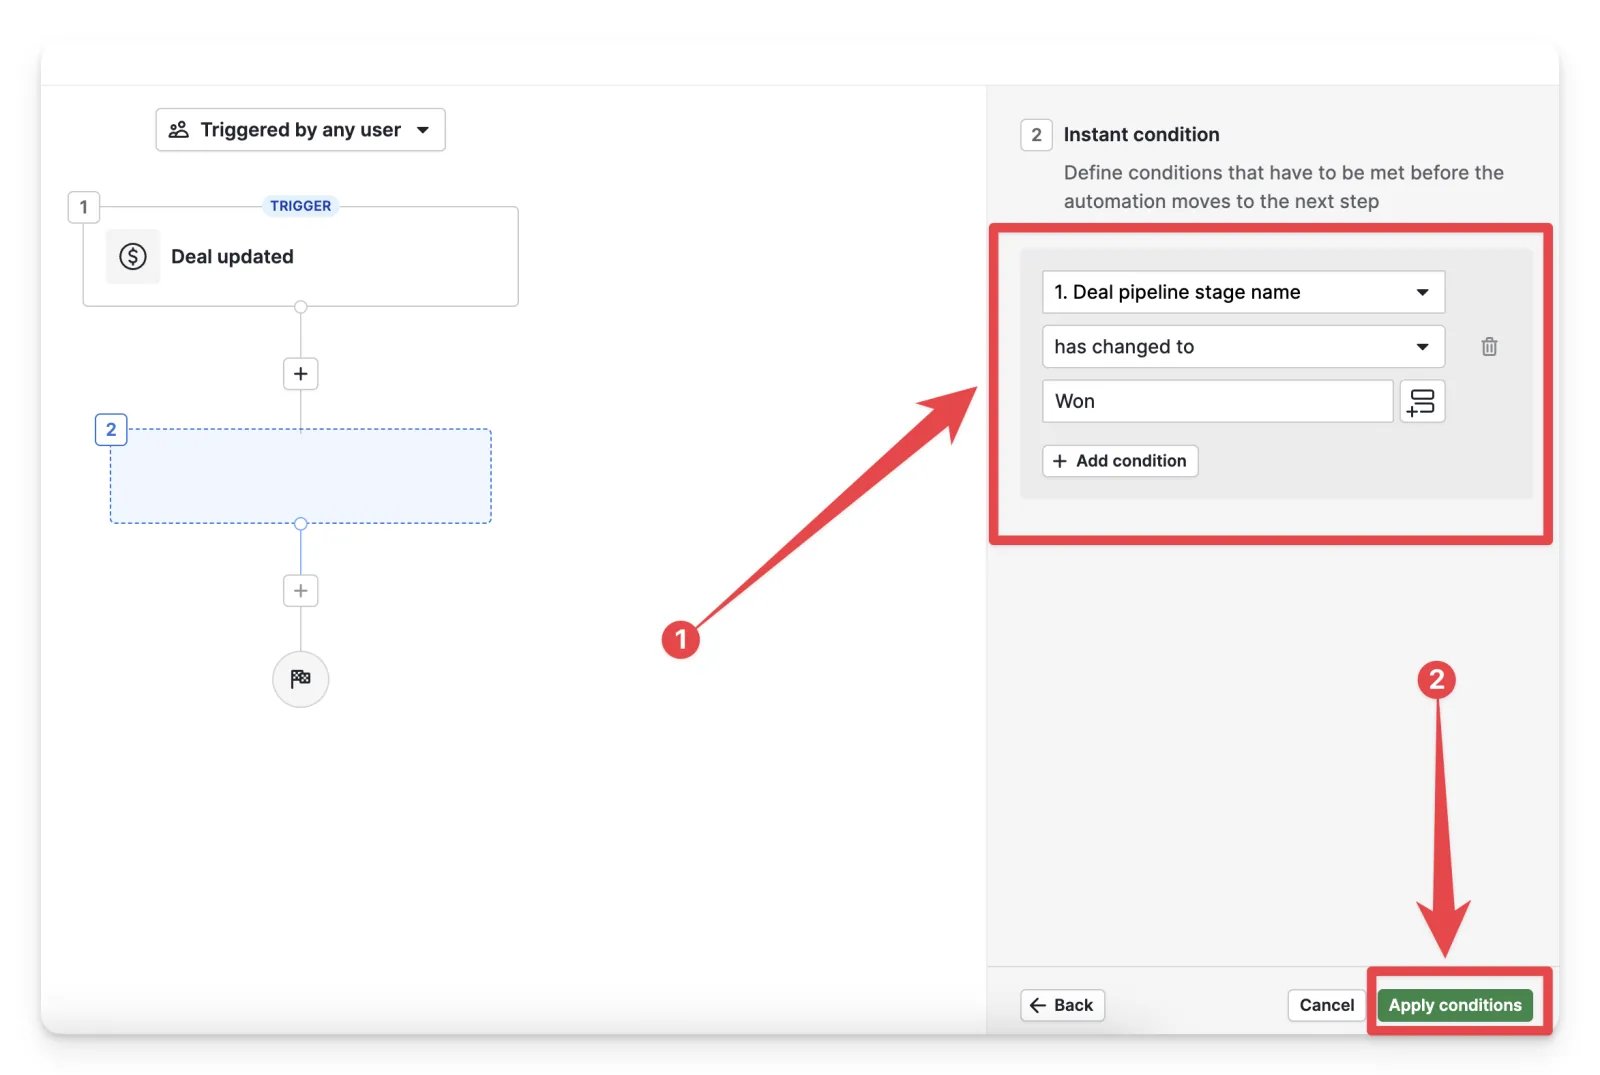
-
Click the (+) sign to add a step, then click Action.
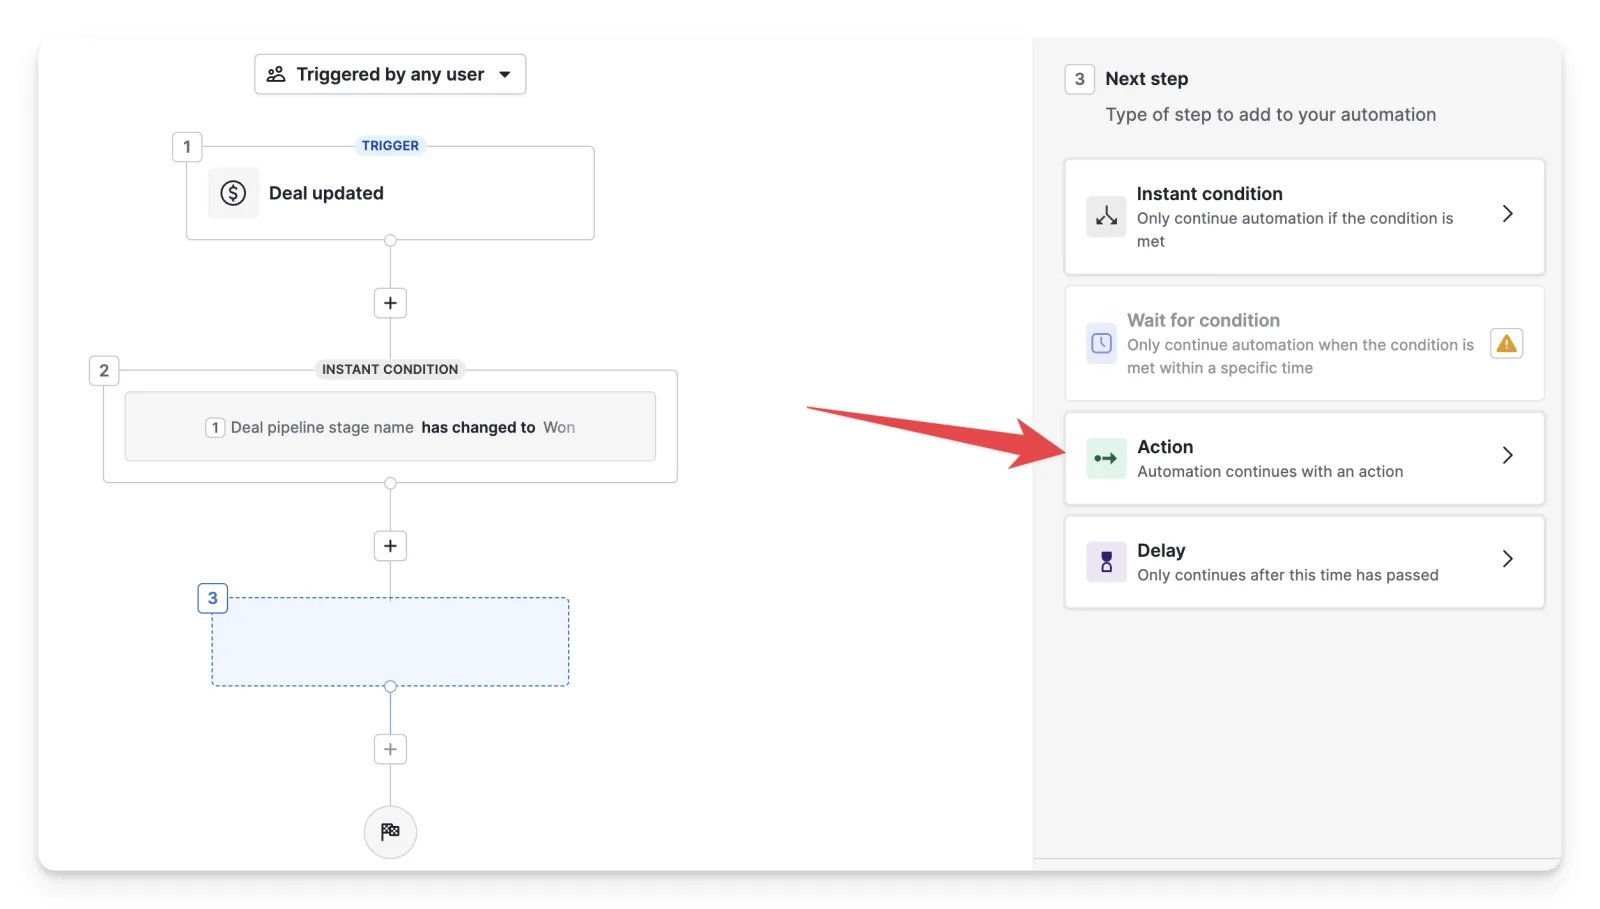
-
Choose Webhook.
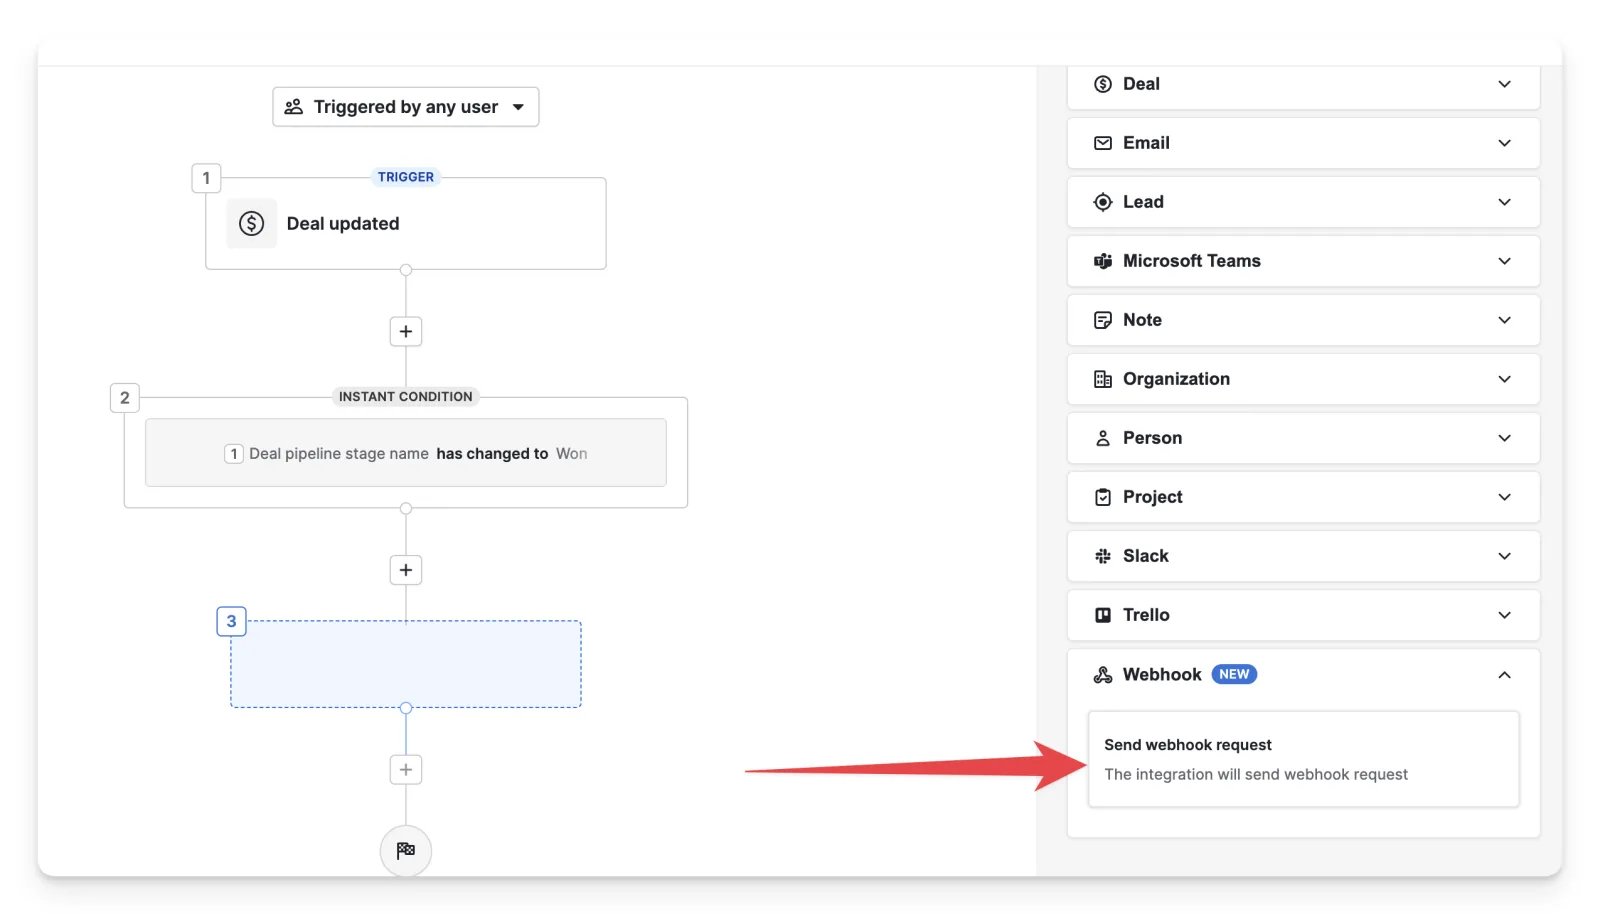
-
Choose Send webhook request.
- The following fields are selected automatically. Click Next.
-
Choose the webhook you created for Webhook (Required) and choose POST for Method (Required).
For Body (Required), select Key-value and add these entries:
- Click Apply action.
-
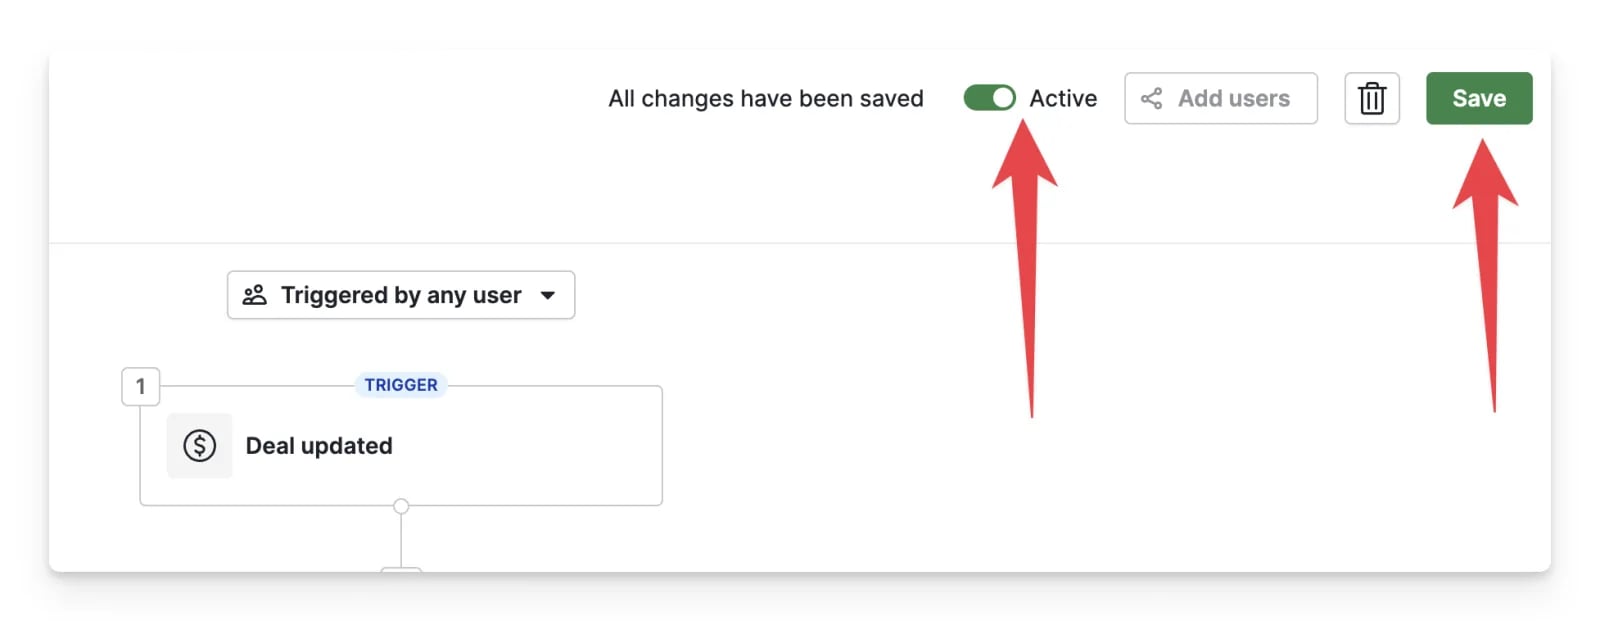
Turn the toggle on so the automation is Active, then click Save.
4
Send data and finish the webhook in Cometly
- Move a deal to your closed won stage in Pipedrive. The automation sends its data to Cometly.
- Back in Cometly, click Check for Data, select the record Pipedrive sent and click Continue With Selected Record.
- Map the fields:
emailto Email,fullnameto Full Name andamountto Amount. The body above has no event time, so set Event Time to The time we receive the event. - Set up filters if you only want some of the data tracked, then click Activate.
Check it worked
In Events Manager, each event you activated shows a switch that is turned on in the Status column. Create a new lead or deal in Pipedrive (or move a deal to your won stage), then open the Events Log tab: the event appears there within 60 seconds, with SUCCESS in the Details column.Frequently asked questions
How long does it take for a Pipedrive lead or deal to show up in Cometly?
The event shows in the Events Log within 60 seconds of Pipedrive sending it. It can take up to 15 minutes to appear in the reporting areas, such as the Report Builder or Ads Manager.Why is my Pipedrive test lead not showing in my Cometly reports?
Test data sent before you clicked Activate is not processed and does not appear in your reports. It only serves as the sample record for mapping. Create a new lead or deal in Pipedrive after the event is active, and that one is tracked.Can I send more Pipedrive fields to Cometly?
Yes. Add another key-value entry to the Body of the webhook action in your Pipedrive automation, then send a new record so Cometly receives the extra field. In Cometly, click Edit on the event’s row in Events Manager and use Add Field in the mapping step to map it.Next steps
- Map fields, format values and add filters with the Cometly webhooks guide
- Use the Events Log to check incoming events
- Learn how standard and custom events work
- Manage custom events such as Deal Created
- Browse all Cometly integrations