

Before you start
- You can edit the
<head>of your website (for example with a header and footer scripts plugin). - Your CallRail plan supports Webhooks and Custom Cookie Capture. CallRail offers these features as add-ons. They may be included in standard or premium packages, so verify that your plan has them.
Set up CallRail tracking
1
Add the Cometly pixel to the head of your website
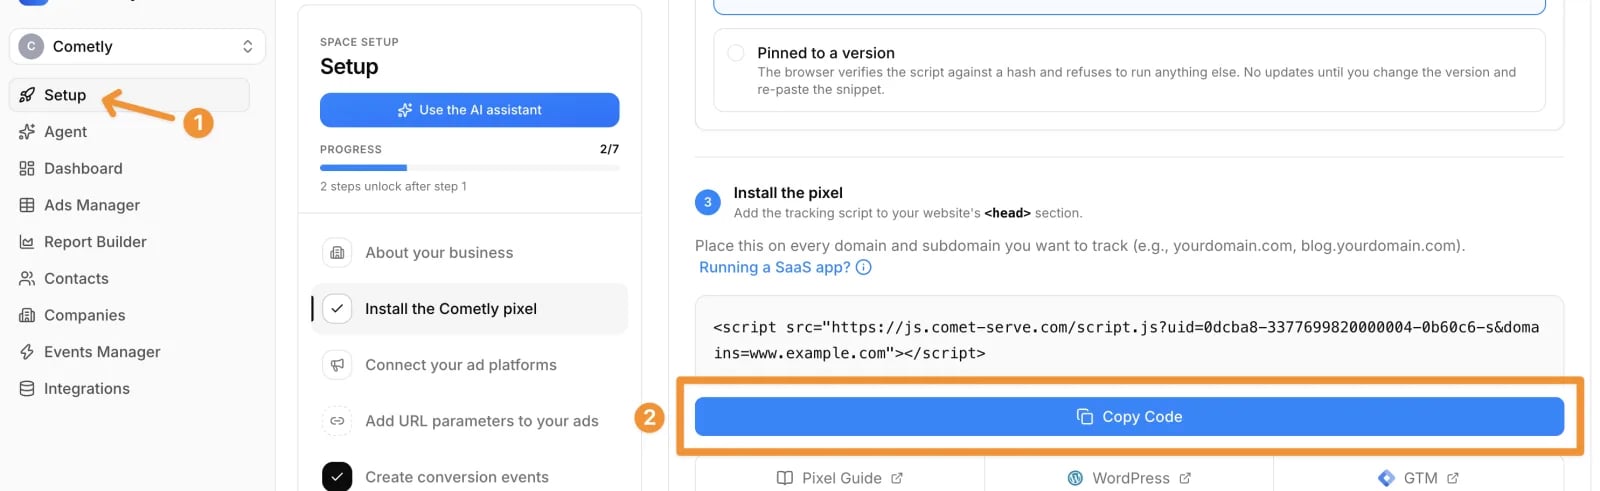
- In Cometly, go to Setup and open the step Install the Cometly pixel. Under Install the pixel, click Copy Code.
- Log in to your website platform (for example WordPress or Webflow).
- Go to your global header and footer script section (often managed by a plugin such as Header Footer Code Snippets).
- Paste the Cometly pixel in the
<head>, and make sure it is installed on every page of your site.
2
Add the cookie snippet after the Cometly pixel
Place the following snippet after the Cometly pixel in the The snippet reads the visitor’s Comet Token from the pixel and saves it in a cookie named
<head>:comet_token, so CallRail can pick it up with the call data.3
Capture the Comet Token in CallRail
-
In CallRail, go to Integrations → Library → Custom Cookie Capture.
- Create a new custom cookie and name it comet_token.
4
Send CallRail calls to Cometly with a webhook
First create the event and its webhook URL in Cometly: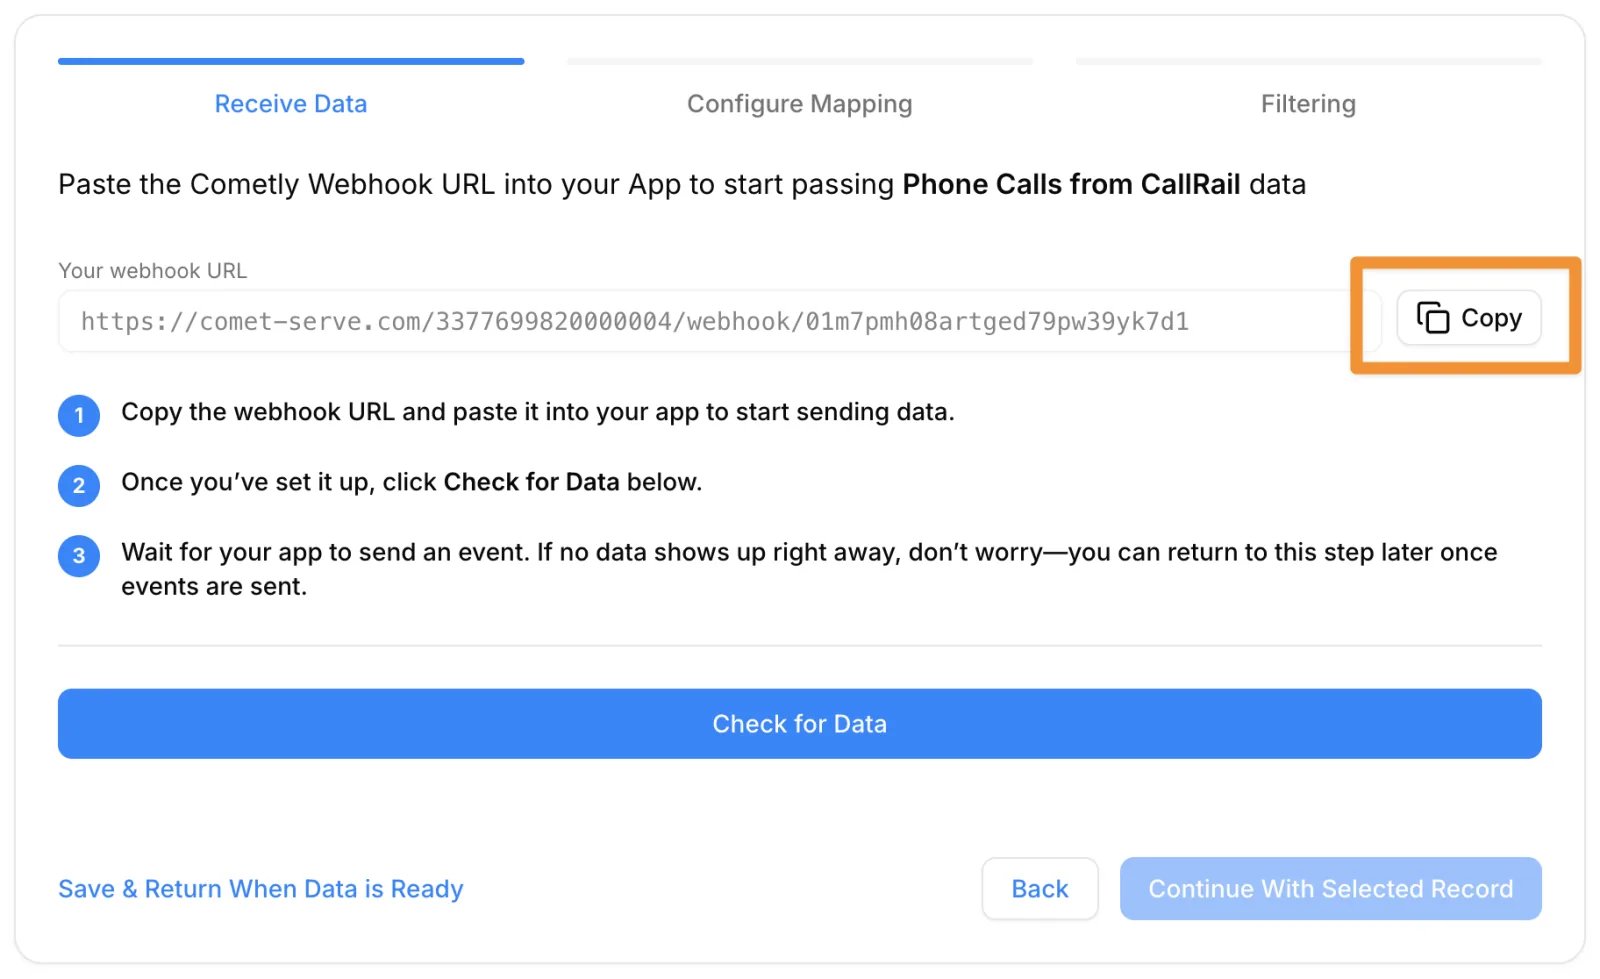
- In Cometly, go to Events Manager and click Create Event.
- Under App / Integration, select Webhooks.
- Pick the event name, or choose Create New Event and give it a clear name such as “Phone Calls from CallRail”. Click Create.
- Under Your webhook URL, click Copy.
- In CallRail, go to Integrations → Library → Webhooks.
- Paste the Cometly webhook URL into the Post-Call Webhook, in the Webhook URL section.
- Save the changes and publish the webhook in CallRail.
CallRail is also in the App / Integration list. If you select it instead of Webhooks, you connect a CallRail account with an API key (in CallRail: Settings > API > Manage API Credentials), choose the Post-Call trigger and click Continue. Cometly then adds its webhook URL to your CallRail webhooks for you, so you skip the CallRail part of this step. The other steps stay the same.
5
Map the Comet Token in Cometly
- In Cometly, open Events Manager.
- Find the event you created in the previous step and click Configure.
- Click Check for Data, select the most recent record and click Continue With Selected Record. If no record shows up yet, place a test call (see the next step) and check again.
- On the mapping step, click Add Field and choose Comet Token under Cometly Fields.
- Under Data Fields, search for your custom cookie field (
custom.comet_tokenin the example below) and select it. - Map the remaining fields (the page requires Email and Event Time), then click Save & Continue and finish the setup.

6
Confirm your call tracking setup
- Place a test call to a CallRail tracking number, after clicking a Google ad or visiting your landing page directly.
- In Cometly, open Events Manager and the Events Log tab to confirm the call event appears with the token attached.
Check it worked
After your test call, the call event is listed in Events Manager, on the Events Log tab, with the Comet Token attached. From then on, a call from a tracked source (such as Google Ads) is attributed to the ad or campaign that drove it.Frequently asked questions
Do I need a developer to connect CallRail to Cometly?
No. The CallRail setup does not use the Cometly API. You need to be able to paste the Cometly pixel and the cookie snippet into the<head> of your website, and to change settings in CallRail and Cometly.
How long is the Comet Token kept for a visitor who calls later?
The cookie snippet on this page saves the Comet Token in thecomet_token cookie for 180 days. The snippet only saves it when the Cometly pixel has loaded first, which is why it must be placed after the pixel.
Which CallRail call events can Cometly receive?
This guide uses CallRail’s Post-Call Webhook, which fires when a call has ended. If you connect a CallRail account by selecting CallRail under App / Integration, you can choose from four triggers: Pre-Call, Call Routing Complete, Post-Call and Call Modified.Next steps
- Create and configure events
- Using the Events Log
- Set up call tracking with the Cometly API
- Connect CallTrackingMetrics
- Comet Token