

- Understand how ClickBank metrics appear in Cometly
- Purchase tracking setup
- Checkout tracking setup
- Landing page tracking setup
- Set up UTM parameters on your ads
- Connect ad accounts
- Configure Conversion APIs
Step 1: Understand how ClickBank metrics appear in Cometly
Start here so you know how ClickBank metrics map to Cometly metrics.- View Content: In ClickBank, a “hop” is a potential customer clicking an affiliate link. In Cometly this metric is called View Content. The link is unique to each affiliate and tracks the source of traffic to a product’s sales page. When someone clicks it, a hop is recorded, which shows the affiliate sent traffic to the vendor’s product page.
- Initiate Checkout: In ClickBank, an “Order Form Impression (OFI)” is the number of times the ClickBank order form was displayed. It tells vendors and affiliates how many potential customers reached the point of possibly buying. A high number of OFIs suggests effective marketing up to the point of sale.
- Upsell Purchase: The number of transactions that are upsells during checkout.
-
Upsell Revenue: The part of your total sales revenue that comes from upsells in your funnel, or from extra items added to a purchase.
- Gross Revenue is the total revenue generated, and Upsell Revenue is automatically included in it.
- Cost per Upsell: The average ad spend needed to generate one upsell purchase. It is the total amount spent on ads divided by the number of upsell purchases.
- LP CTR: Landing page click-through rate. It is the total number of View Content events divided by the number of link clicks.
The “DV to OFI%” and “OFI to Sale%” metrics are no longer available as columns. If you need them, build your own: in the Ads Manager, open the Columns menu and click Manage Custom Metrics.
Pro tip: Now that you know which metrics you will use, configure your Ads Manager to show them.
Step 2: Purchase tracking setup
In this step you add a webhook to your ClickBank account. It sends each new purchase to Cometly as soon as it happens.1
Open My Site in ClickBank
In your ClickBank account, go to Vendor Settings > My Site.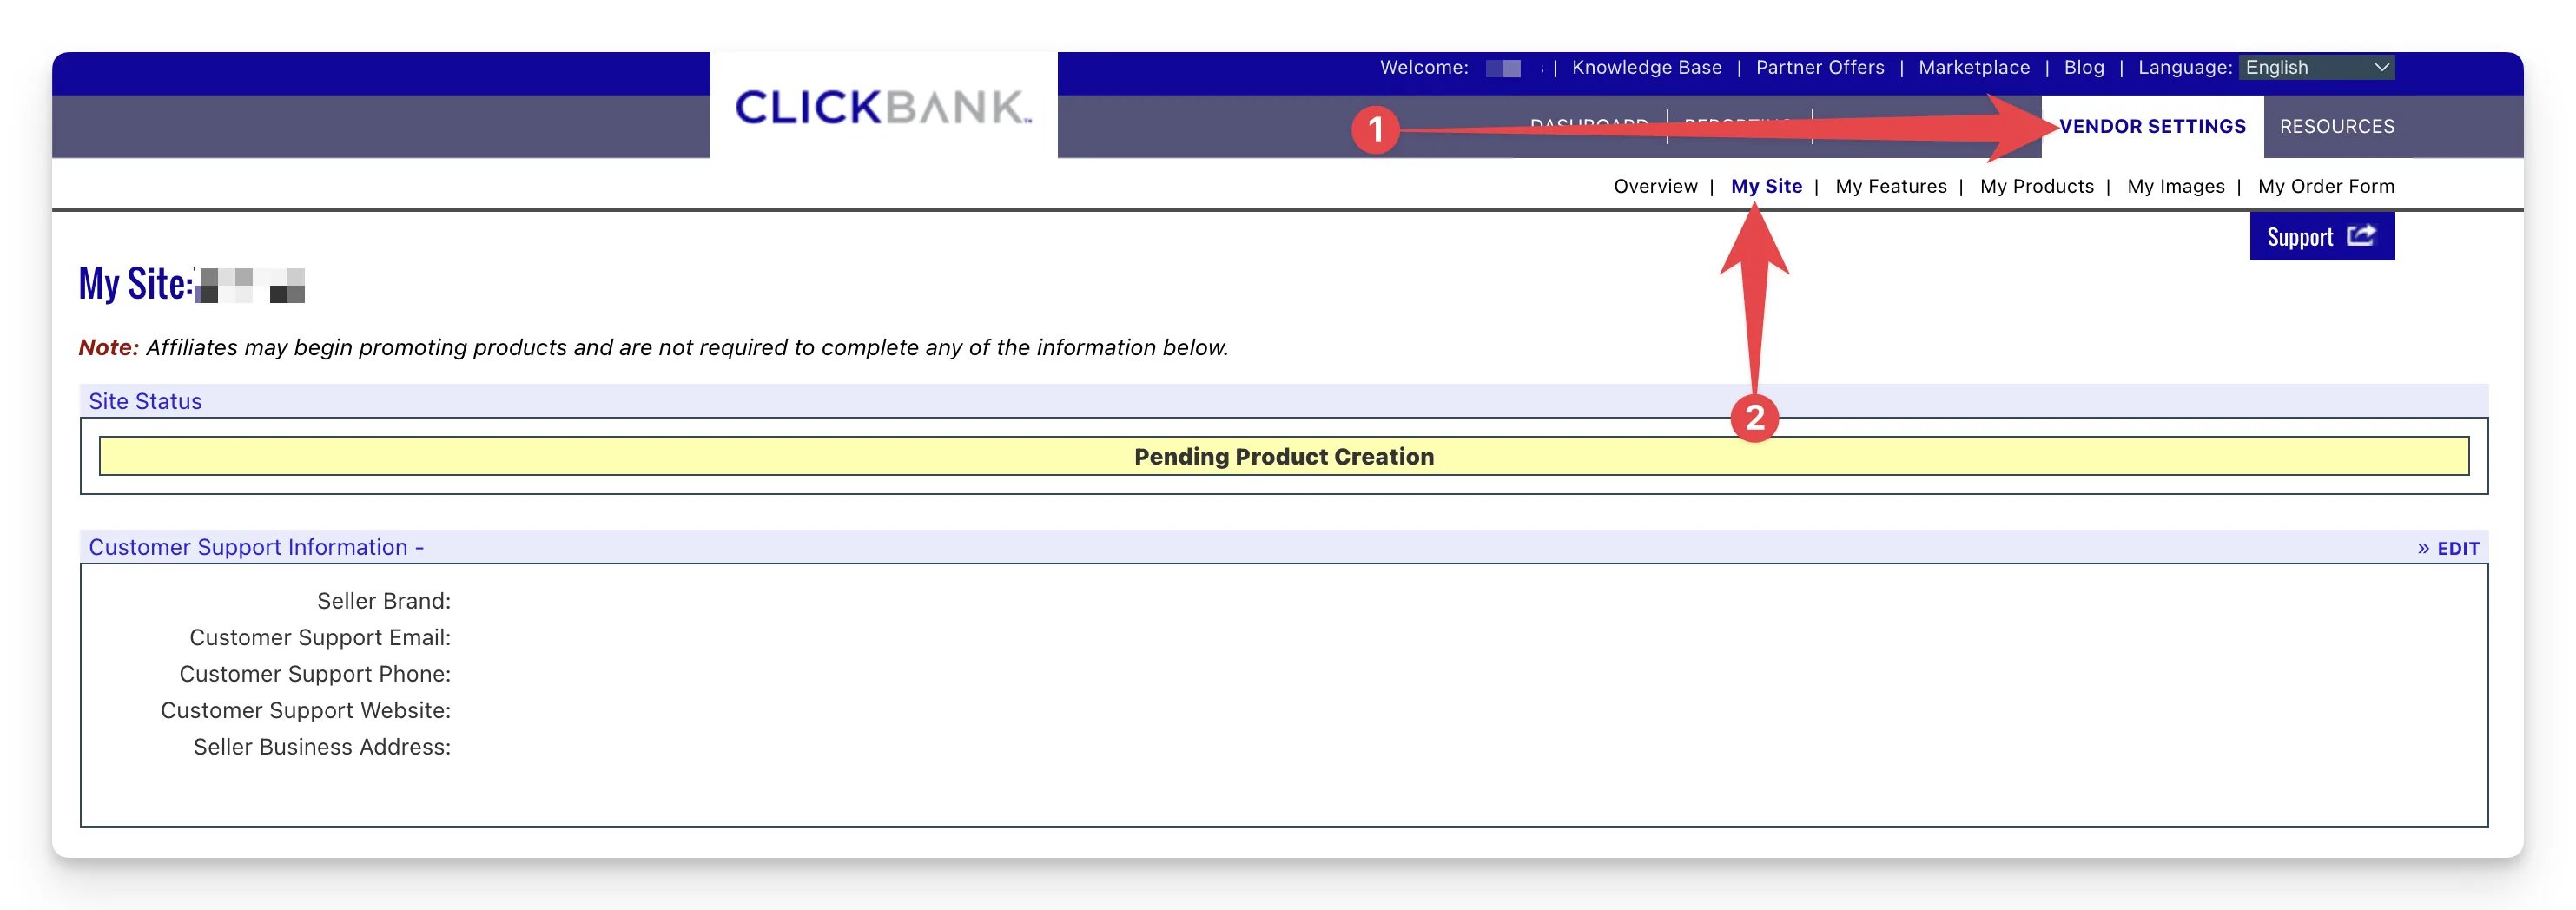
2
Edit Advanced Tools
Scroll down the My Site page to the Advanced Tools section and click Edit.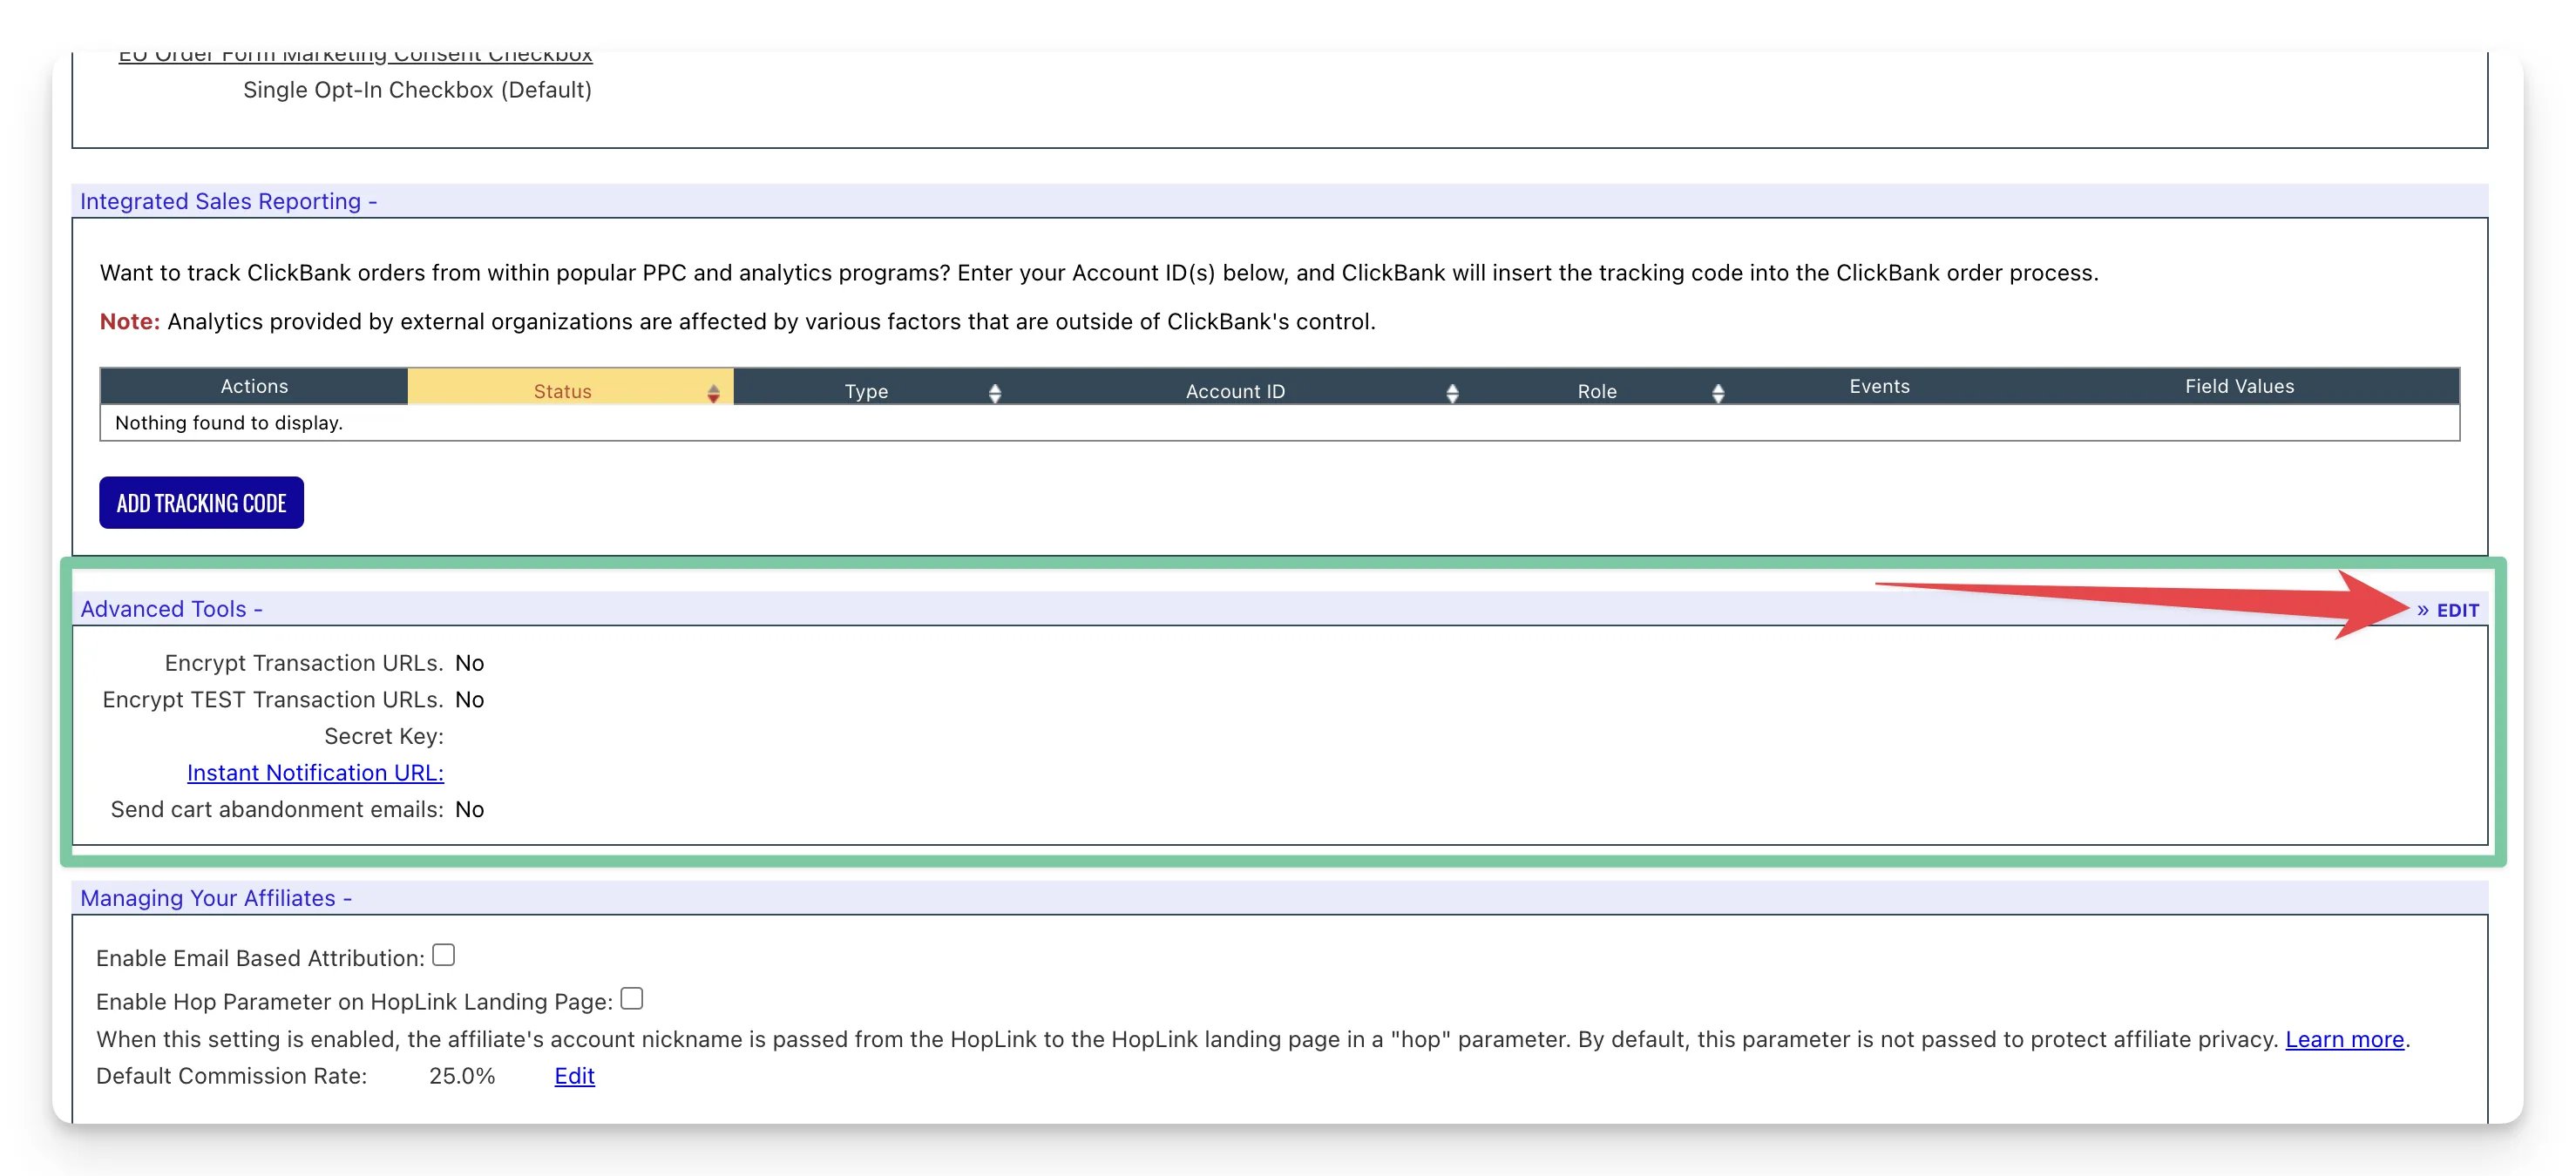
3
Create a Secret Key
Enter a Secret Key made of UPPERCASE LETTERS or numbers, up to 16 characters. Do not use lowercase letters, spaces or symbols, or you will get an error.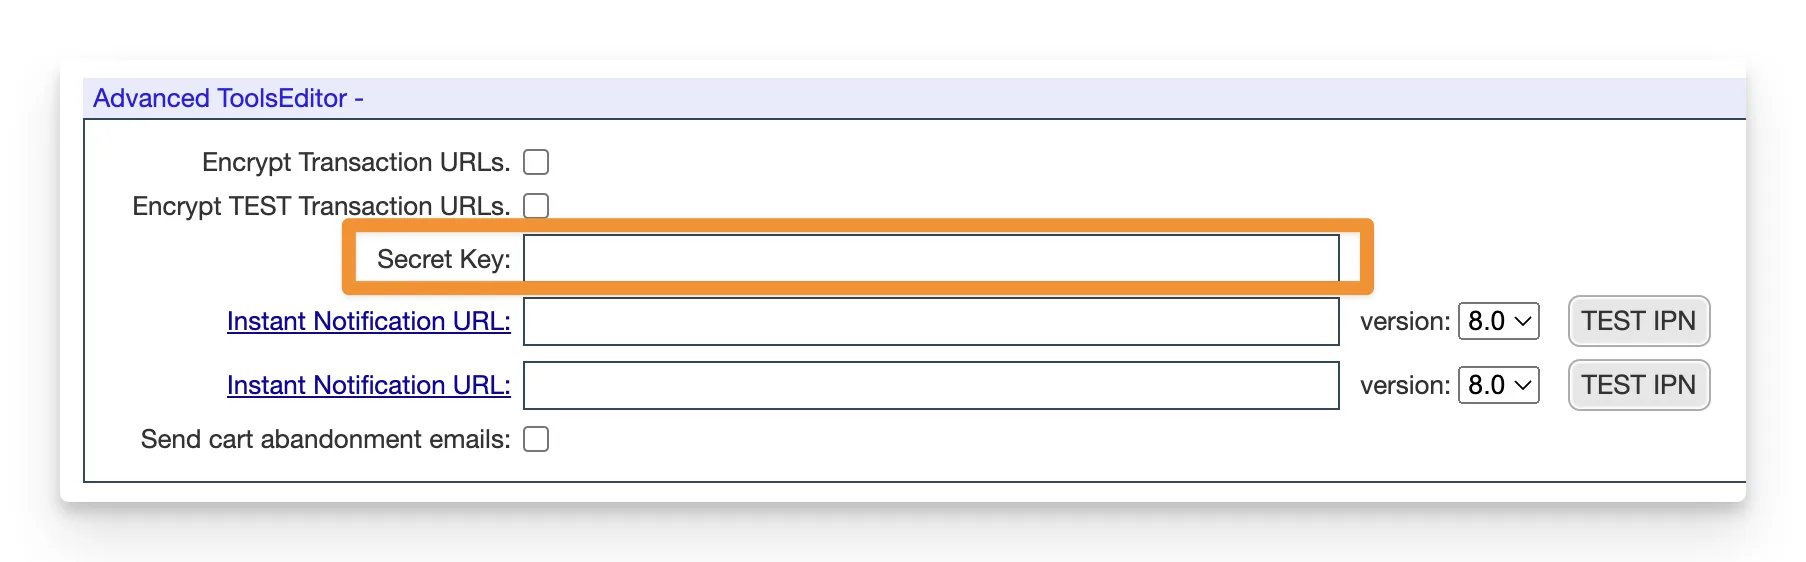
4
Open the Clickbank integration in Cometly
In a new tab, open the Events Manager in your Cometly space and click Create Event.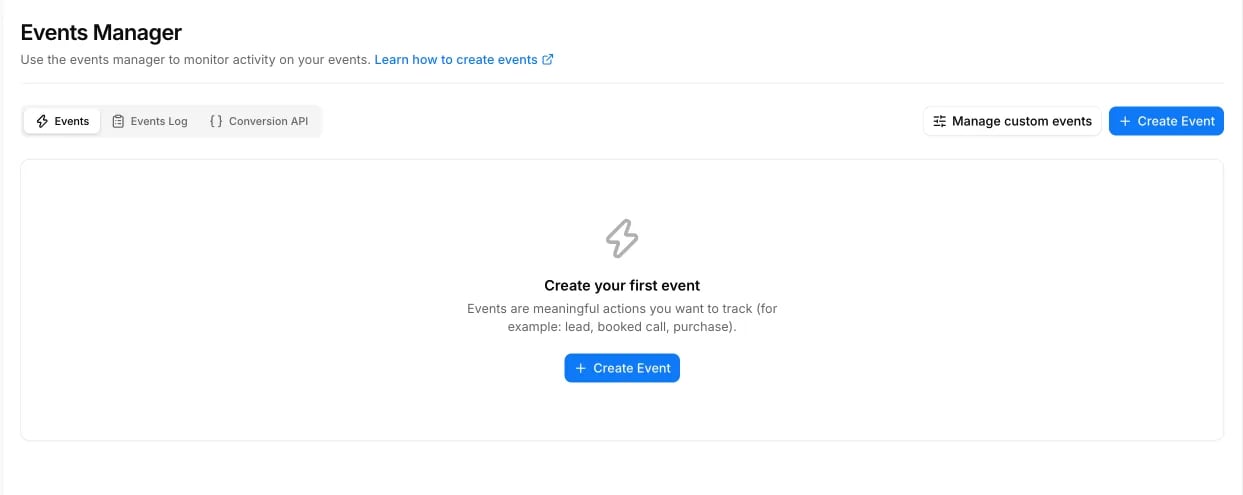
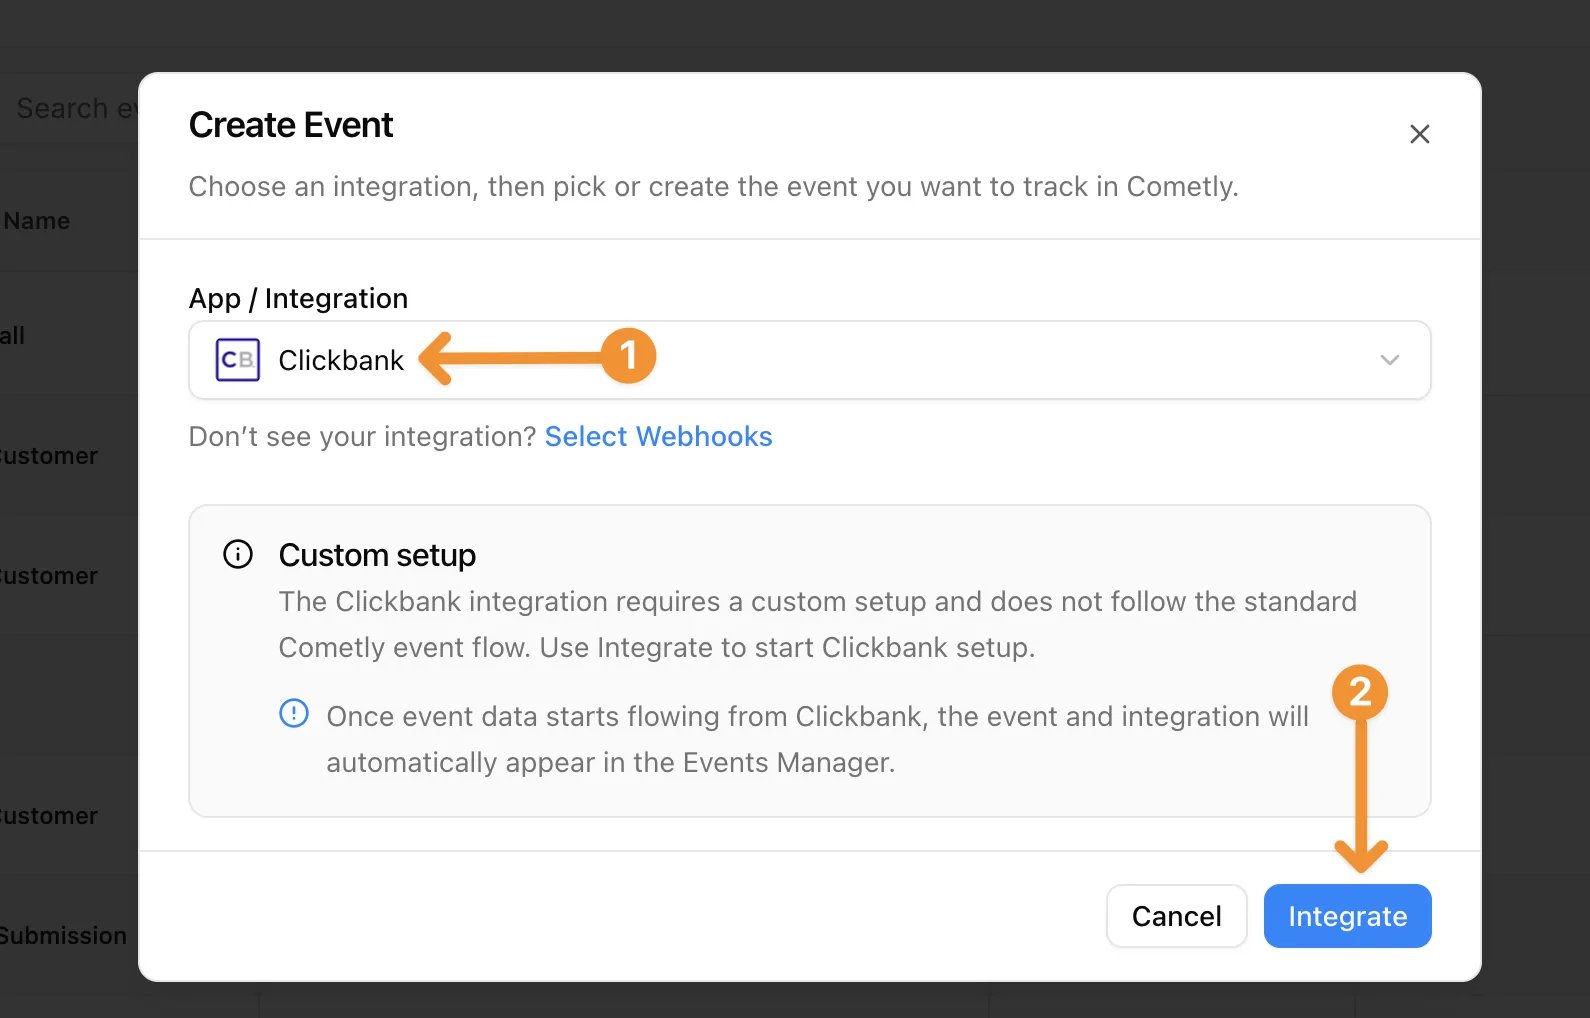
5
Activate ClickBank
Click Activate ClickBank.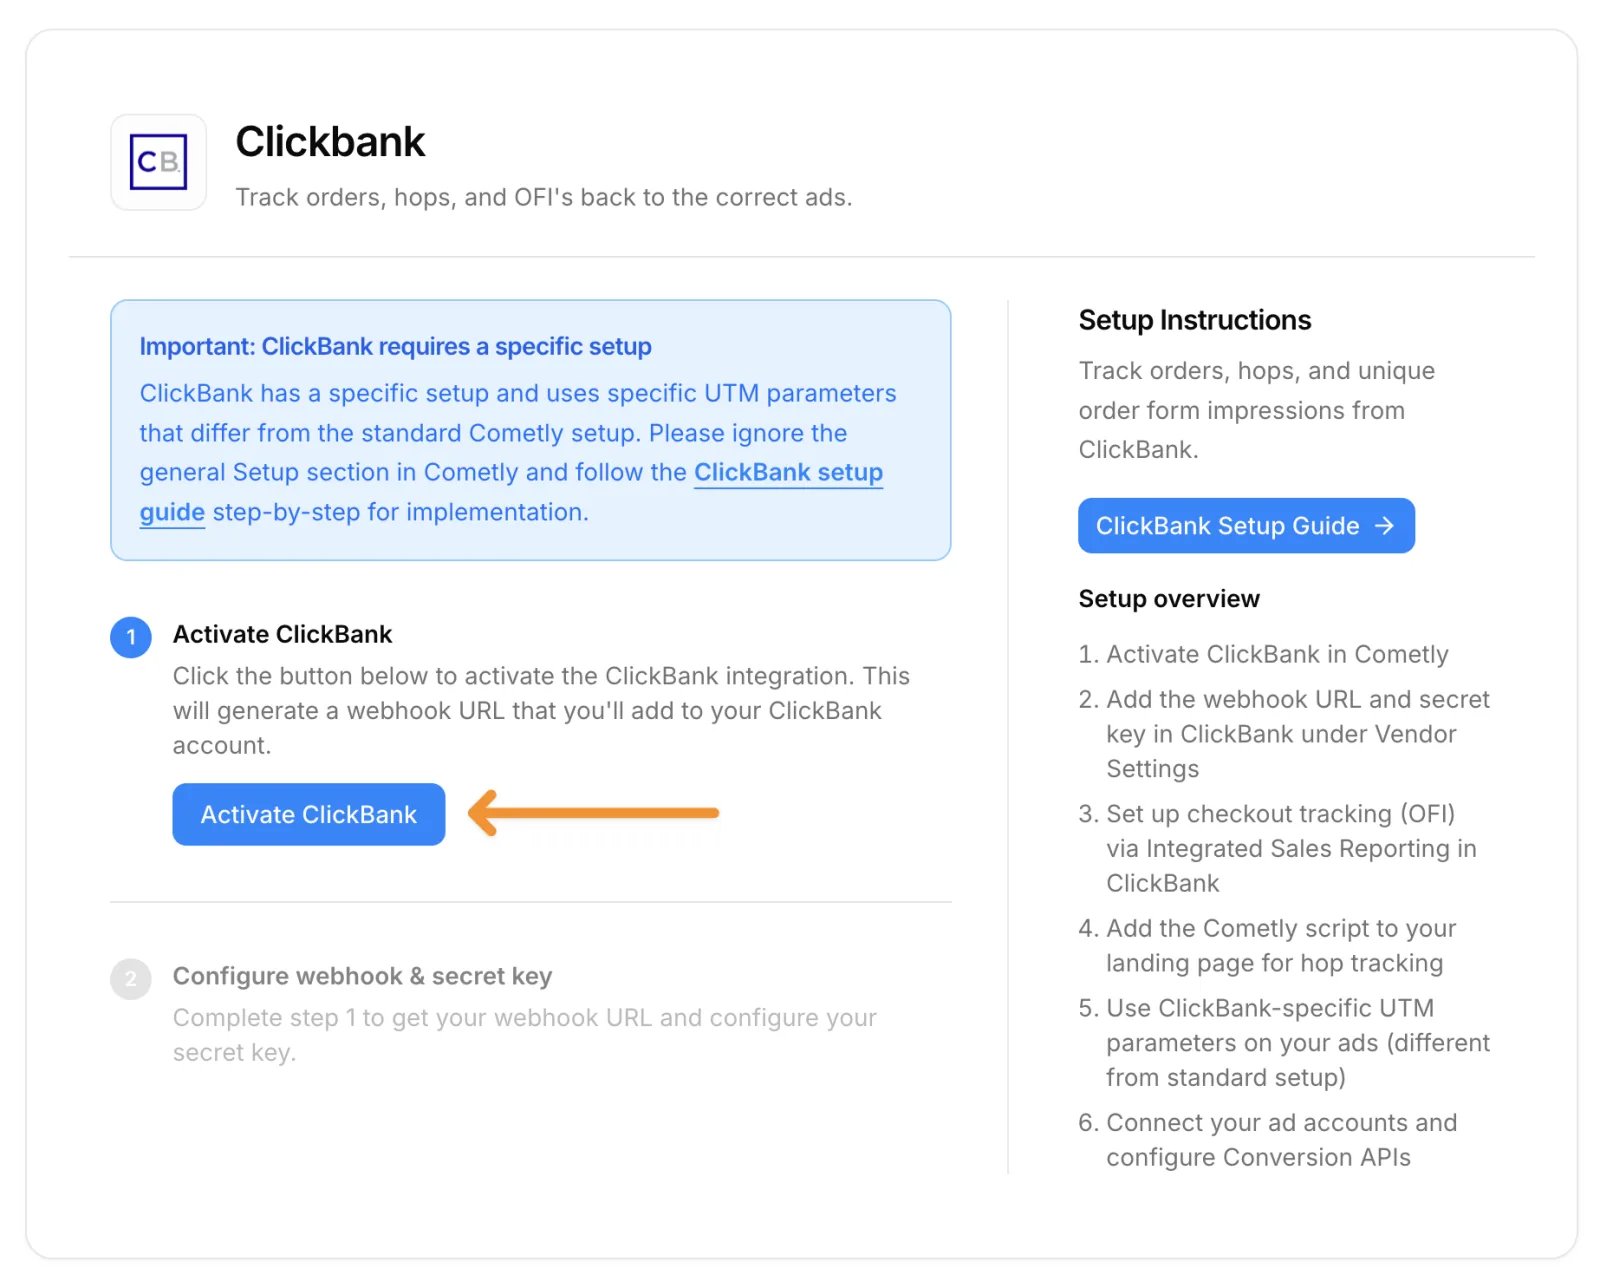
6
Save your Secret Key in Cometly
Under Configure webhook & secret key, paste your Secret Key into the Secret Key field and click Save. It must match the key you created in ClickBank.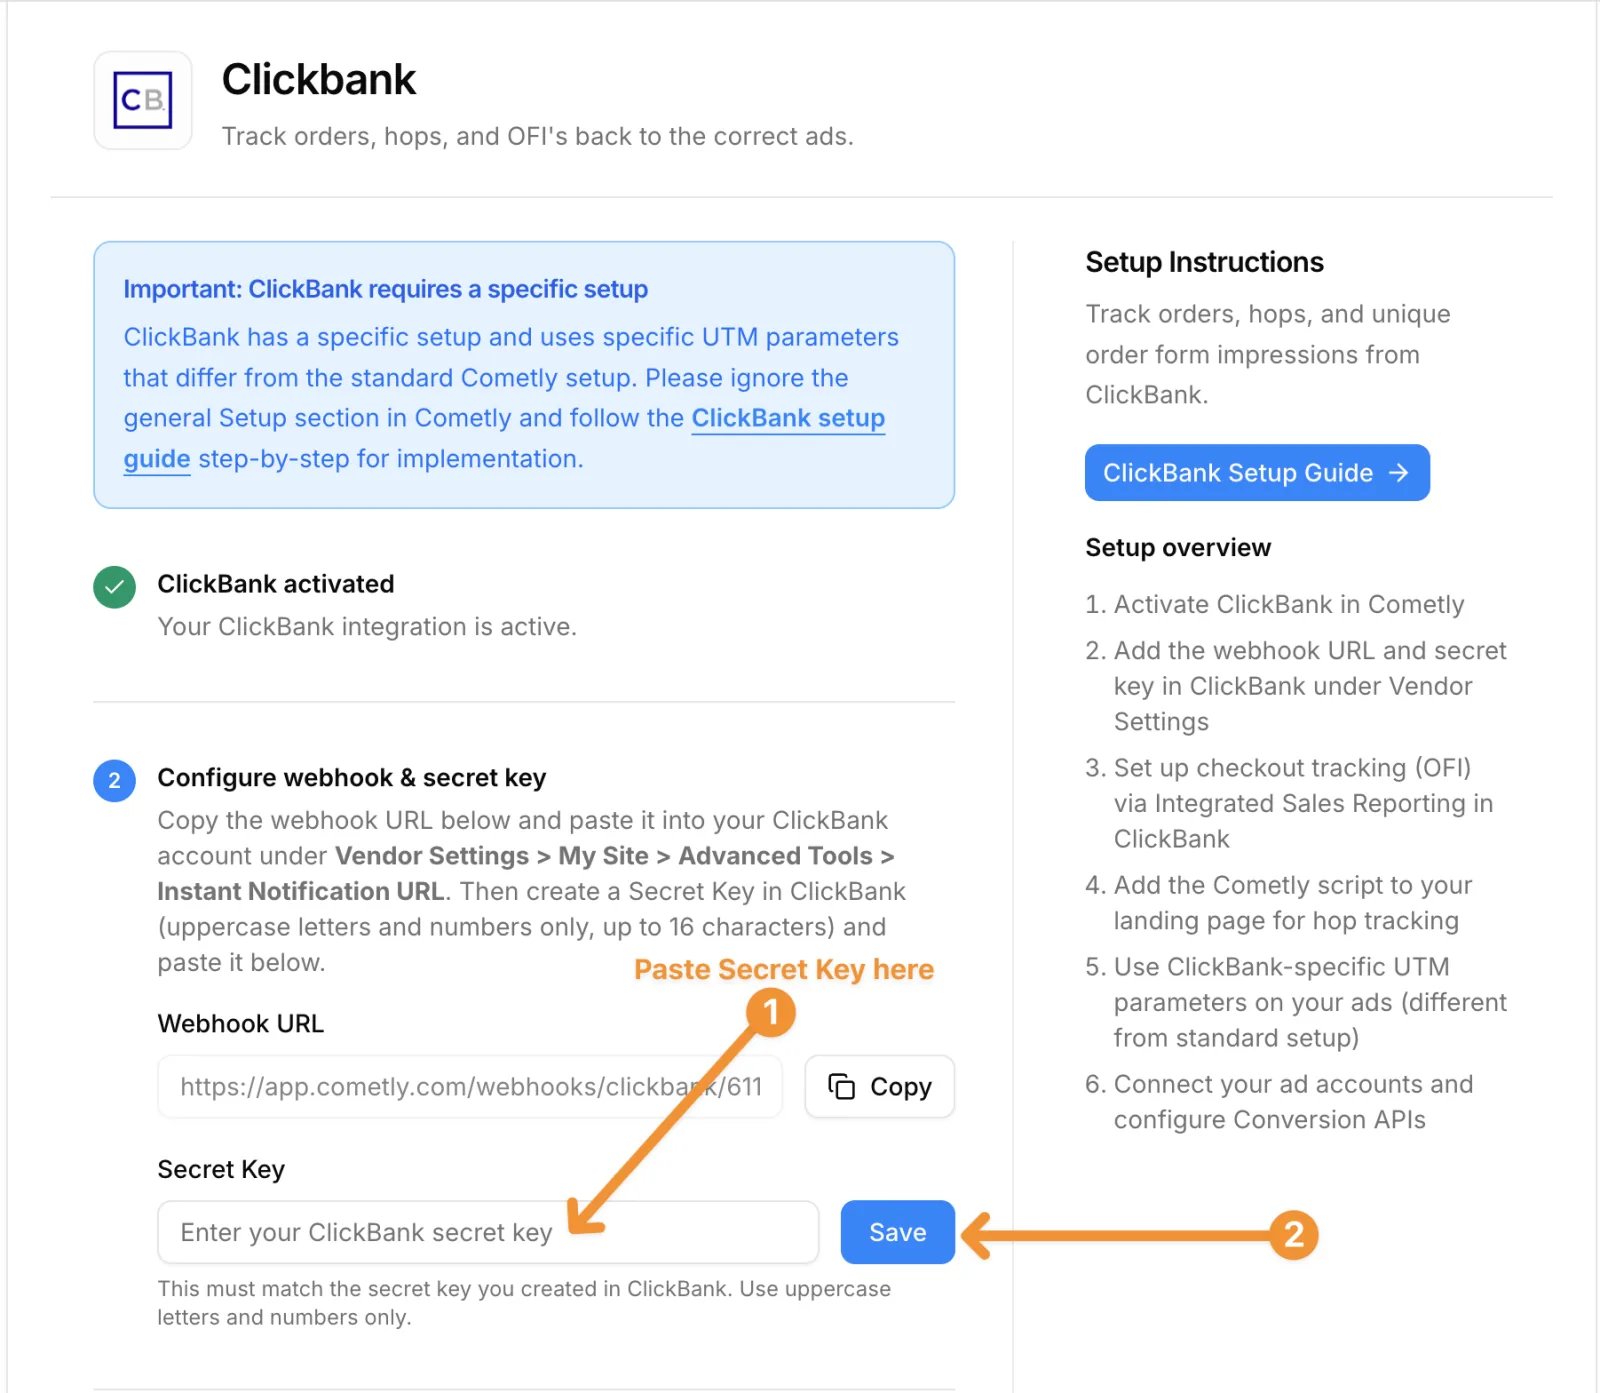
7
Copy the webhook URL
Next to Webhook URL, click Copy. Then go back to ClickBank in your other tab.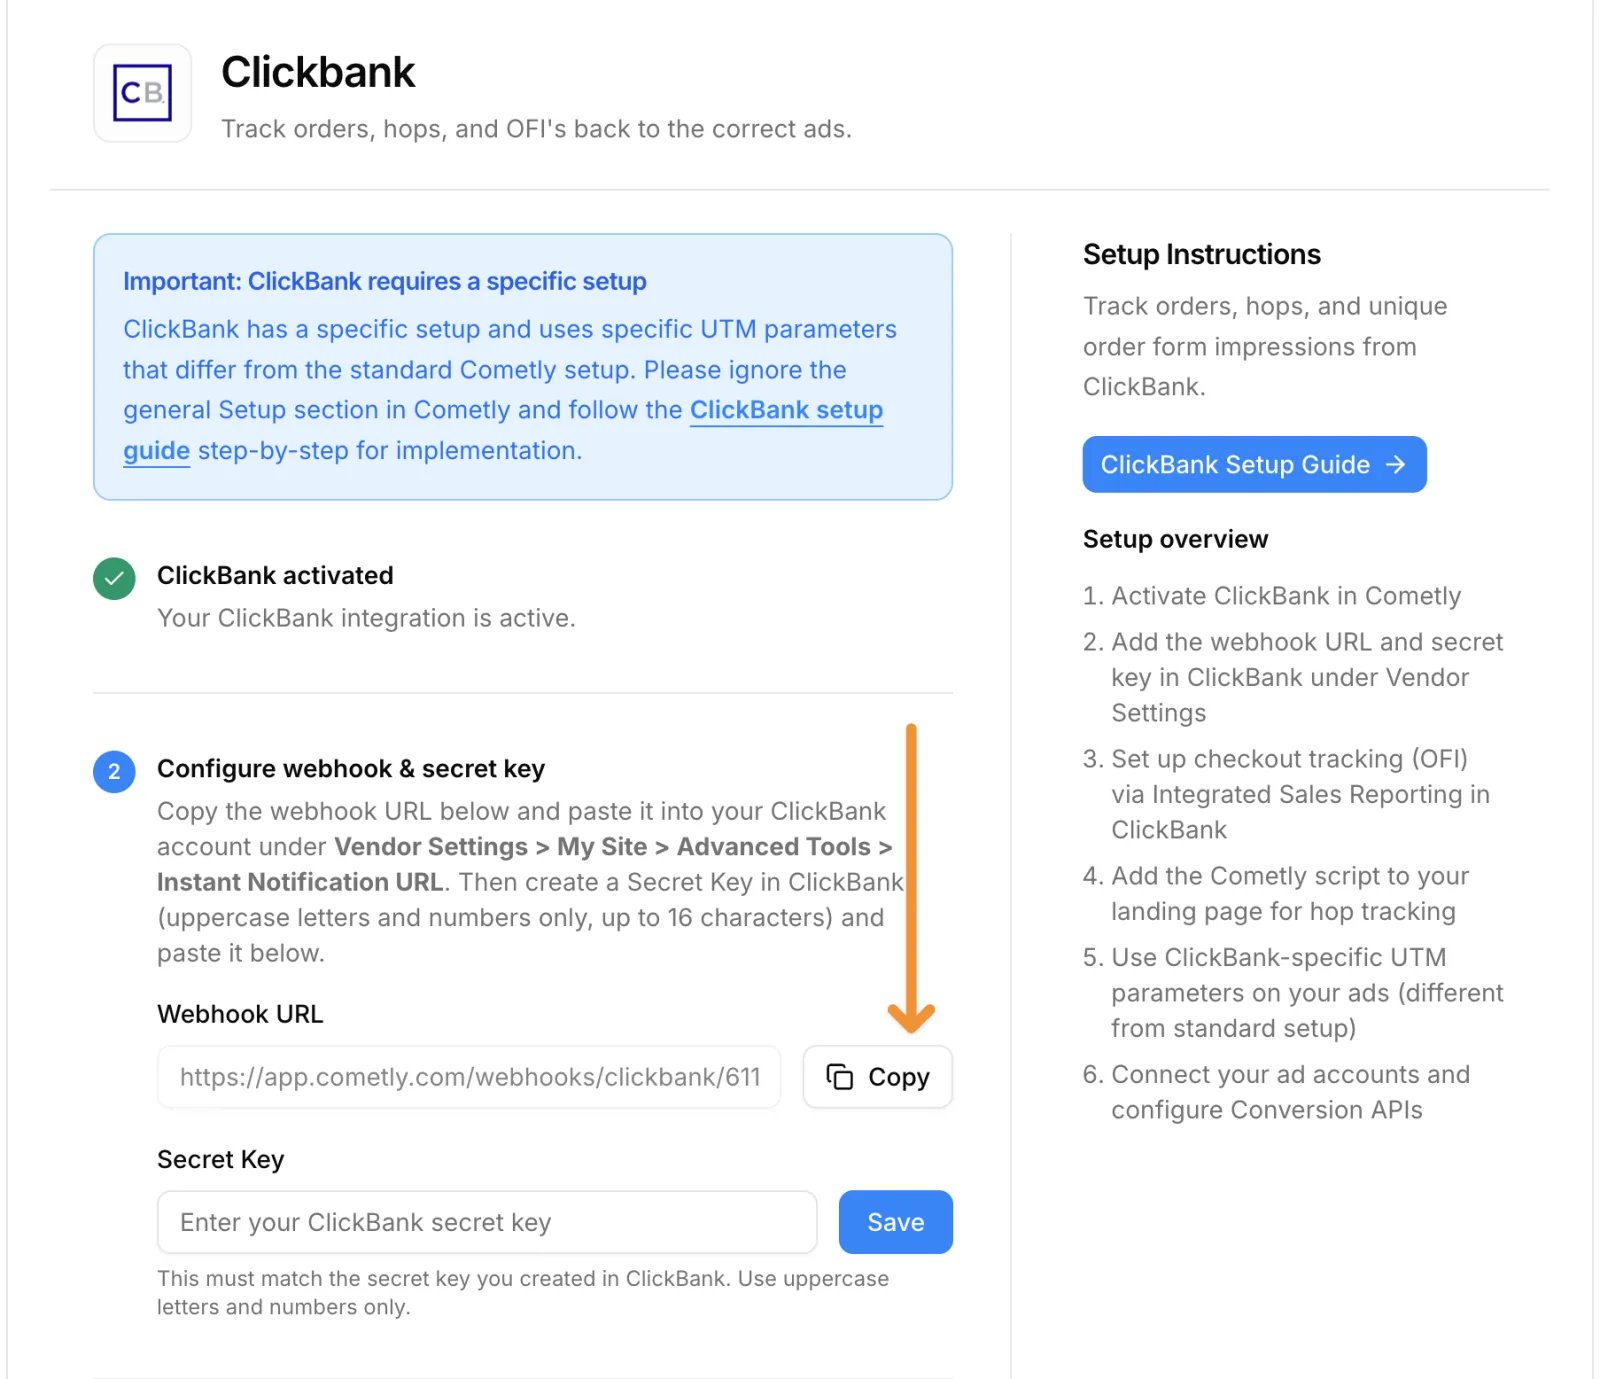
8
Paste the webhook in ClickBank
Paste the webhook into the Instant Notification URL box and click Save Changes.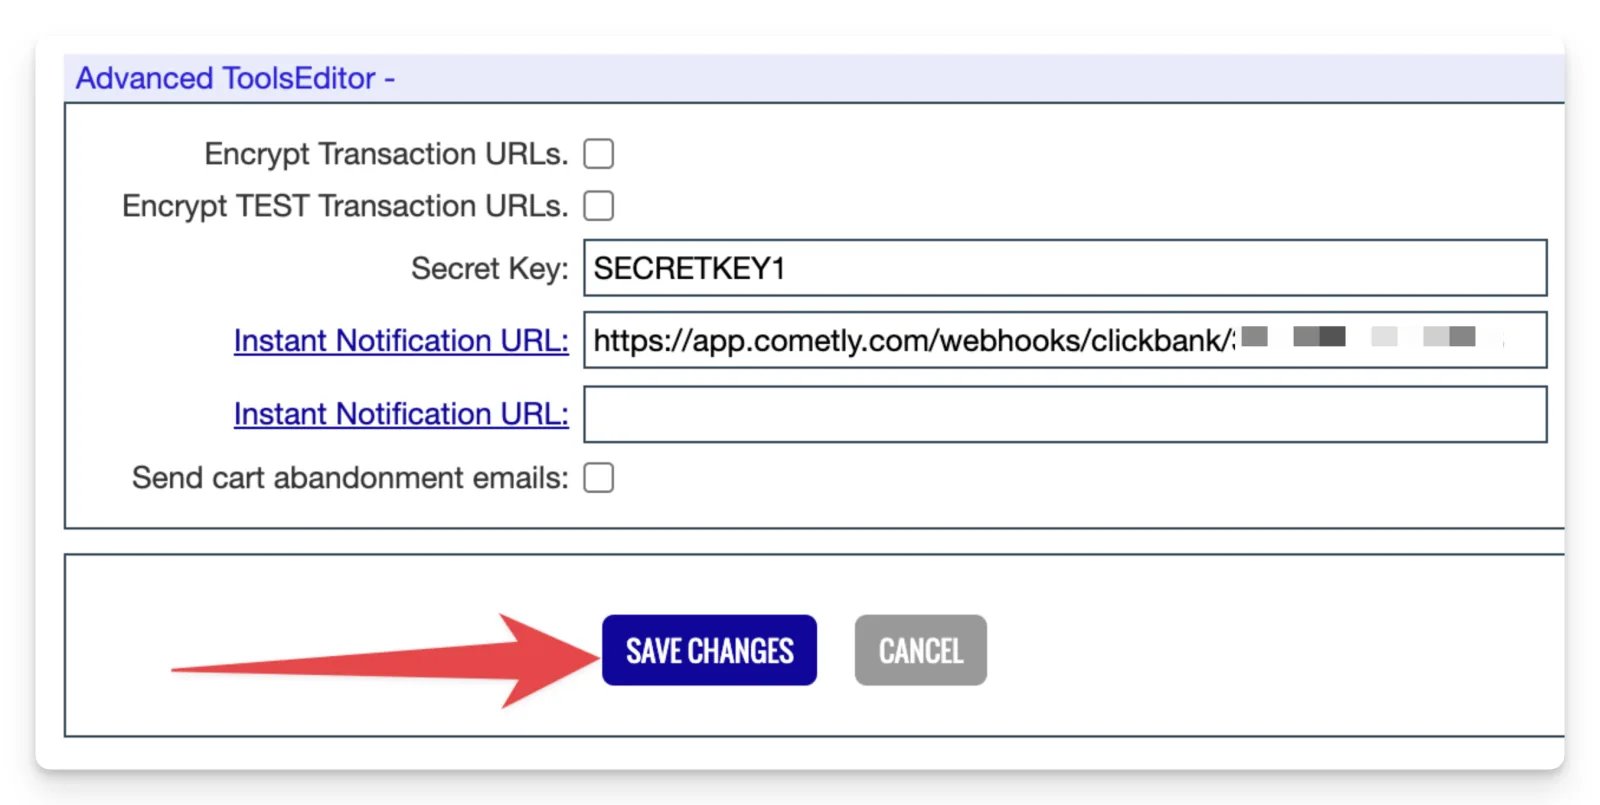
If the Instant Notification URL section says (request access), click the request access link and select Yes for all of the questions. Tick the checkbox to agree to the Terms of Service, then click Save Changes & Request API Access.
9
Test and verify the webhook
After you save, you need to test and verify the webhook. Click Edit again to go back to the webhook setup.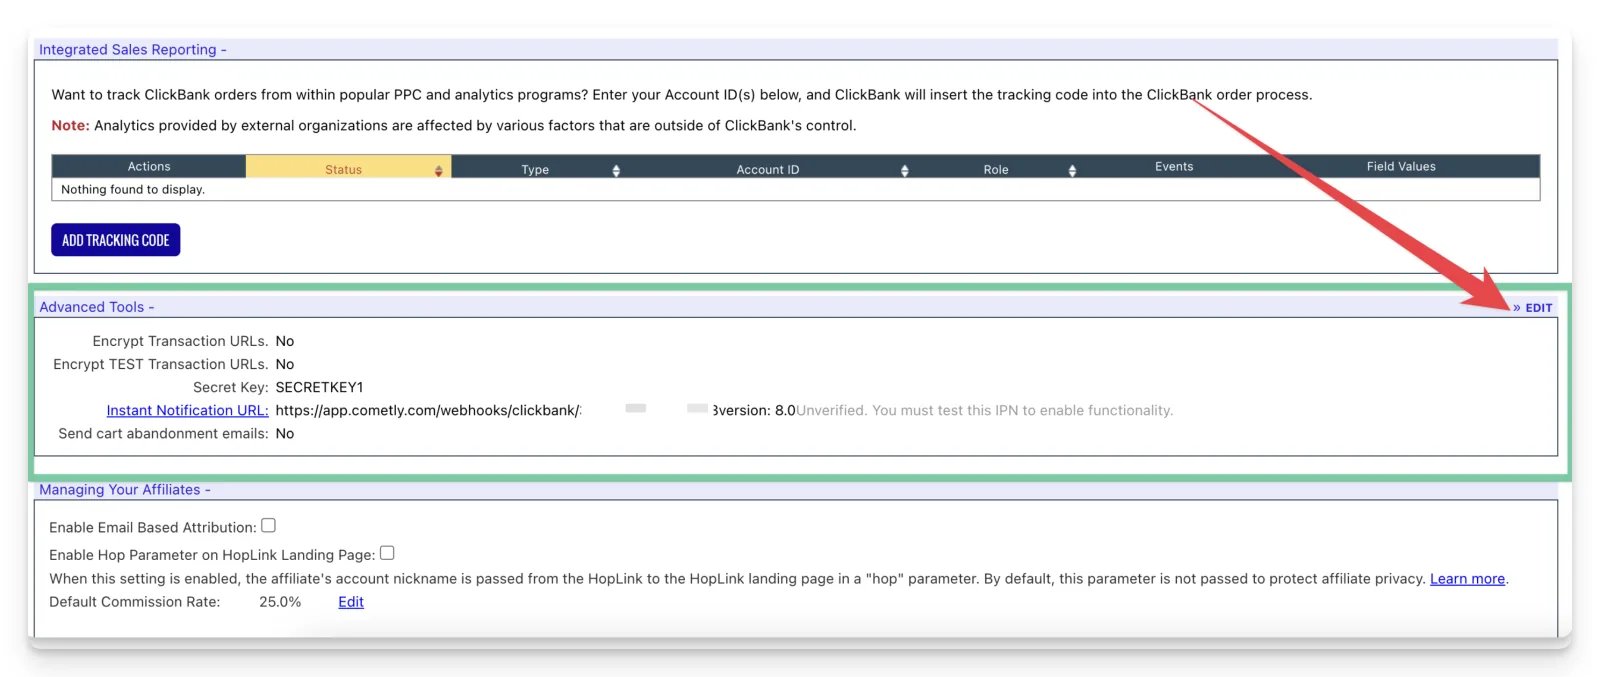
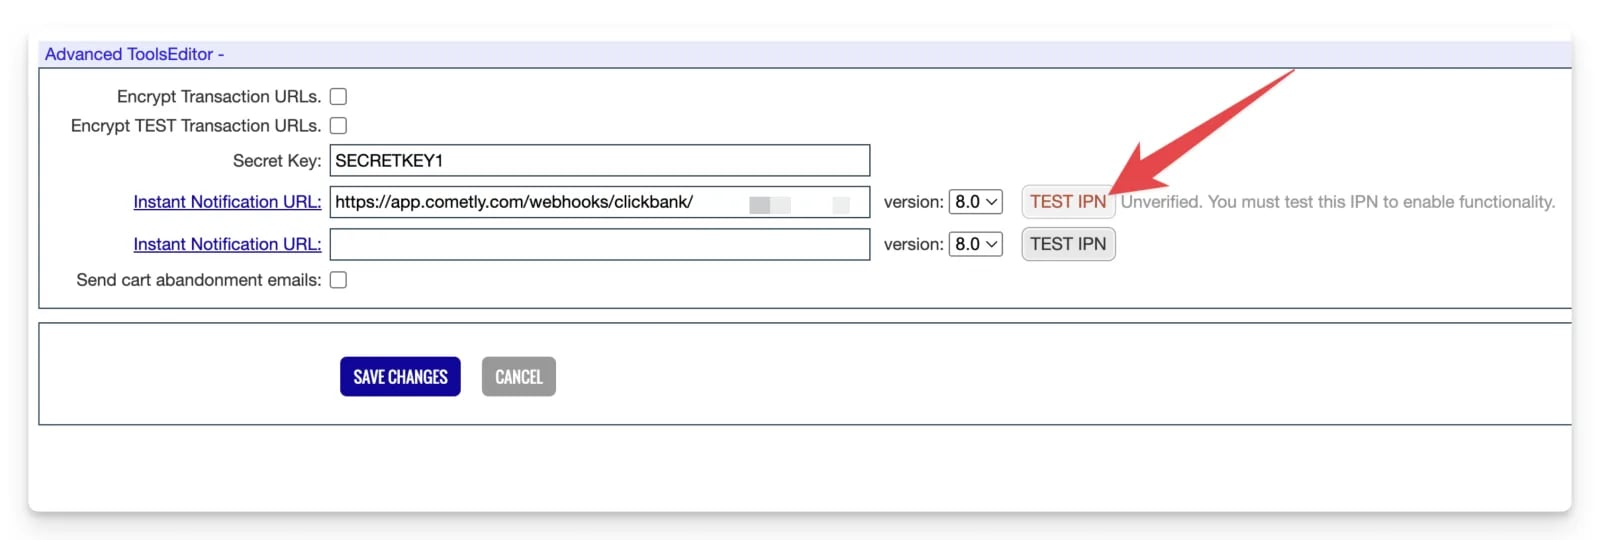
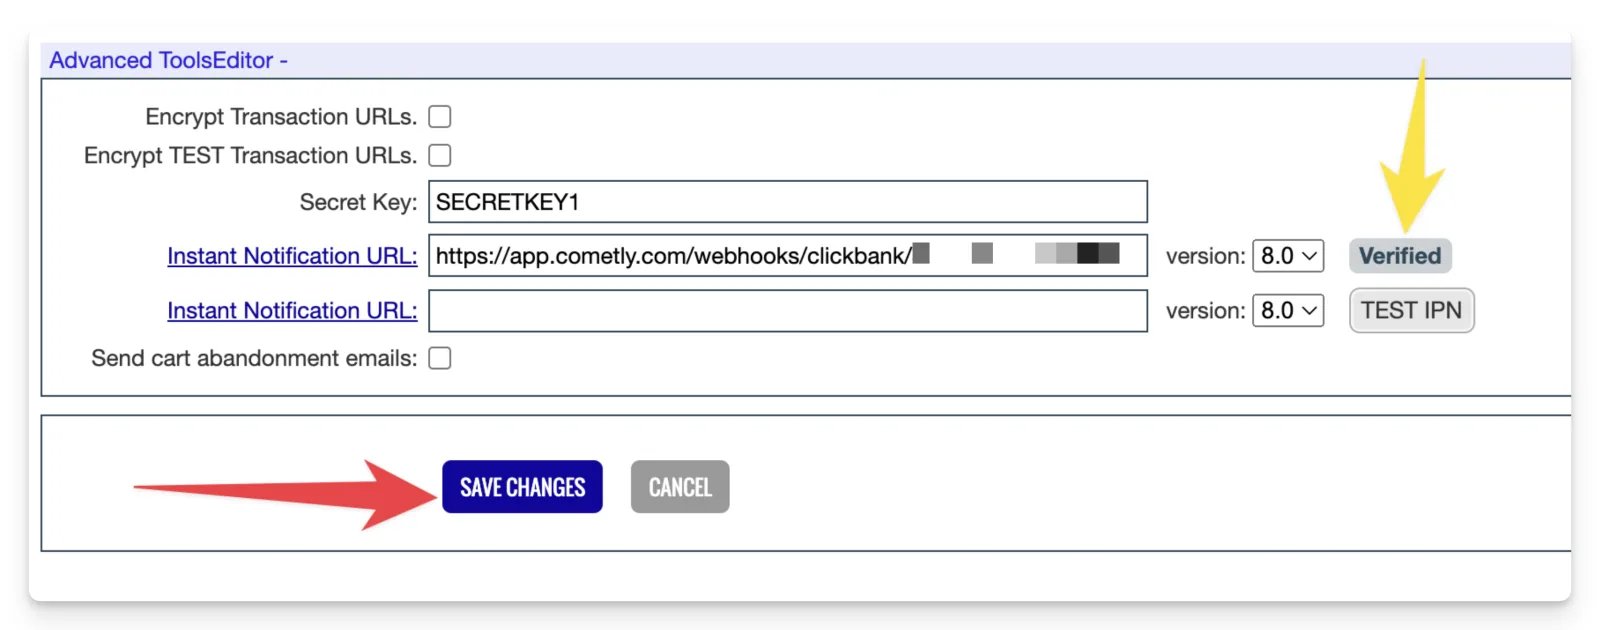
You do not create ClickBank events by hand. Once event data starts flowing from ClickBank, the event and integration appear in the Events Manager automatically. Cometly records a Purchase for ClickBank sale (
SALE) and rebill (BILL) notifications. Other notification types are not recorded, and a rebill that pays your account $0 is ignored.Step 3: Checkout tracking setup
In this step you add a tracking pixel to your ClickBank account. It sends information to Cometly every time a visitor views the checkout page, or “initiates a checkout”. In ClickBank this metric is called “Order Form Impression”. In Cometly it is called “Initiate Checkout”.1
Open My Site in ClickBank again
In your ClickBank account, go to Vendor Settings > My Site.
2
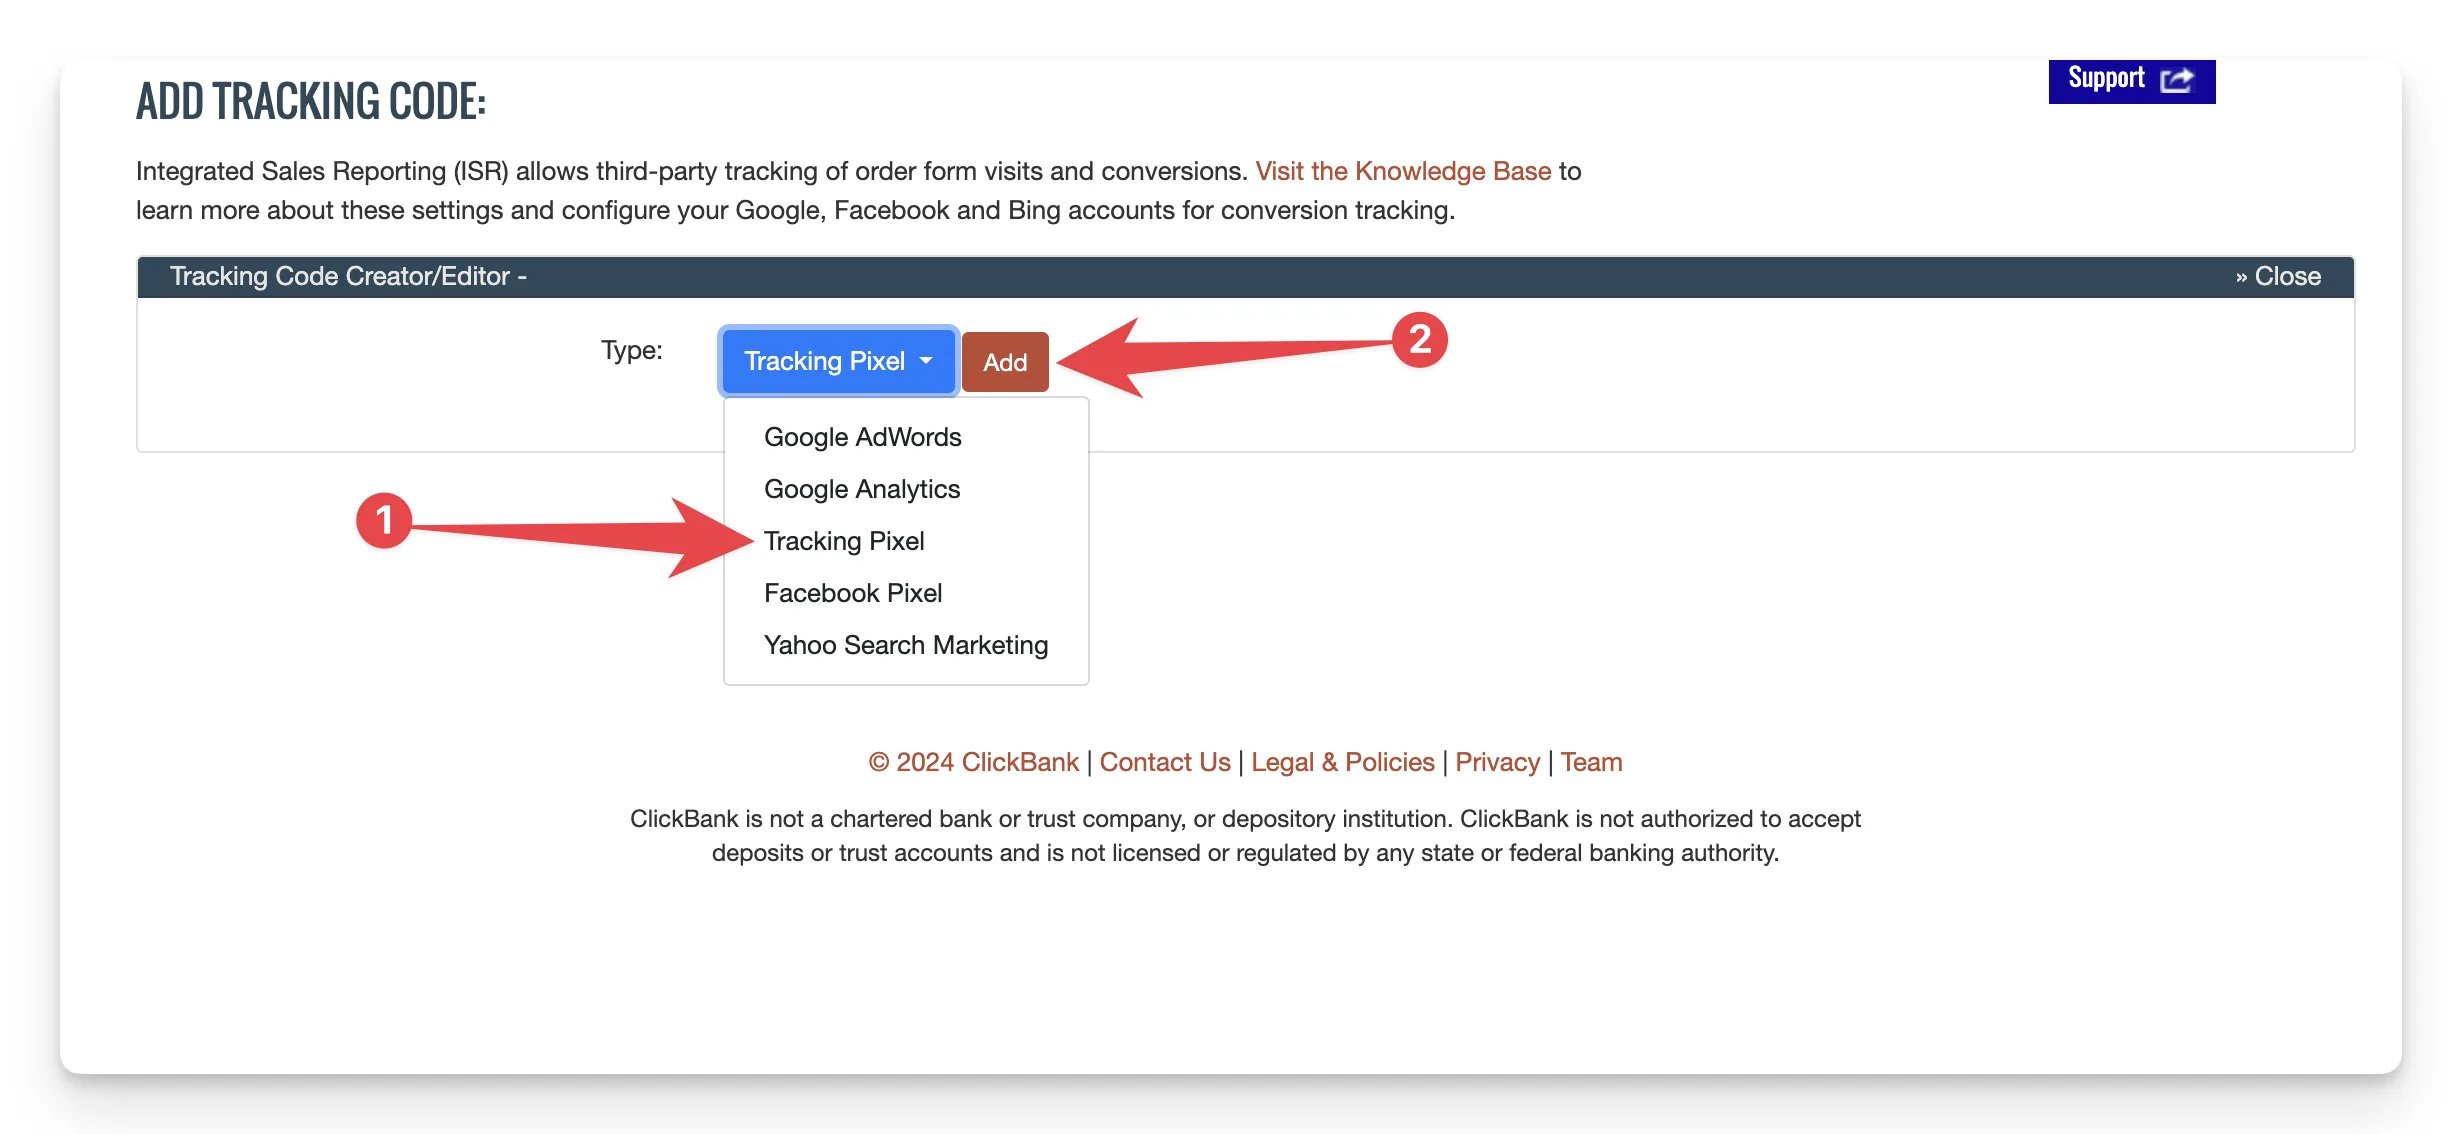
Add a tracking code
Scroll down the My Site page to the Integrated Sales Reporting section and click Add Tracking Code.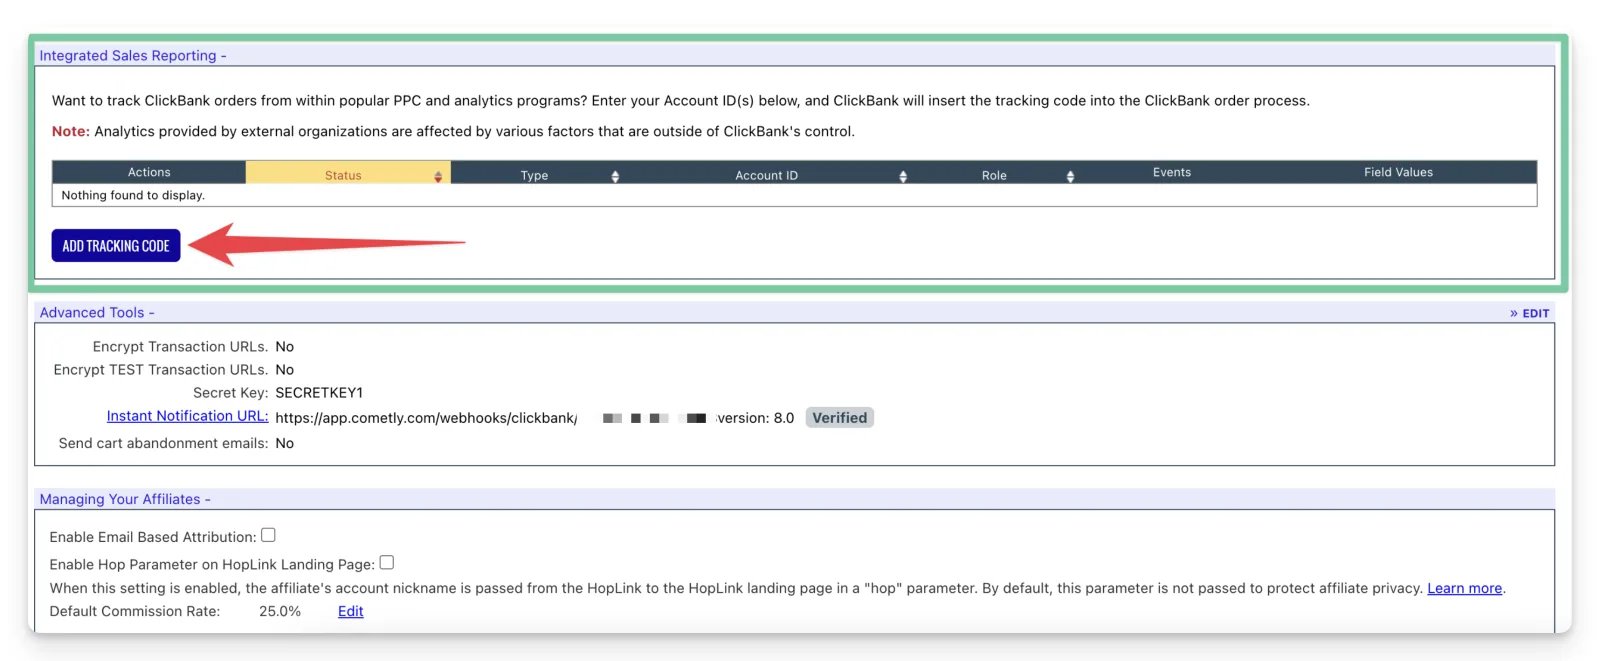
3
Configure the order form tracking
The numbers below match the numbers in the image.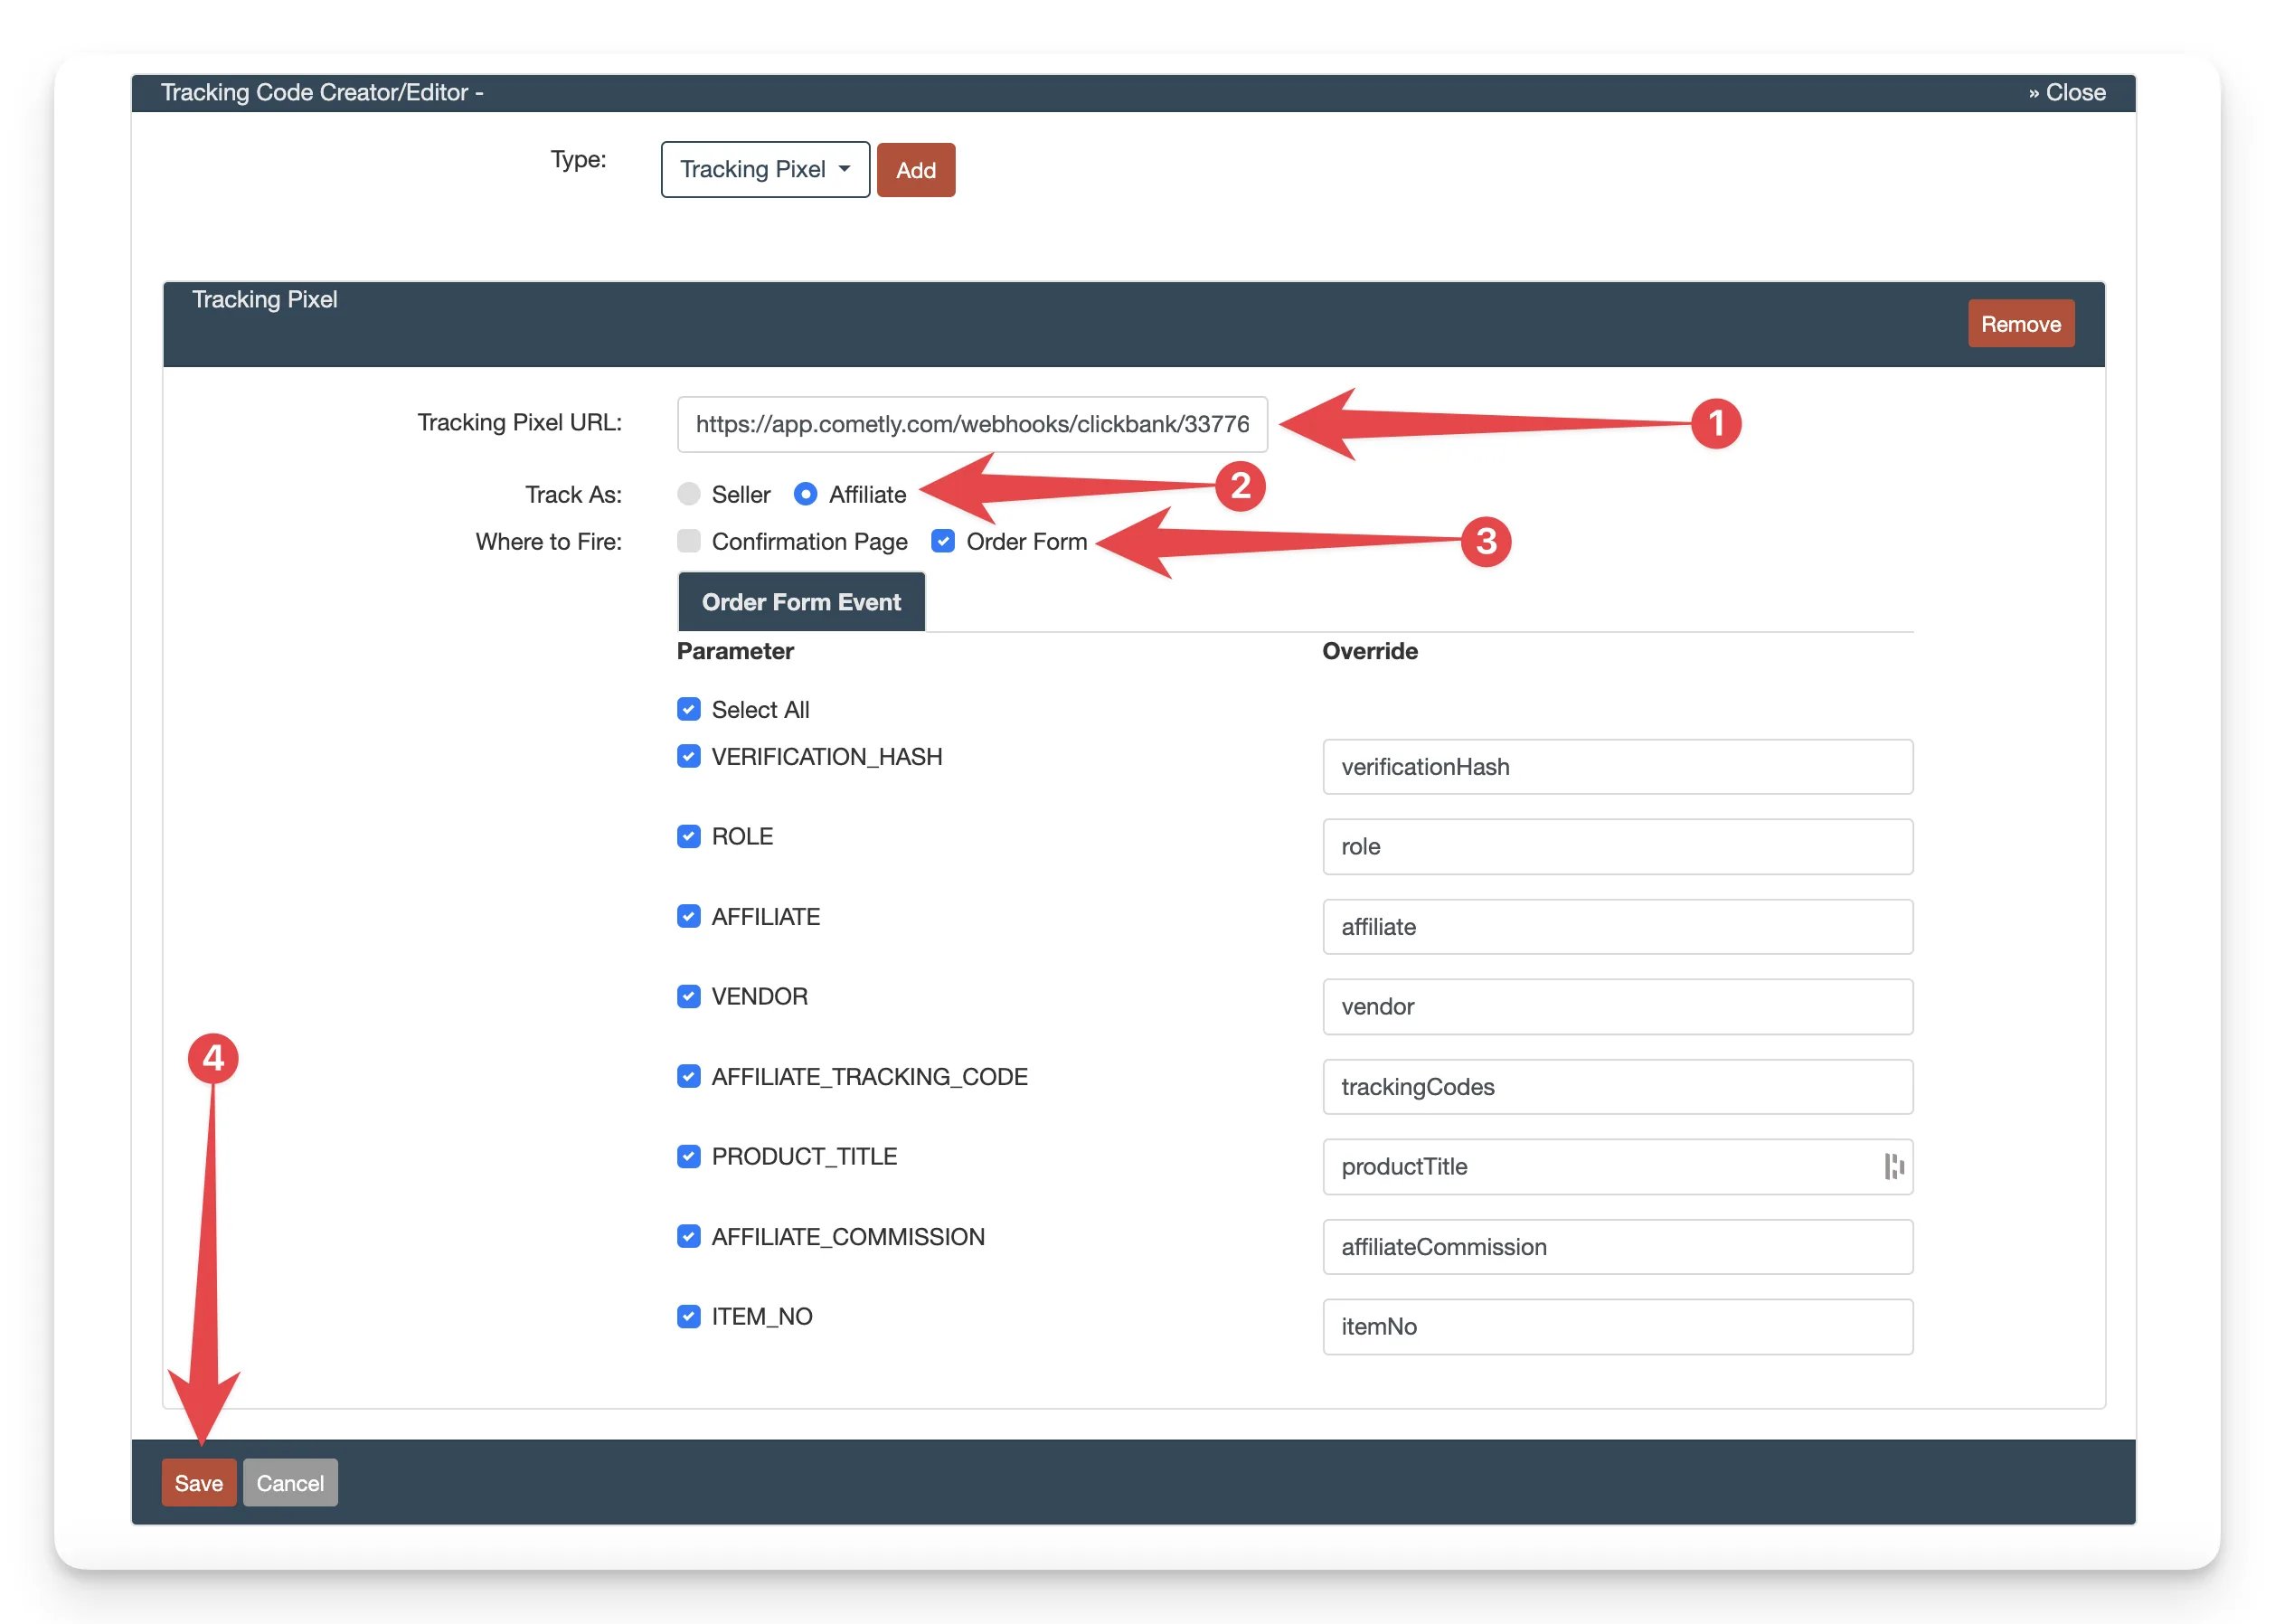
- Go back to the Clickbank integration page in Cometly, copy the webhook URL and paste it into the Tracking Pixel URL box.
- For Track As, choose Affiliate.
- For Where to Fire, choose Order Form.
- Click Save.
4
Activate the tracking code
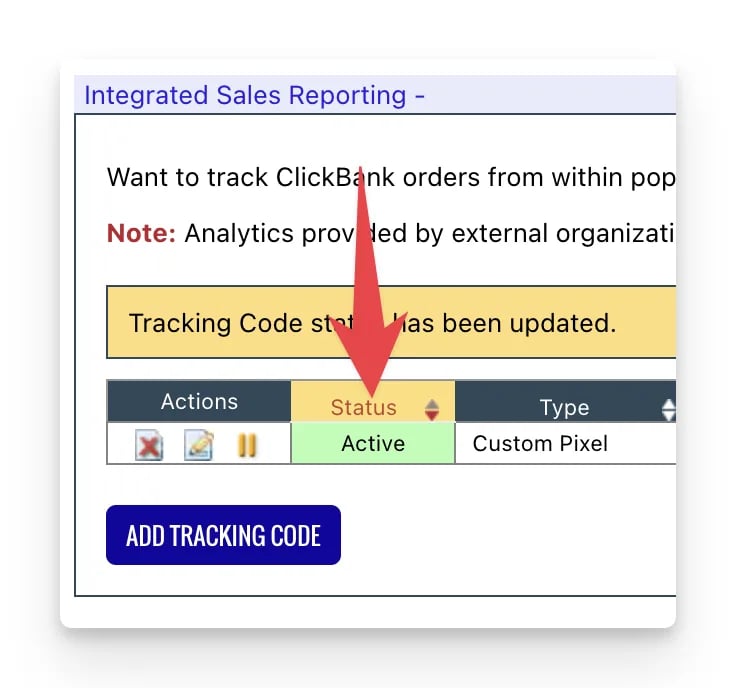
The tracking code you added is inactive by default. To make it active, go back to Integrated Sales Reporting on the My Site page and click the green play button, as shown below.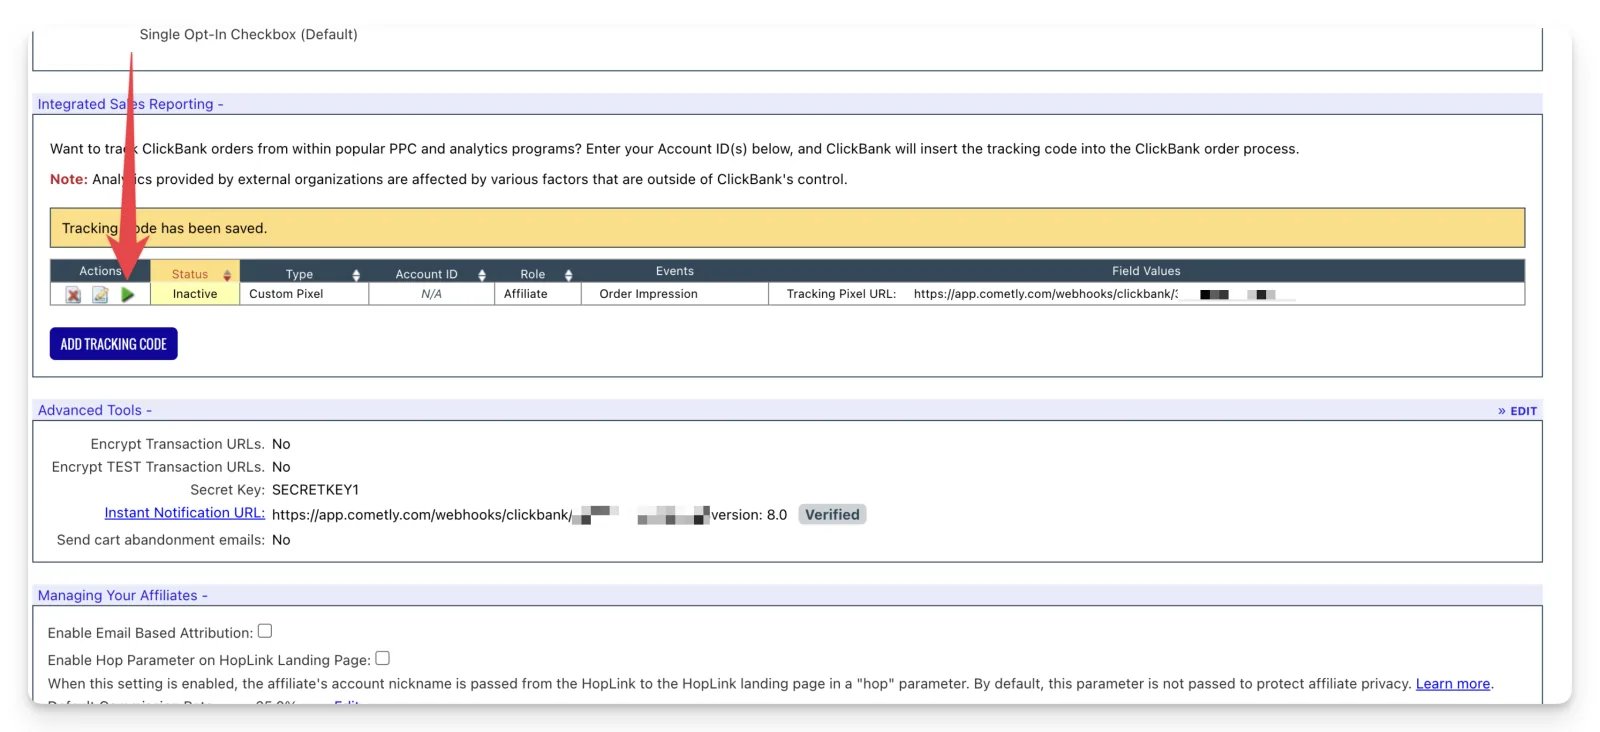
Step 4: Landing page tracking setup
In this step you add scripts to your landing page. It is very important that these scripts are placed properly, so read the instructions carefully. Pick the landing page builder you use. We have specific instructions for:ClickFunnels landing page setup
Add header code Add your Cometly pixel and your Meta pixel to the HEADER CODE section.1
Copy your Cometly pixel
In Cometly, open Setup and go to step 2, Install the Cometly pixel. Under Install the pixel, click Copy Code. See Install the Cometly pixel for details.
2
Open Tracking Code in ClickFunnels
Go to your funnel in ClickFunnels and click Settings > Tracking Code.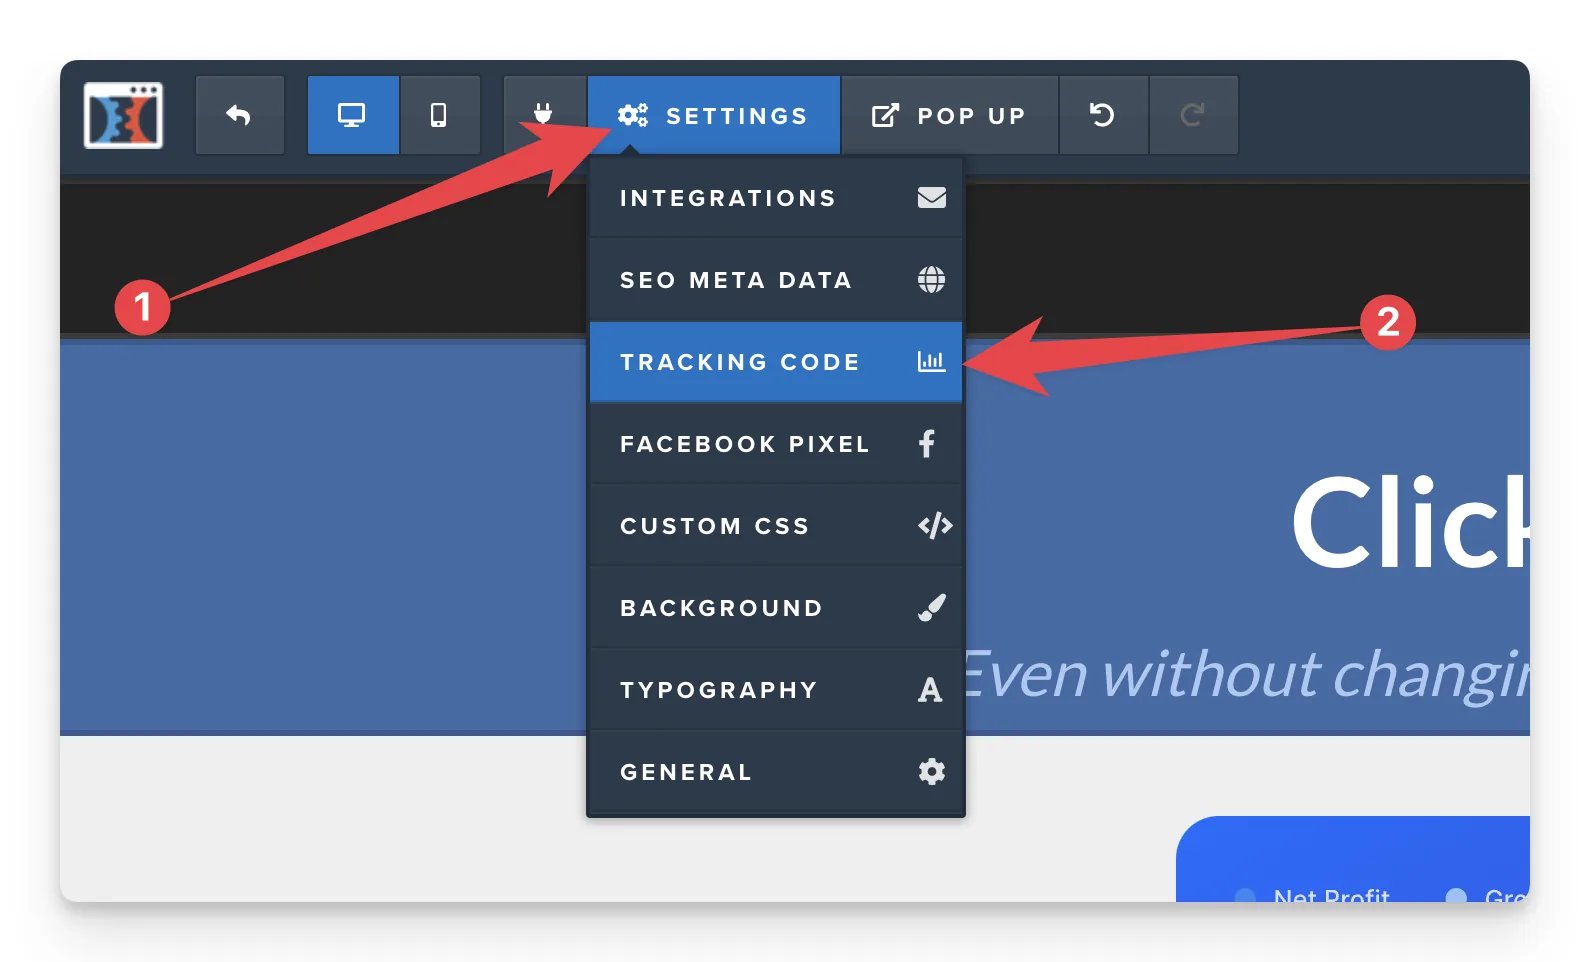
3
Paste the Cometly pixel in the header
Add the Cometly pixel to the
<head> section of your landing page.4
Add your Meta pixel in the header
Add your Meta pixel to the
<head> section of your landing page.1
Open Tracking Code again
Click Settings > Tracking Code.
2
Add the footer script
Click Footer Code and add the code below: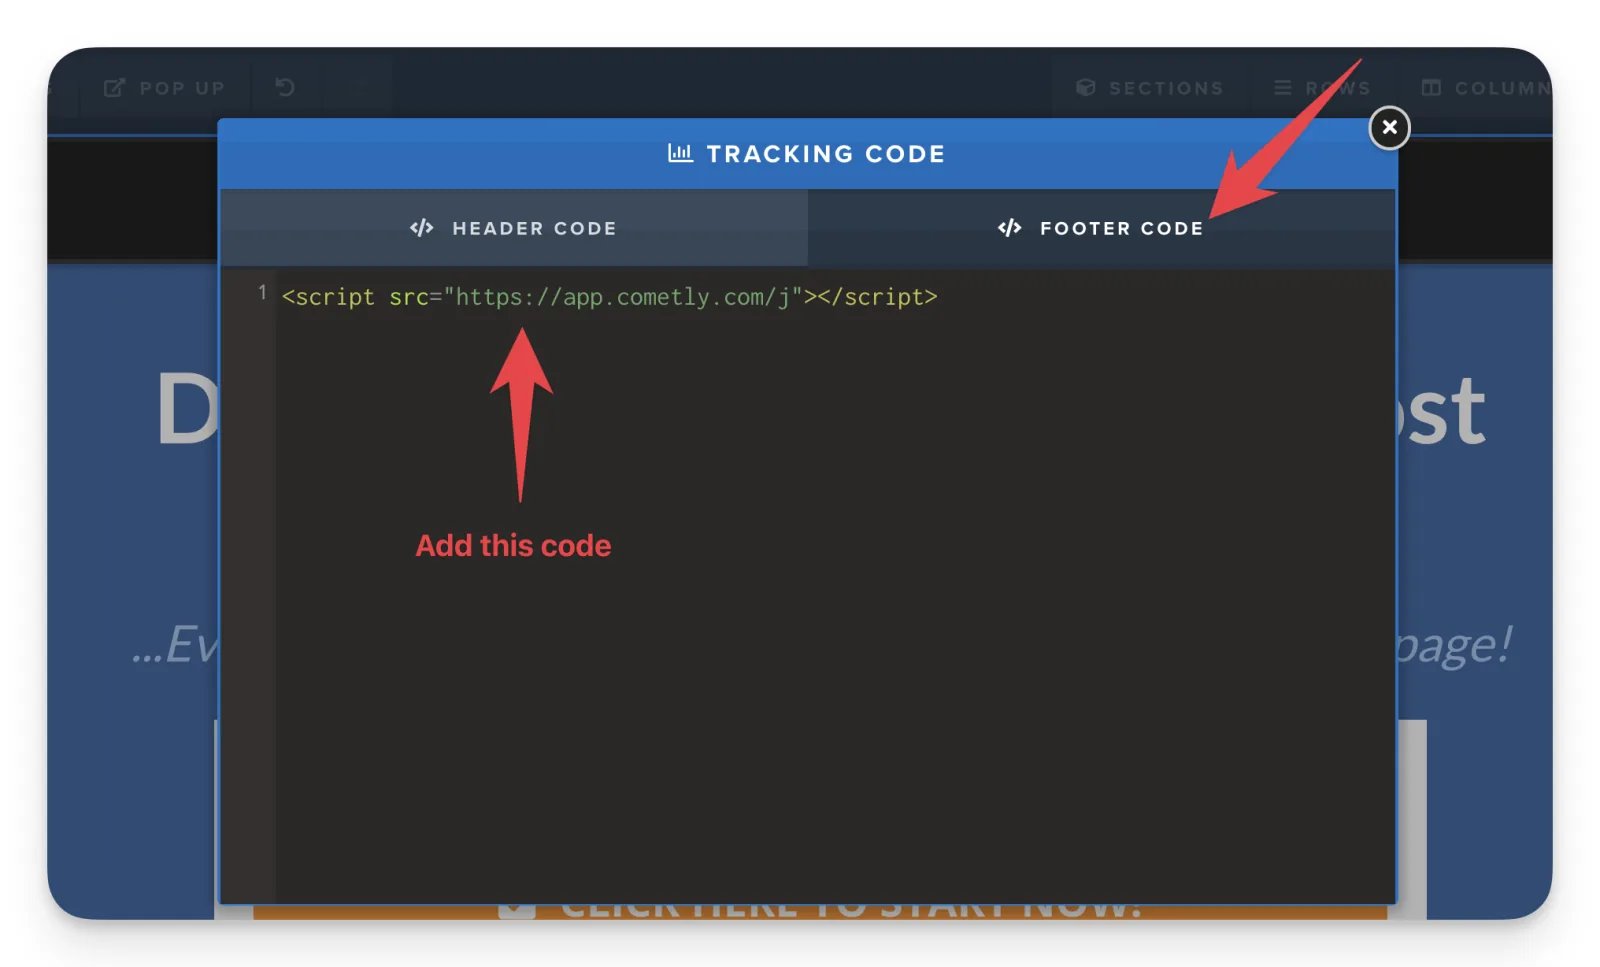
3
Save the page
In the top right of the page editor, click Save.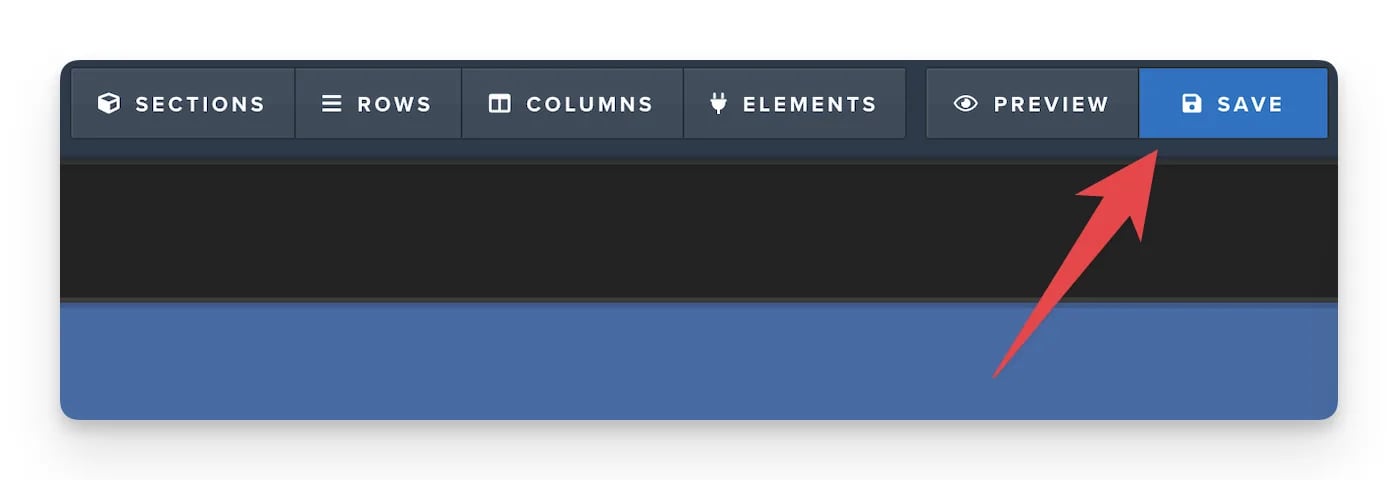
- Check image hyperlinks: Make sure image links in ClickFunnels include the proper UTM parameters.
- Test buttons: Make sure CTA buttons pass tracking codes correctly (they usually work without changes).
- Modify hoplink URLs: If tracking issues persist, try adding
&tid=at the end of your hoplink URL. This can resolve persistent tracking problems in ClickFunnels 2.0.
Test your ClickFunnels landing page
This video shows you how to test your own landing page to make sure the UTM parameters from Facebook pass through your landing page and into the ClickBank checkout (so the ad ID reaches the ClickBank offer):
If your UTM parameters are not passing through to the ClickBank checkout, check the following:
- Your Cometly code is in the footer of your landing page.
- You have no other custom scripts on your landing page.
- Depending on your offer you may have to use a different UTM parameter. Instead of ?utm_campaign= try ?tid=.
- You have an encrypted hoplink on your landing page with no extra parameters added to it. Use the exact encrypted hoplink that ClickBank provides.
Hero AI landing page setup
These instructions set up ClickBank tracking for all landing pages in a Hero AI site group. Any landing page you build in that site group gets the codes automatically.1
Add your Meta pixel
Go to Pixel Code and add your Meta pixel.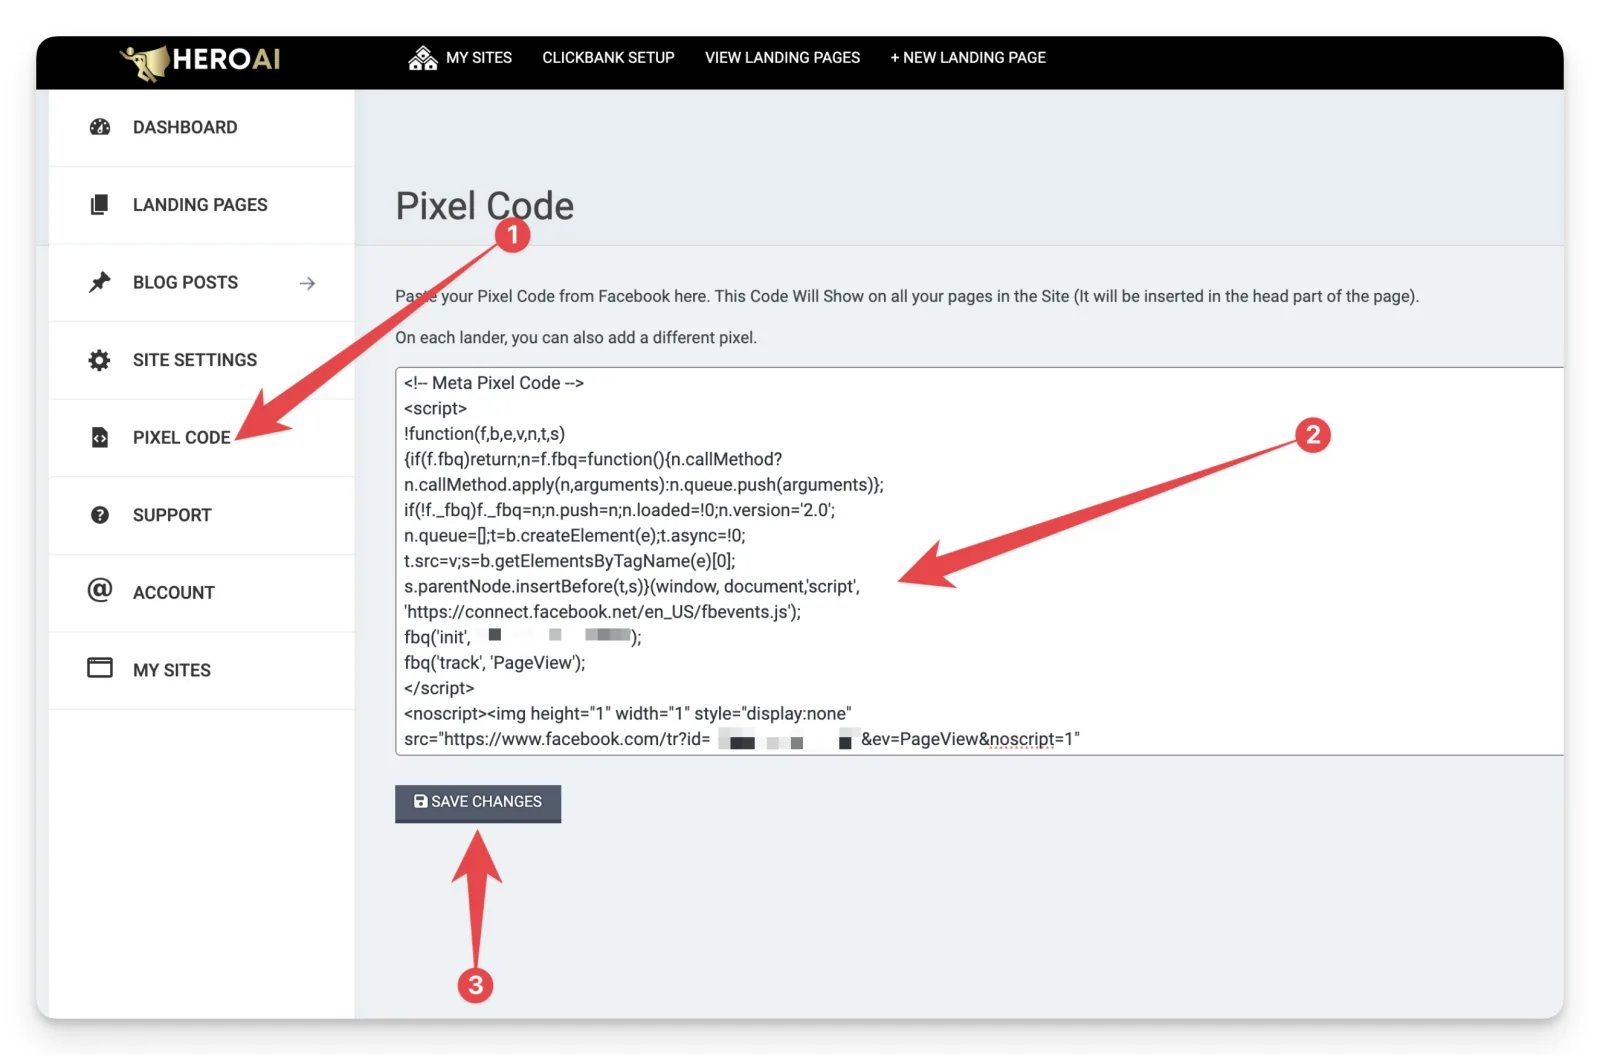
2
Add the header code
In Cometly, open Setup and go to step 2, Install the Cometly pixel. Under Install the pixel, click Copy Code.In Hero AI, click Site Settings and paste the Cometly pixel into Header Code.
3
Add the footer code
In Footer Code, add the code below:Click Save Changes.
Test your Hero AI landing page
This video shows you how to test your own landing page to make sure the UTM parameters from Facebook pass through your landing page and into the ClickBank checkout (so the ad ID reaches the ClickBank offer):
If your UTM parameters are not passing through to the ClickBank checkout, check the following:
- Your Cometly code is in the footer of your landing page.
- You have no other custom scripts on your landing page.
- Depending on your offer you may have to use a different UTM parameter. Instead of ?utm_campaign= try ?tid=.
- You have an encrypted hoplink on your landing page with no extra parameters added to it. Use the exact encrypted hoplink that ClickBank provides.
Step 5: Set up UTM parameters on your ads
- Meta Ads parameters for ClickBank
- Google Ads parameters for ClickBank
- TikTok Ads parameters for ClickBank
Setup UTM parameters on your Meta ads for ClickBank
The following UTM parameter is required on every Meta ad that you want to track with Cometly: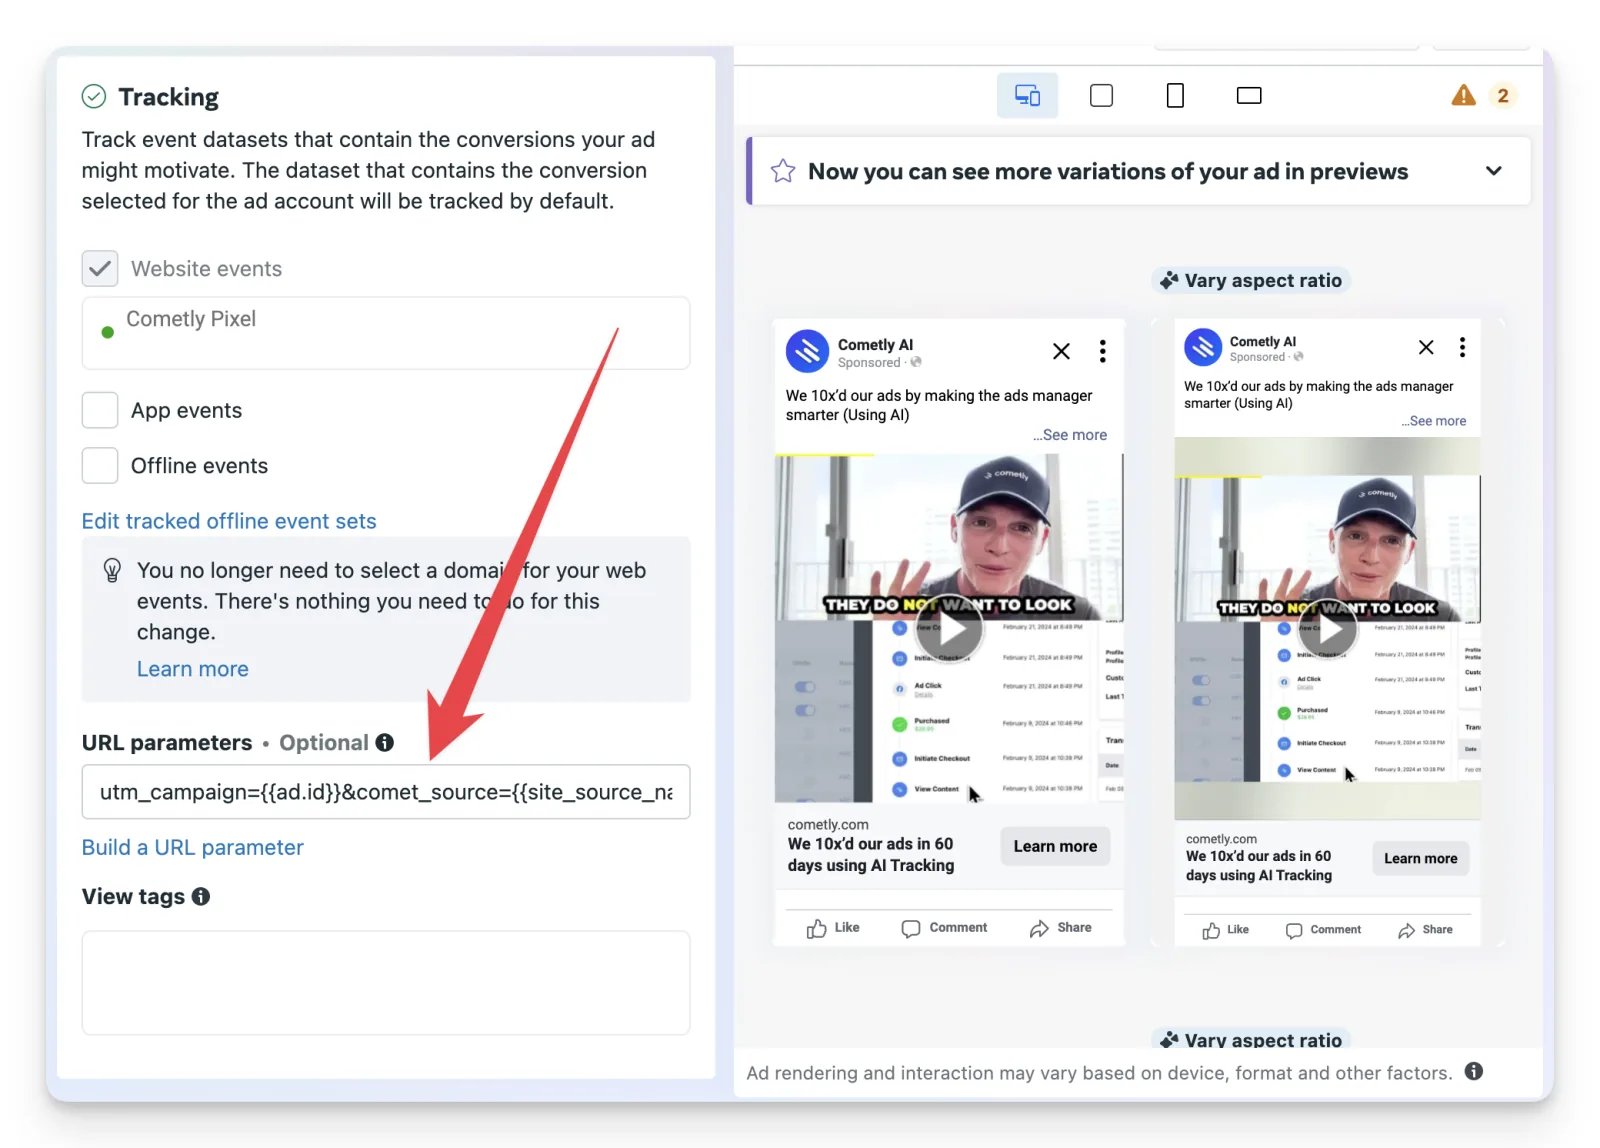
Set up Google Ads parameters for ClickBank
To track ClickBank data from your Google Ads, Cometly needs the following tracking template in the Tracking template field of each of your Google campaigns:
Set up TikTok Ads parameters for ClickBank
Cometly needs the following UTM parameters added to the end of the Website URL of each of your TikTok ads:
Step 6: Connect ad accounts
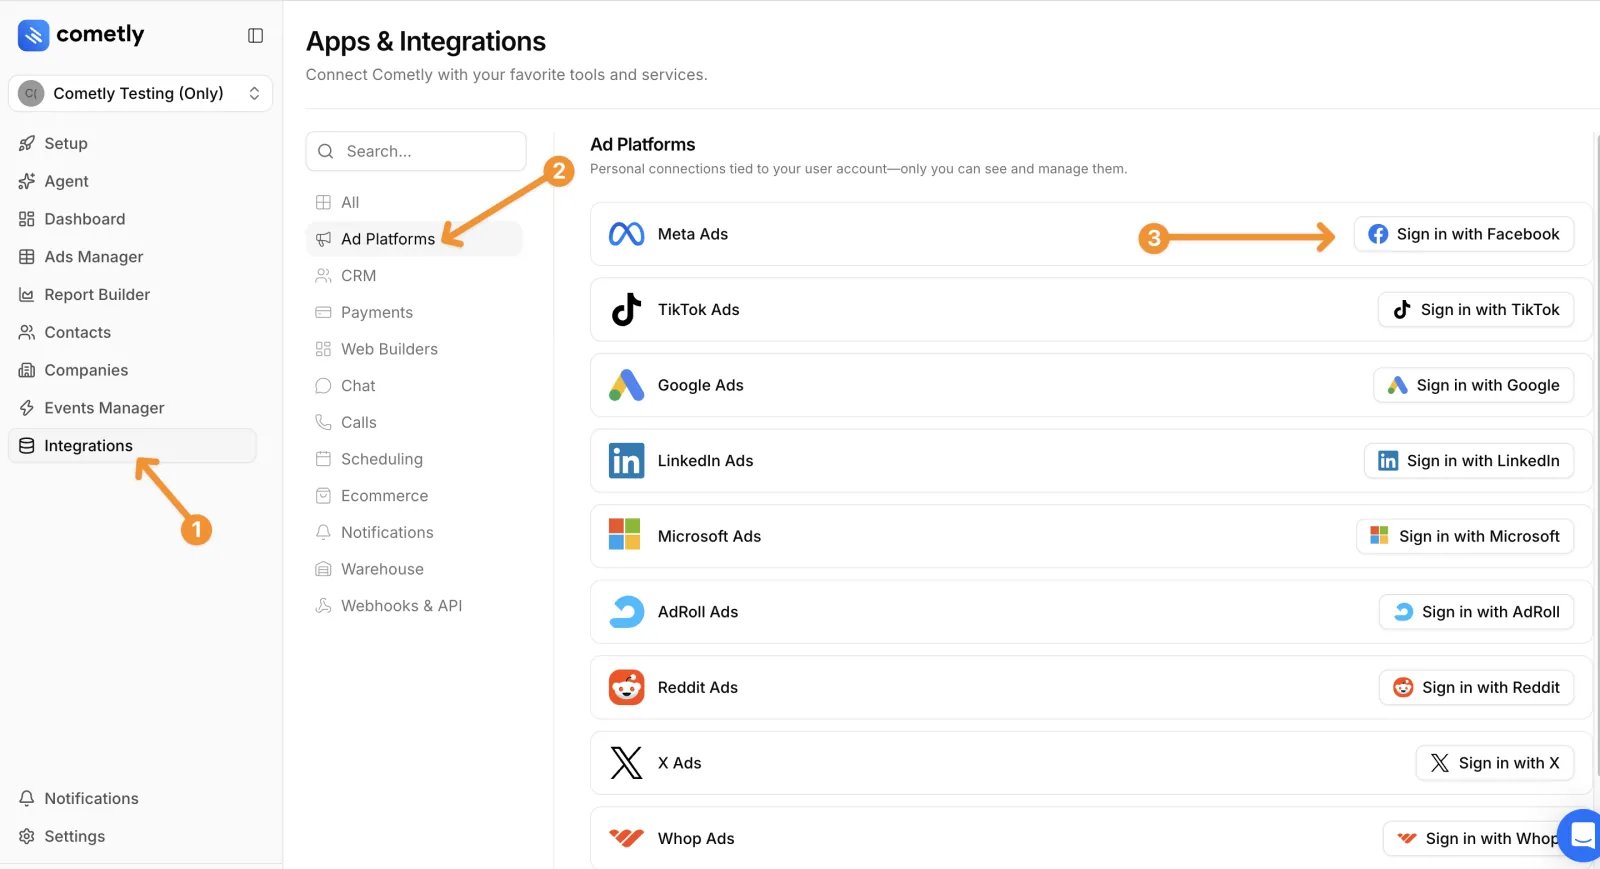
Connect your profile
Connecting your own profile lets Cometly see the ad accounts you have permission to use. Once your profile is connected, you can connect those ad accounts to your space for tracking and reporting. For the full walkthrough, see Connect ad platforms and ad accounts.- In the left sidebar, click Integrations.
- In the Ad Platforms section, find the row of the ad platform you want to connect (for example Meta Ads, Google Ads or TikTok Ads).
- Click the sign-in button on that row (for example Sign in with Facebook for Meta Ads) and follow the prompts.
Connect ad accounts to your space
After you connect your profile, expand the platform’s row to see the ad accounts you have access to. Profile connections are personal: they are tied to your user account, so only you can see and manage them. Click Connect & Sync Data next to the ad account you want to add to the space. Once connected, the ad account appears in the connected ad accounts card for that platform (for example Connected Meta Ad Accounts), where everyone in the space can see it.What to expect after you connect ad accounts
- After you connect an ad account, it takes up to 60 minutes for data to refresh and appear in Cometly.
- During this time, active campaigns won’t show in the Cometly Ads Manager. Once the data refreshes within the 60-minute window, all active campaigns appear automatically.
- Ad and event conversion data starts showing from the moment tracking is enabled. Past data cannot be retrieved retroactively.
Step 7: Configure Conversion APIs to send data to ad platforms
Set up the Facebook Conversion API on ClickBank
The video below walks you step by step through setting up the Facebook Conversion API inside your ClickBank account.Set up the Google Conversion API on ClickBank
The video below explains step by step how to set up the Google Conversions API inside your ClickBank account:Check it worked
On the Clickbank integration page in Cometly you see ClickBank activated, and in ClickBank the Instant Notification URL shows as verified. Once ClickBank data starts flowing, the ClickBank event and integration appear in the Events Manager on their own, and your Purchase, Initiate Checkout and View Content numbers show against your ads in the Ads Manager. Allow up to 60 minutes after you connect an ad account for your campaigns to appear.Troubleshooting the ClickBank integration
These are the common issues our support team sees when Cometly users set up the ClickBank integration.Missing ClickBank purchases in Cometly
If you had a sale in the past few days and it is not showing in Cometly, use the troubleshooting guide below to check that everything is set up properly. Learn how to troubleshoot missing ClickBank purchases in CometlyMy active ad campaigns are not showing in Cometly
After you connect an ad account, it takes up to 60 minutes for data to refresh and appear in Cometly. During this time, active campaigns won’t show in the Cometly Ads Manager. Once the data refreshes within the 60-minute window, all active campaigns appear automatically. Ad and event conversion data starts showing from the moment tracking is enabled.Red dots next to campaigns, ad sets and ads
If you see red dots next to your campaigns after the first data refresh (the tooltip reads “UTM Setup Error”), there is likely an issue with the UTM parameters on your ads. The ClickBank integration needs specific UTM parameters that differ from the ones listed in Cometly’s Setup. Use the parameters in this article:- Meta UTM parameters for ClickBank
- Google UTM parameters for ClickBank
- TikTok UTM parameters for ClickBank
View Content and LP CTR % metrics are not showing
If you use the ClickBank integration and the View Content (hops) metric or the LP CTR % (landing page click-through rate) is not displaying, the cause is likely the View Content tracking, because LP CTR % is calculated from the total number of View Content events. Fix View Content and LP CTR % metric not showingData in Cometly does not match Facebook
If the data in Cometly doesn’t match what you see in Facebook Ads Manager for ClickBank campaigns, the cause is likely a timezone difference. Learn why data in Cometly does not match FacebookData in Cometly does not match ClickBank
If you notice differences between your ClickBank data and your Cometly data, the cause is likely a timezone difference, because ClickBank data defaults to the Pacific timezone. Learn why data in Cometly does not match ClickBankClickBank TID not passing from landing page to offer
If your ClickBank TID is not passing from your landing page to your offer, you may not have placed the Cometly ClickBank script on your landing page. For the fix and other troubleshooting steps, see the article below. Fix ClickBank TID not passing from landing page to offerImage links or buttons in ClickFunnels not passing tracking codes
If you use ClickFunnels and find that image links or buttons don’t pass tracking codes properly, try these solutions:- Update your UTM parameters: Check that the UTM parameters in your tracking links match the format in Step 5 of this guide.
- Check image hyperlinks: Update the hyperlink settings for images to include the proper UTM parameters.
- Test buttons: Check that CTA buttons pass tracking codes correctly.
- Modify hoplink URLs: For persistent tracking issues in ClickFunnels 2.0, try adding
&tid=at the end of your hoplink URL.
Frequently asked questions
Does Cometly track ClickBank rebills and upsells?
Yes. Cometly records a Purchase for each ClickBank sale and each paid rebill, and a purchase that includes an upsell item also counts toward Upsell Purchase and Upsell Revenue. A rebill that pays your account $0 is ignored.Why does a ClickBank sale show in Cometly but not against an ad?
The sale reached Cometly without a TID (the tracking ID that carries the ad ID from your landing page to the ClickBank order). Cometly still saves the sale, but it cannot attribute it to an ad. Check the UTM parameters on your ads and the footer script on your landing page.How do I see what ClickBank sent to Cometly?
Go to Events Manager > Events Log. It lists the data Cometly received, so you can confirm whether a sale arrived. See Use the Events Log.Next steps
- Configure your Ads Manager to show ClickBank metrics
- Connect ad platforms and ad accounts
- Troubleshoot missing ClickBank purchases
- Fix a ClickBank TID that does not pass to your offer
- Use the Events Log to see what Cometly received