

What you can do with Cometly webhooks
- Send event data from any app. Connect apps that have no native Cometly integration.
- Track the events that matter. Choose specific events such as form submissions, purchases or lead updates.
- Map data to Cometly fields. Match your app’s data fields (for example email and event time) to Cometly’s fields for accurate reporting.
- Filter out unnecessary data. Use filters so that only relevant events are processed.
Send event data with a webhook
1
Start a new event
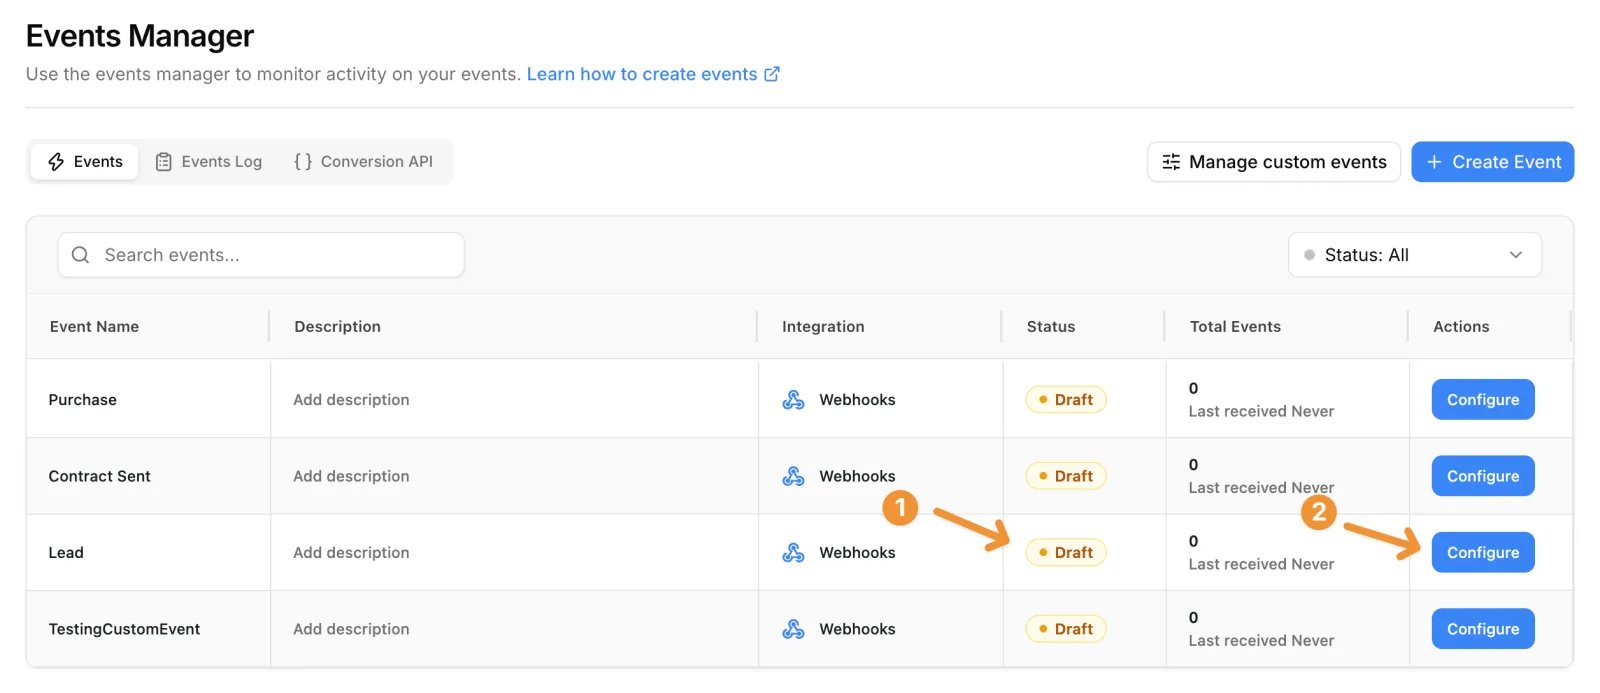
Go to Events Manager and click Create Event. You can also start from Setup, in the step Create conversion events, or from the Webhooks card on the Integrations page, which opens Events Manager.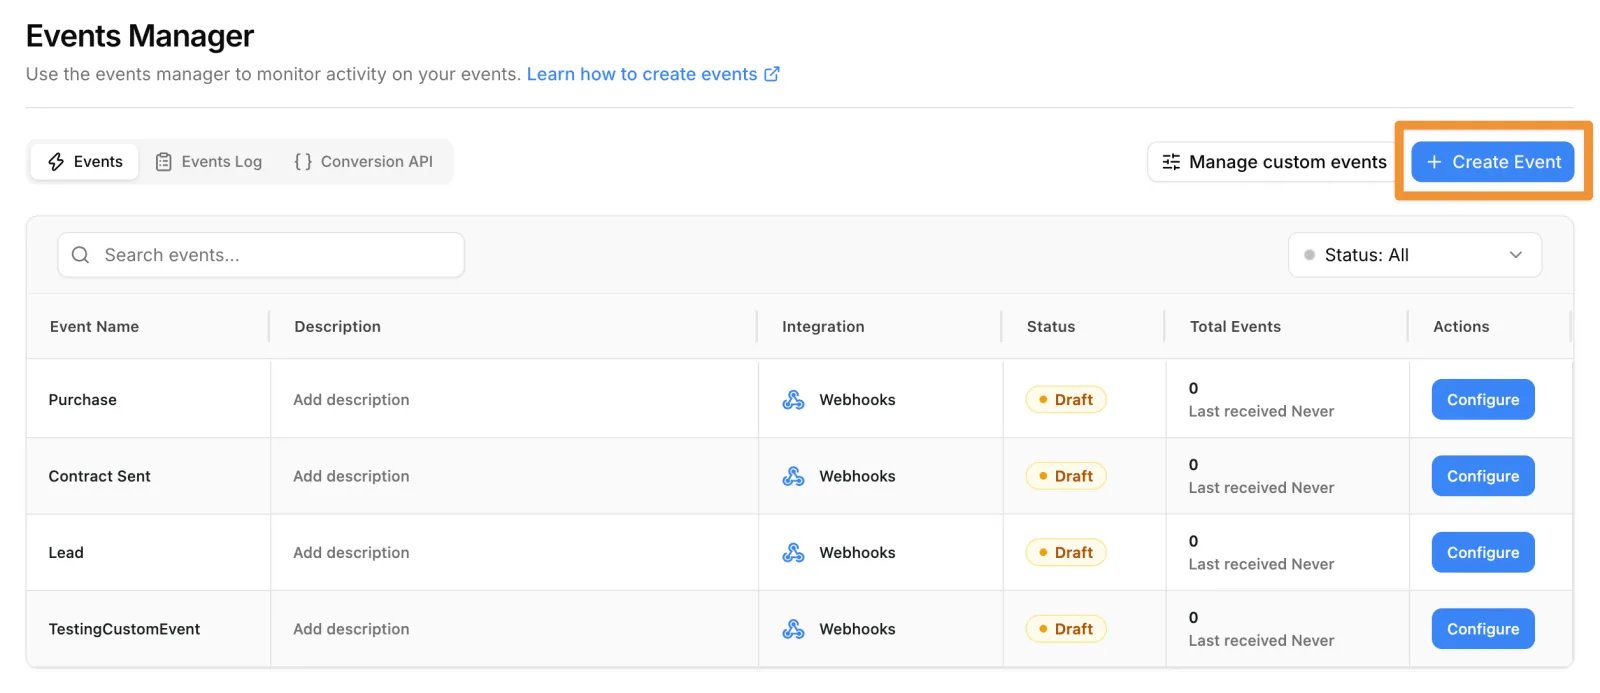
2
Choose Webhooks
Under App / Integration, choose Webhooks. If you can’t find it, click Select Webhooks next to “Don’t see your integration?”.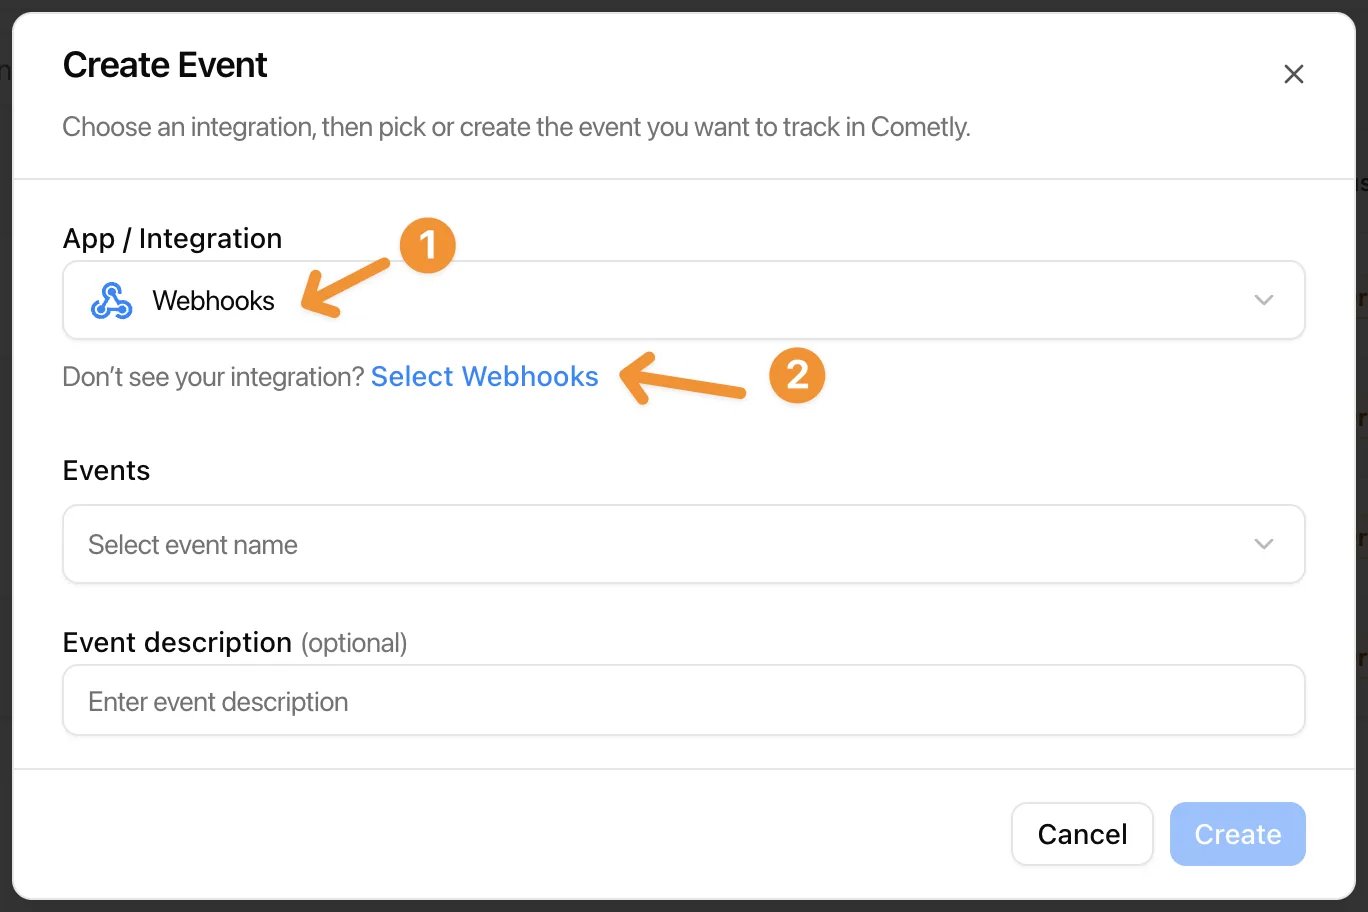
3
Pick or create the event
Under Events, choose a standard event (for example Lead or Purchase) or click Create New Event to make a custom one. Add an optional description, then click Create (Create Event when you start from Setup).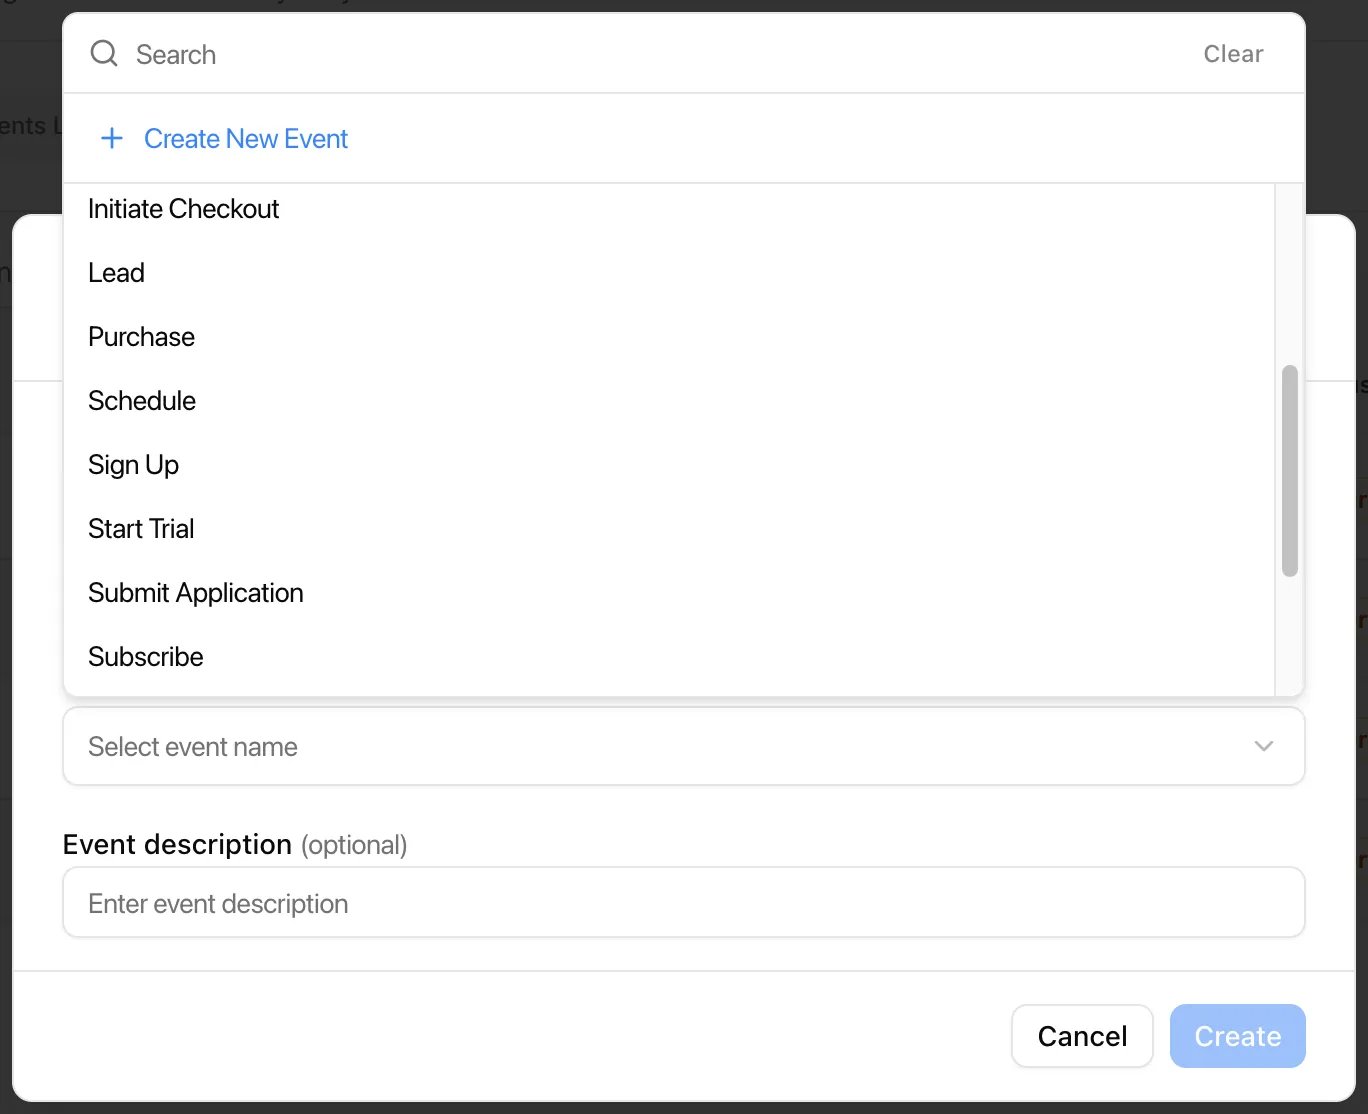
4
Copy the webhook URL into your app
The Send Event Data page opens on the Receive Data step with your webhook URL. You can place this URL in any app or integration to send event data to Cometly.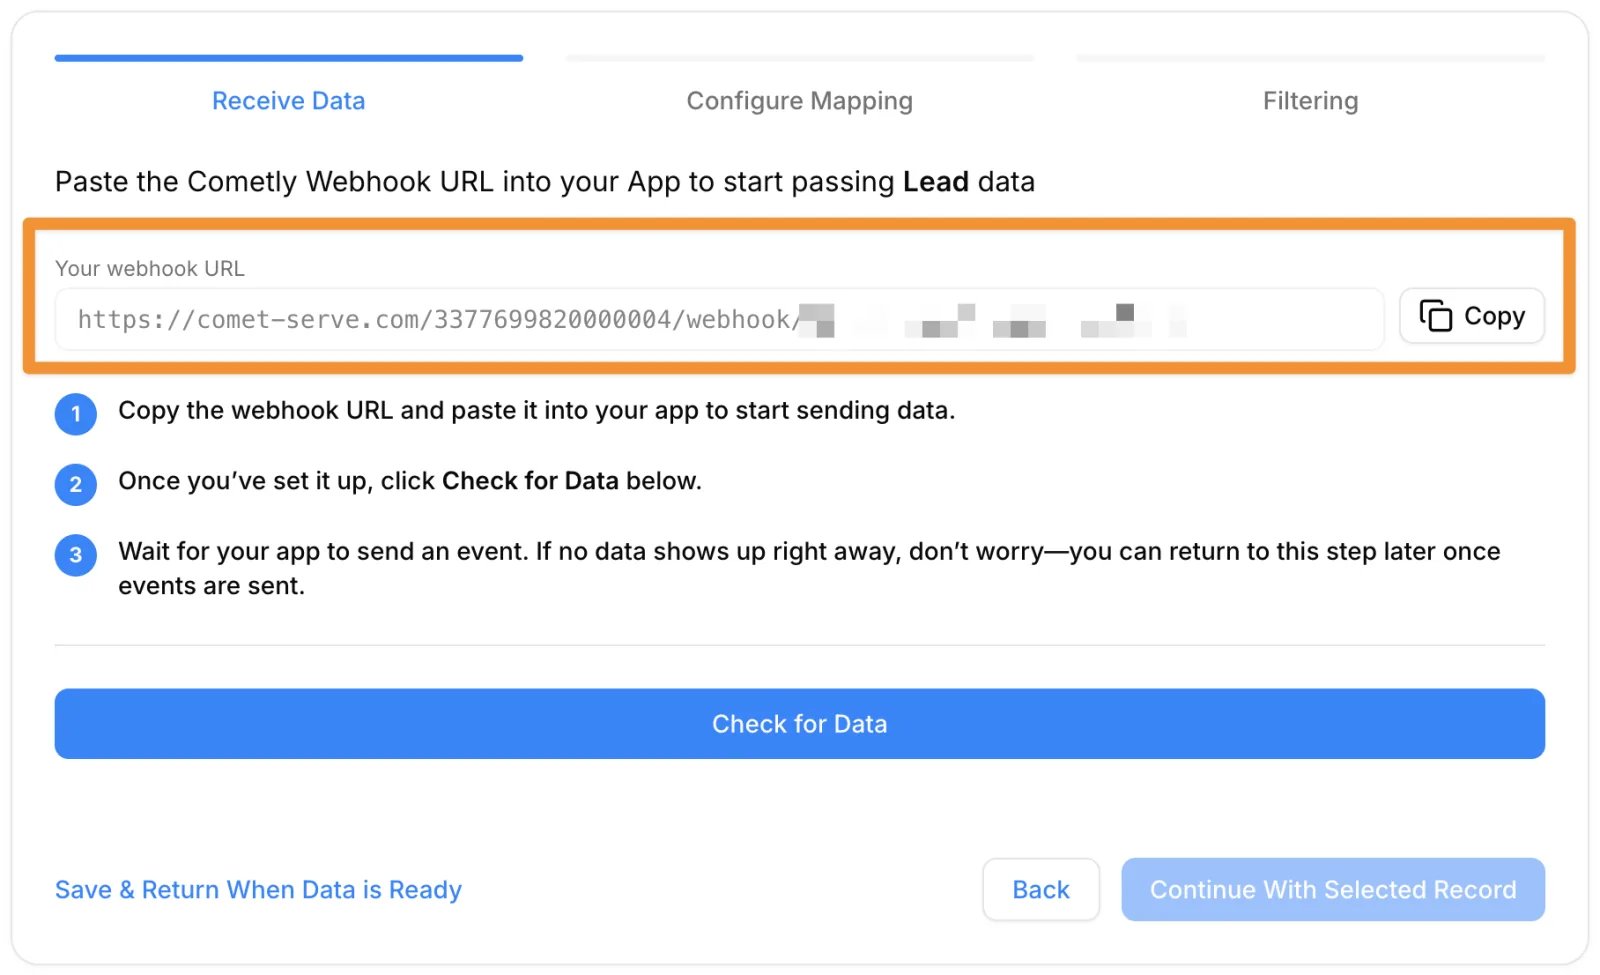
- Click Copy and paste the webhook URL into your app.
- Once you’ve set it up, click Check for Data.
- Wait for your app to send an event.
5
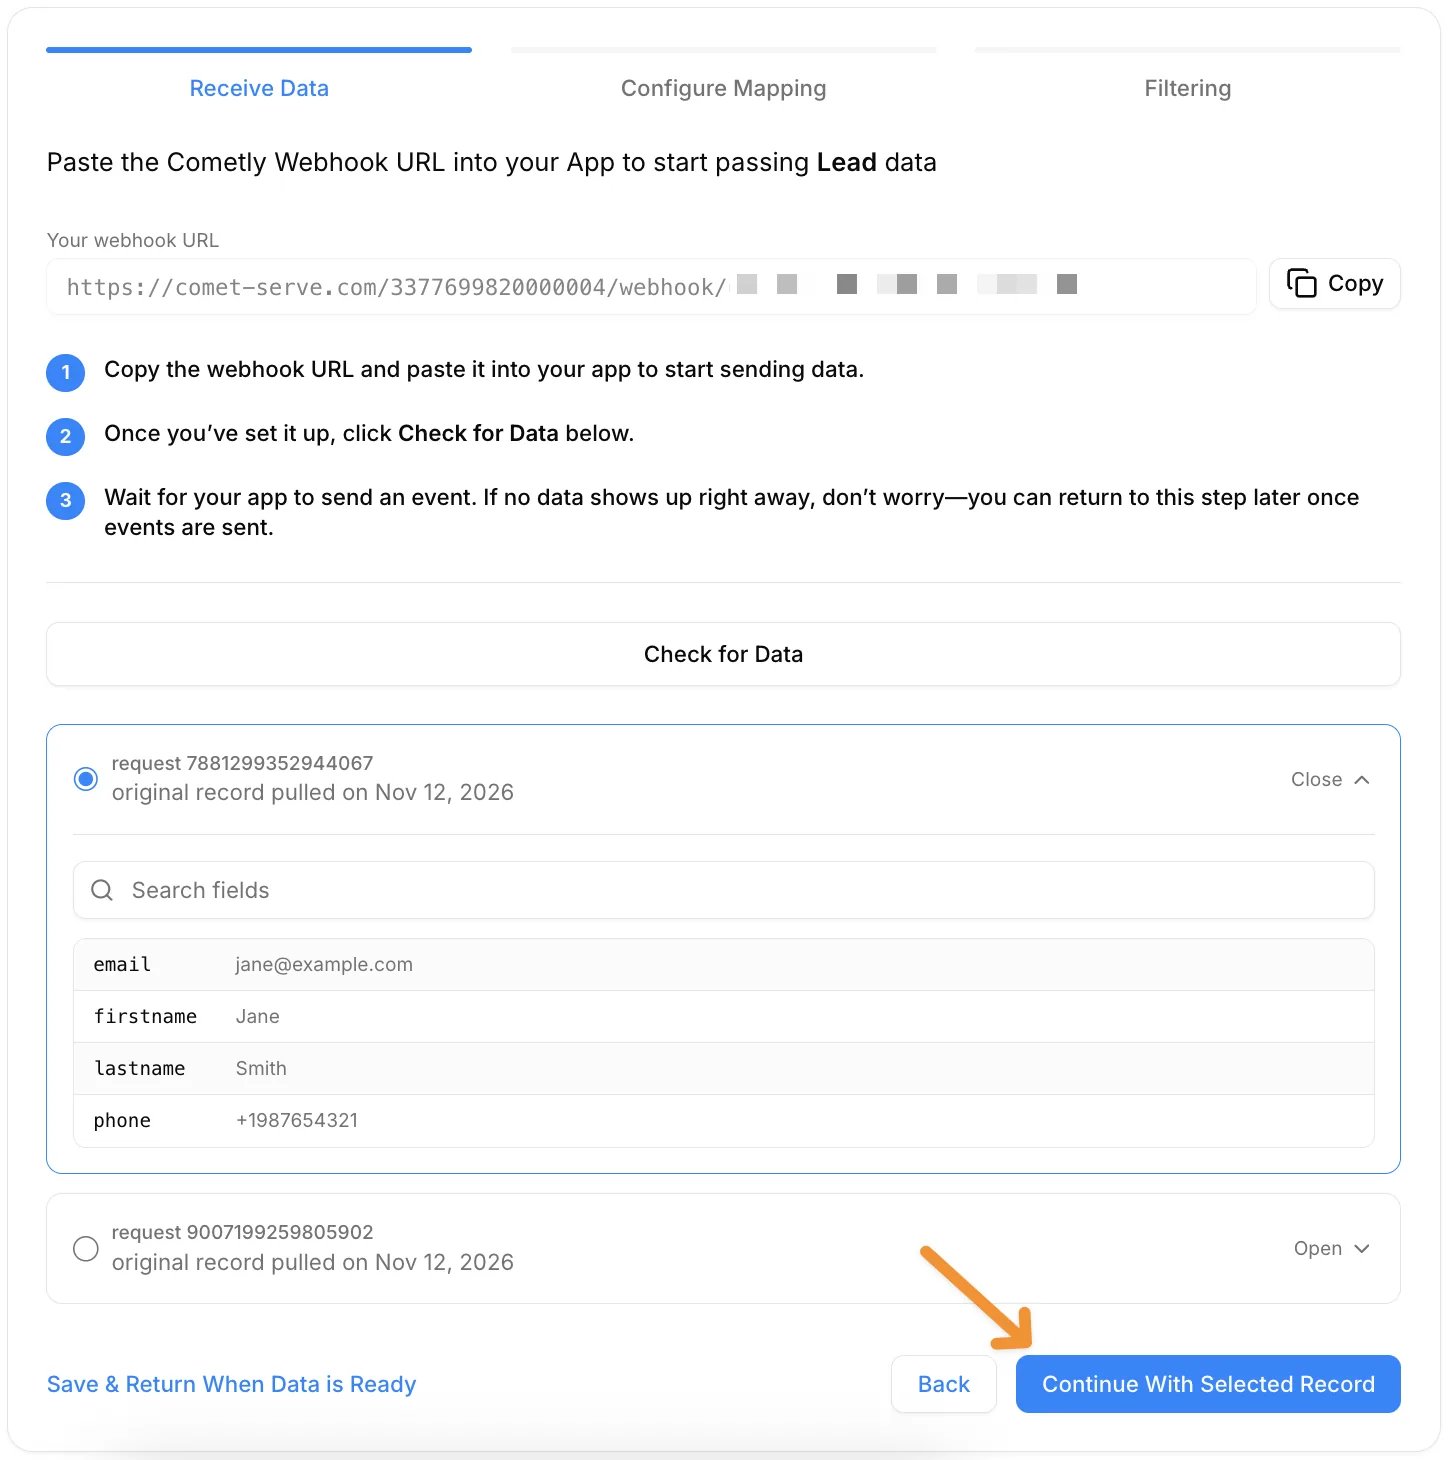
Select a record
When data is received, each request is listed with the date it was pulled.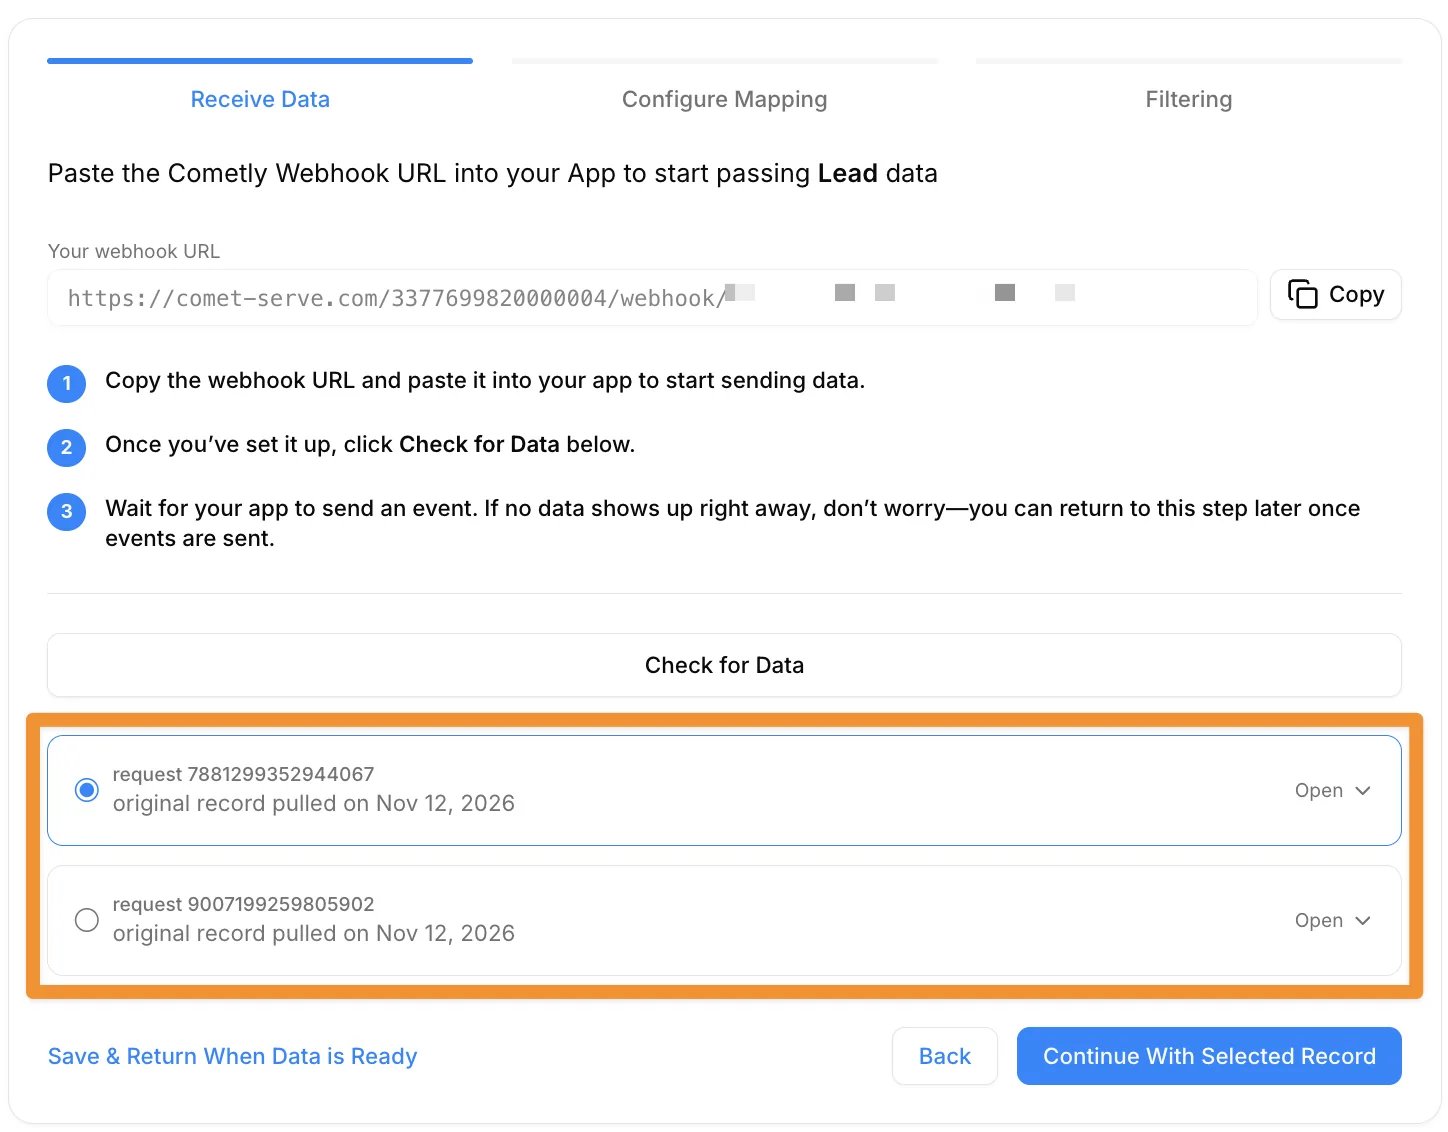
Configure mapping
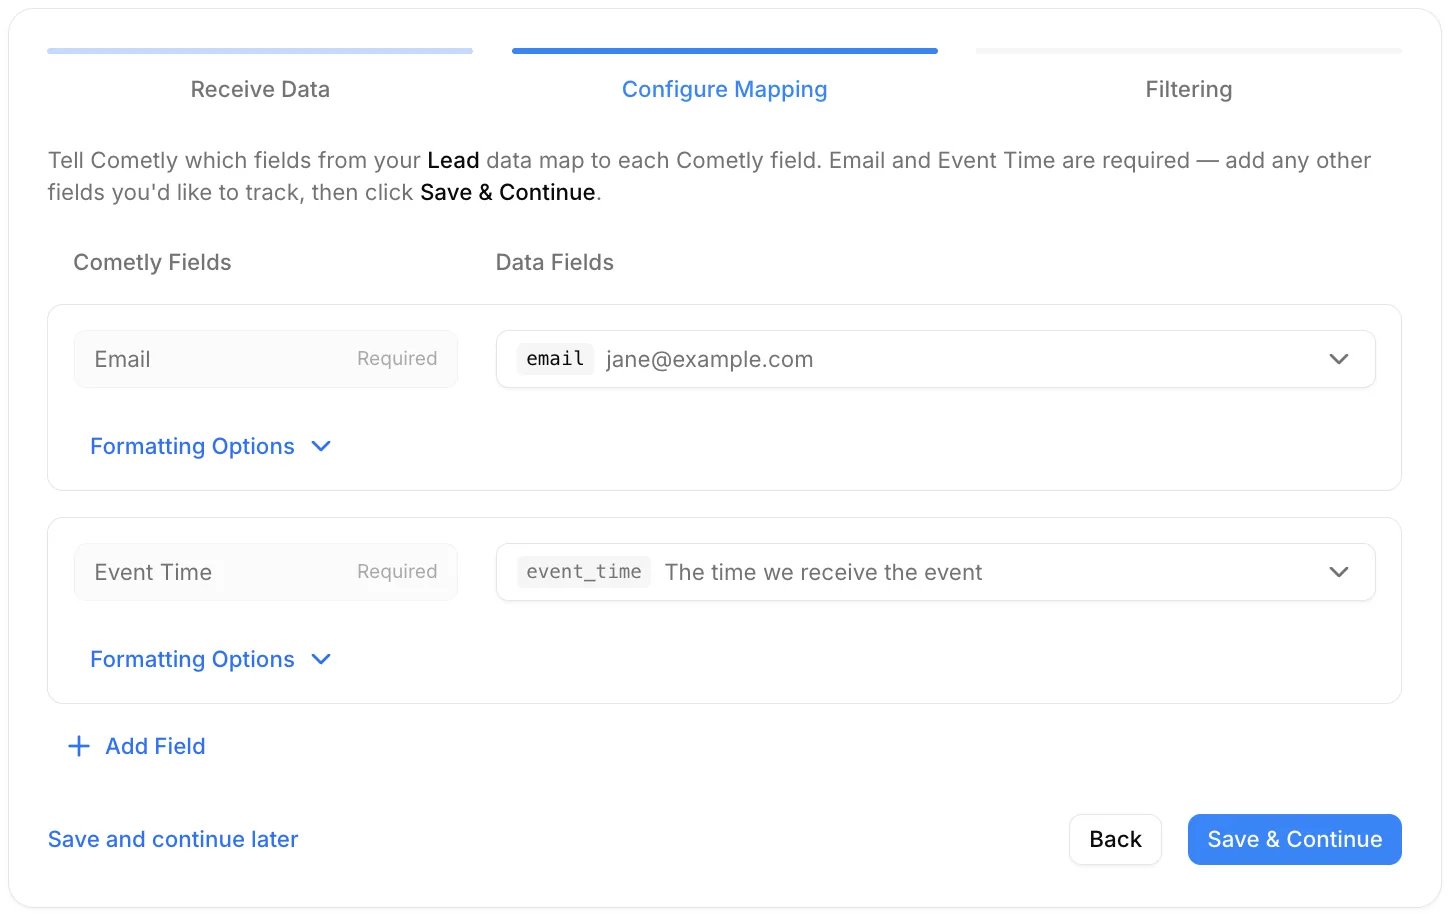
Mapping tells Cometly which fields in your app’s data match each Cometly field, such as the email address, the event time or other data you want to track.Map fields
- Select the Cometly field you want to map (for example Email or Event Time).
- Choose the matching field from your app’s data (for example
email@example.com). - Repeat for each additional field you want to track.
- Email and Event Time are required.
- If your data has no event time, choose The time we receive the event for Event Time. Cometly then uses the time the event arrives.
Add more fields
If your event includes more data points (for example user IDs, product names or amounts), click Add Field and repeat the mapping. When every field is mapped and formatted, click Save & Continue. To finish later, click Save and continue later.Use formatting options
Fields that can be formatted show Formatting Options under the mapping. The preview next to Formatted shows the result.- Date fields
- Timezone conversion: convert timestamps to a specific timezone.
- Amount and other number fields
- Increase or decrease decimal places.
- Add, subtract, multiply or divide by a fixed value you type, or by a numeric value from your payload (for example a tax or fee).
- Currency conversion: convert amounts from one currency to another.
Set up filters
Filters are optional. They control which events are processed: only events that pass all of your filters are tracked in Cometly.- Choose your filtering options.
- If your sample record passes the filters, a green box confirms that the webhook would have continued, with PASS next to each condition.
- If it does not pass, the box tells you the webhook would not have continued, with FAIL next to the condition that stopped it.
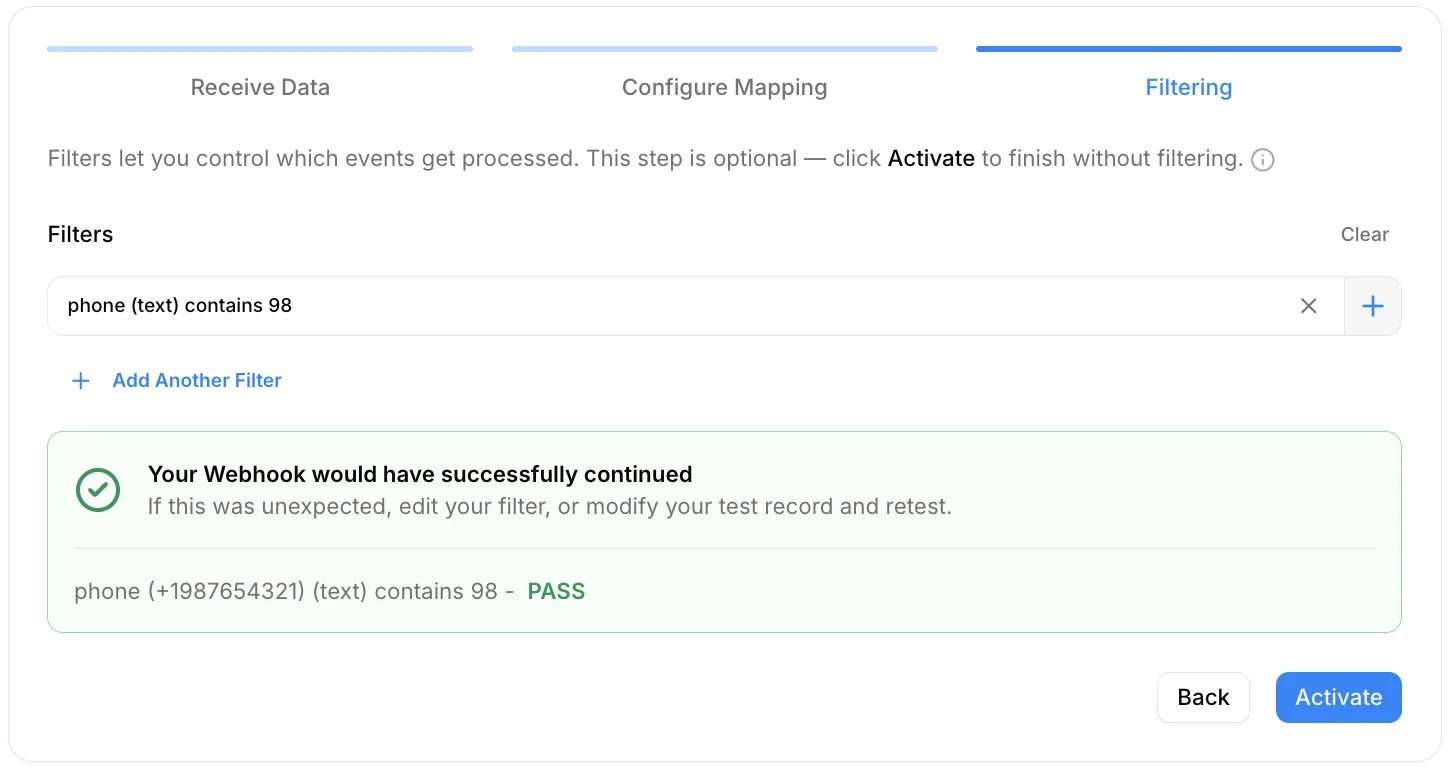
Activate your webhook
On the Filtering step, click Activate. Cometly confirms that the event was created, and Continue to Events Manager takes you back to the list. In Events Manager, an activated webhook event shows a switch that is turned on in the Status column.
Check it worked
In Events Manager, your webhook event shows a switch that is turned on in the Status column. Send a new event from your app, then open the Events Log tab: the event appears there within 60 seconds, with SUCCESS in the Details column.Additional notes about webhooks
Event time format
When you send theevent_time field in your webhook payload, Cometly accepts UNIX time in seconds. It does not accept UNIX time in milliseconds.
Correct format (seconds), a 10-digit UNIX timestamp:
Frequently asked questions
How long does it take for a webhook event to show up in Cometly?
The event shows in the Events Log within 60 seconds of being sent. It can take up to 15 minutes to appear in the reporting areas, such as the Report Builder or Ads Manager.How do I see what data my webhook sent to Cometly?
Open Events Manager, then the Events Log tab, and keep Source set to Server. Each event is listed with its raw data, and the Details column shows SUCCESS or the error message when something went wrong. See Use the Events Log for the full walk-through.Should I use a webhook, Zapier or the Cometly API?
Use a webhook when your app can send data to a URL on its own. Use Zapier when you would rather build the connection as a Zap, with your app as the trigger and Cometly as the action. Use the Cometly API when a developer sends events from your own systems with an API token.Next steps
- Use the Events Log to check incoming events
- Learn how events work in Cometly
- Manage custom events
- Send events to Cometly with Zapier
- Plan which events to track