

The Integrations page in Cometly also has a Shopify card that connects with your Shopify store URL and an Admin API access token. This guide covers the webhook method.
How the Shopify Cometly integration works
Here is the idea in plain terms:- You install the Cometly pixel on your Shopify store so Cometly can identify each visitor using a unique token called
comet_token(plus a fingerprint). - When someone places an order and payment is captured, Shopify sends a webhook (a message) to Cometly with the order details.
- Inside Cometly, you map the Shopify data (name, email, amount,
comet_tokenand so on) into your Purchase event. - That gives you accurate attribution and also lets you power server-side tracking like the Meta Conversion API (CAPI) and Google Conversion API if you want.
Why this matters
Shopify webhooks give Cometly a reliable “order paid” signal. When you also passcomet_token, fingerprint and IP, Cometly can match purchases back to the exact visitor journey, which improves attribution accuracy and match rates in ad platforms.
Step 1: Install the Cometly pixel in Shopify
You must install the Cometly pixel first so Shopify orders contain the visitor identity data needed for accurate matching. Follow the Shopify pixel installation guide. What to do- Add the Cometly pixel before the closing
</head>tag in yourtheme.liquid.
-
The Cometly pixel automatically generates and stores the following tracking attributes on your orders:
comet_tokenfingerprint
Step 2: Create a Purchase webhook in Cometly
Now you create a webhook event in Cometly and copy the webhook URL you will paste into Shopify. The webhooks guide covers this flow in more detail.- In Cometly, click Events Manager in the sidebar.
- Click Create Event.
- Under App / Integration, select Webhooks.
- Select Purchase as the event name.
- Click Create. The event appears in the Events Manager as a draft.
- Click Configure on the draft event, then click Copy next to Your webhook URL.
Keep this tab open. You paste this URL into Shopify in the next step.
Step 3: Create the webhook in Shopify
You are going to tell Shopify to send an event to Cometly whenever an order payment happens.- In Shopify, click Settings (bottom left).
-
Click Notifications.
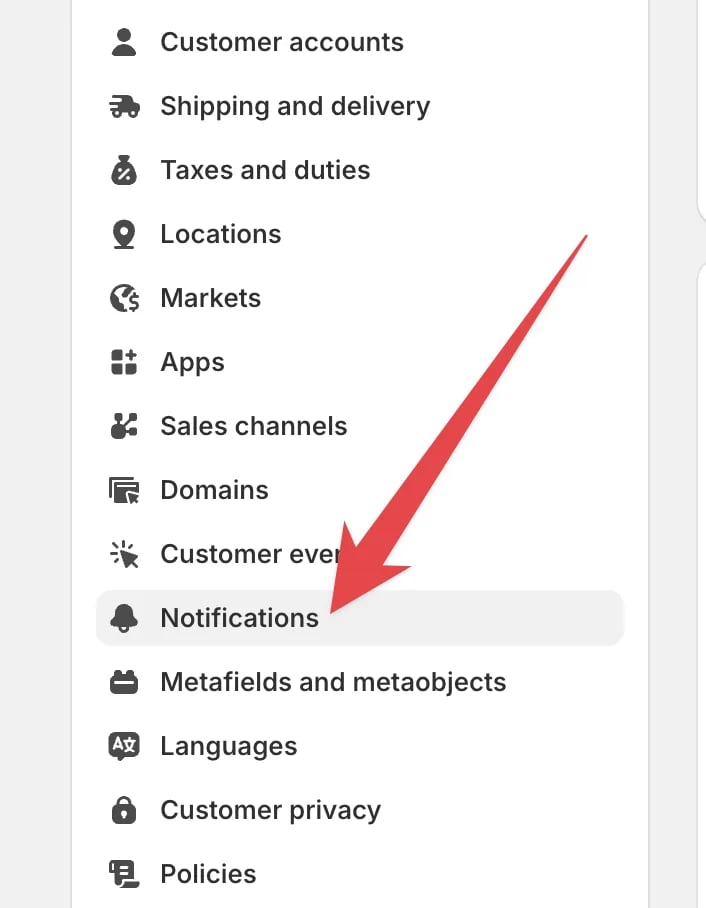
- Click Webhooks.
-
Click Create webhook.
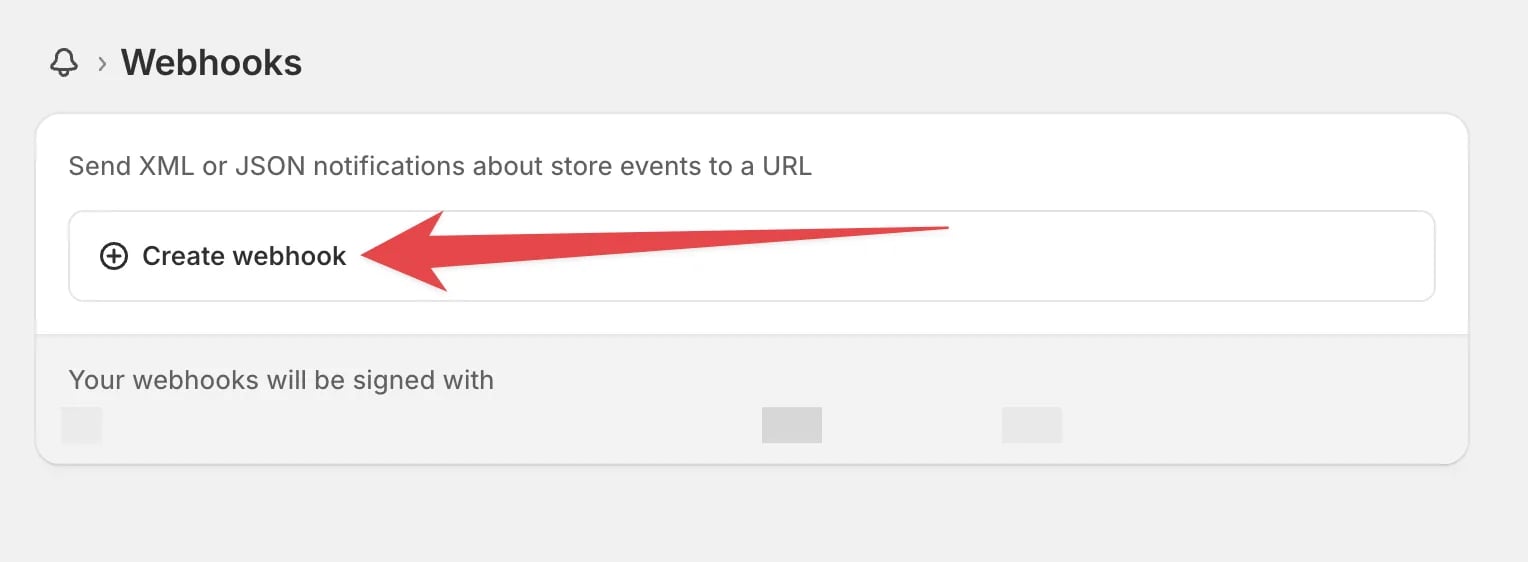
-
Configure the webhook like this:
- Event:
Order payment(the paid order event) - Format:
JSON - URL: Paste your Cometly webhook URL
- Webhook API version: Whichever version is marked (Latest)
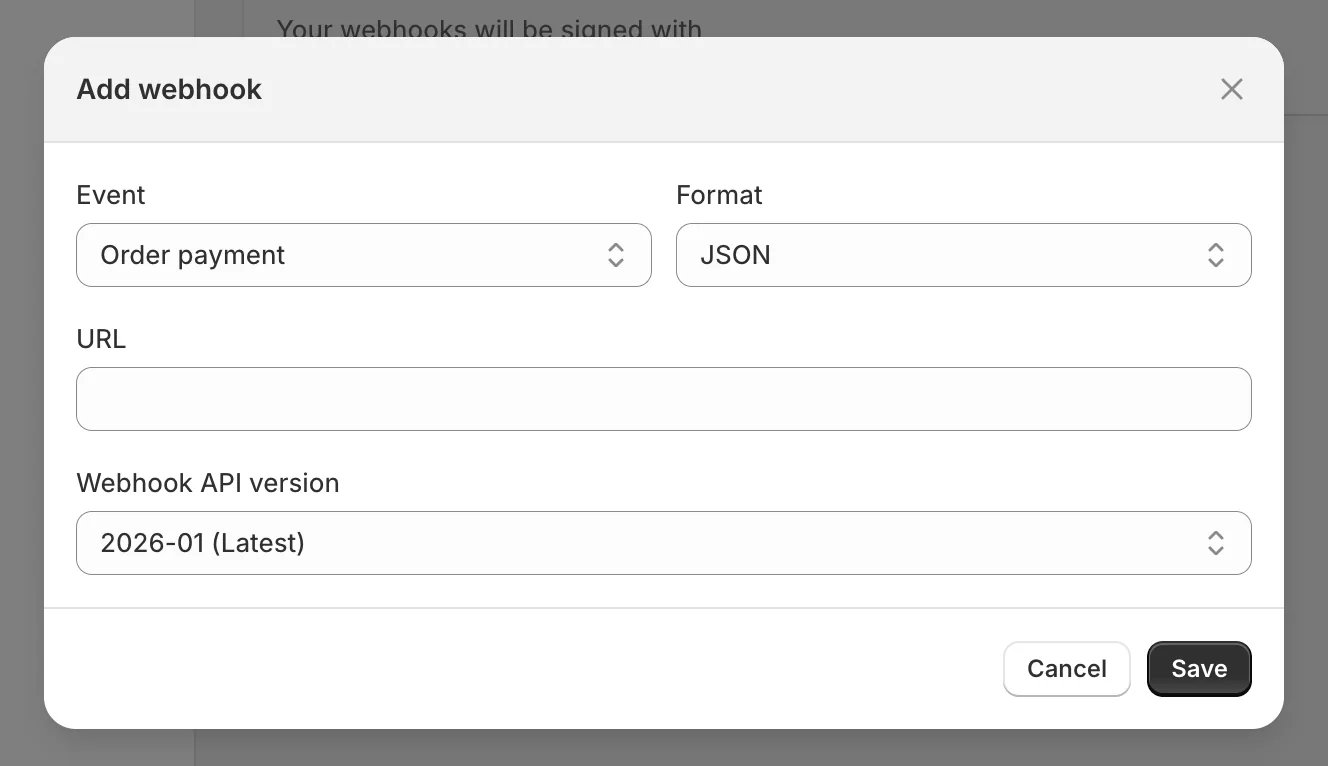
- Event:
- Click Save.
Step 4: Map Shopify webhook data into your Cometly Purchase event
Now that Shopify is sending the payload, you need to map the payload fields into the right Cometly fields so attribution and match rates are strong. Back on the Cometly tab, click Check for Data, select a record once Shopify has sent one, and click Continue With Selected Record to reach the mapping step. See the webhooks guide for how mapping works.Required mappings for accurate tracking
On the mapping step, make sure you map all of the following Cometly fields:- First Name
- Last Name
- Phone
- Amount: the purchase amount. You can use Formatting Options to adjust the amount, for example to deduct taxes and shipping.
- IP
- Comet Token (the
comet_tokenvalue in the payload) - Fingerprint
Why these fields matter
- Email, phone, name and IP help with identity matching and conversion quality.
- Comet Token and Fingerprint connect the purchase back to the exact visitor tracked by the Cometly pixel.
- Amount powers accurate revenue attribution and ROAS reporting.
Choose the correct Amount field
When you map the Amount field, select:current_total_price represents the final amount the customer paid for the order. It includes all components of the purchase, such as:
- Product prices
- Discounts
- Shipping
- Taxes
- Additional fees or duties
Step 5: Test the webhook end to end
Do a real test so you know Shopify is sending data and Cometly is receiving it.- Open a new browser window.
- Visit your Shopify store and browse at least 1 to 2 pages.
- Complete a test purchase (use a real payment method or a test method based on your store setup).
- Confirm in Shopify that the order status reflects paid.
-
In Cometly, go to Events Manager > Events Log, set Source to Server, and:
- Confirm the Purchase event arrived
- Confirm the order has a
comet_token,fingerprintandip, and that the amount is populated
Step 6: Choose Shopify Meta CAPI or Cometly Meta CAPI
A Conversion API (CAPI) sends your conversions to an ad platform from the server instead of the browser. You can use either Shopify’s native Meta Conversion API integration or Cometly’s Meta Conversion API, but you can only run one Meta CAPI connection for the same pixel setup. See the Meta Conversion API guide.- Use Cometly Meta CAPI if you want server-side events aligned to Cometly attribution, plus deeper visibility and control over mapping, match signals and event definitions.
- Use Shopify’s native Meta CAPI if you want a basic Shopify-managed connection and you do not need Cometly controlling the event stream.
Step 7: Set up the Google Conversion API (recommended if you want server-side Google tracking)
For Google, you can create separate conversion actions specifically for events coming from Cometly. See how to configure the Google Conversion API.Check it worked
In Cometly, go to Events Manager > Events Log and set Source to Server. Each new paid Shopify order appears there as a Purchase event within 60 seconds, with SUCCESS in the Details column and the amount,comet_token and fingerprint filled in.
Common issues and fixes
comet_token is missing in the webhook payload
- Confirm the Cometly pixel is installed before
</head>intheme.liquid - Make sure the customer completed the order after the pixel was installed
- Ensure the pixel loads on all storefront pages involved in the checkout flow
- Make sure you mapped the correct value field (total paid, not subtotal)
- Confirm currency formatting matches what Cometly expects
- Re-check the Shopify webhook event selection (must be order paid / payment captured)
- Confirm the webhook URL is pasted correctly
- Place a new paid test order and check Shopify webhook delivery logs if available.
Track Add to Cart and Initiate Checkout events
If you would like to track Add to Cart and Initiate Checkout events for your Shopify store, follow the Add to Cart and Initiate Checkout guide.Troubleshooting
Cometly is not tracking all orders
Cometly is designed to track all your Shopify orders. For example, if you see 10 orders in Shopify for a given day, you should see 10 orders in Cometly, provided that the timezones in your Cometly and Shopify account settings are aligned. If the numbers do not match, follow these steps:- Check the Events Log in Cometly: Go to Events Manager > Events Log and look for any errors.
- Common issue, missing email: One of the most common errors occurs when the “Email” field is not passed through for certain orders. Cometly relies on email addresses to track orders and build customer journeys. If an email is missing, the order cannot be tracked.
- Orders created by third-party apps: If you’re using third-party apps that generate orders and pass them into your Shopify store, these apps may not share customer email addresses with Shopify. As a result, Cometly cannot track these orders, and you will see them flagged as errors in the Events Log.
Frequently asked questions
Why are my Shopify sales not showing in Cometly when payment capture is manual?
Cometly records a purchase when Shopify reports the order as paid. If your store’s payment capture is set to “Manual” instead of “Automatic”, Cometly may not be able to report your sales. Switch the setting to “Automatic” as described in Shopify automatic payment capture.How do I stop Shopify orders from being counted twice in Cometly?
Map the Shopify order ID to the Cometly field Order Id on the mapping step. Cometly then ignores any repeat of the same event name and Order ID for that customer, for example when a webhook is retried. See how Order ID works.Can I track only first-time purchases from a Shopify subscription store?
Yes. By default, Cometly tracks every purchase as a Purchase event. To record initial orders separately, create a second webhook event as described in Track first-time purchases in Shopify.Next steps
- Track Add to Cart and Initiate Checkout events
- Send purchases to Meta with the Meta Conversion API
- Configure the Google Conversion API
- Track first-time purchases in Shopify
- Learn how webhook mapping, filters and activation work