

We recommend that a Super Admin installs the Cometly app in HubSpot, but it is not required.You can connect HubSpot to Cometly as long as your user has the correct CRM object permissions and App Marketplace access. These permissions allow Cometly to receive contact and deal data through webhooks.Learn how to check your HubSpot user permissions
Available triggers
Each Cometly event you create for HubSpot uses one trigger. The trigger decides when HubSpot sends the event to Cometly.
A typical use of Contact Property Change is the lifecycle stage: when a contact moves from Lead to MQL, an MQL event is sent to Cometly.
For the Deal Created trigger to work, always associate a contact when you create a deal, and create the deal in the stage you selected in Cometly. See Requirements for the Deal Created trigger.
Using HubSpot forms?
If you use HubSpot marketing forms on your website, set them up for tracking before you send events: see HubSpot forms (new editor) or HubSpot legacy forms.Prefer HubSpot workflows?
You can also send event data to Cometly from your HubSpot workflows with a webhook. This is a good option if you want full control over which events are sent and when. Your HubSpot plan must include webhooks to use this method. See Send HubSpot events with webhooks.Step 1: Install the Cometly pixel
Install the Cometly pixel (the tracking script that records the visitors who reach your site) in the<head> of every page of your website, including the thank-you page.
See Install and verify the Cometly pixel.
Step 2: Create the event
In Cometly, open Events Manager and click Create Event.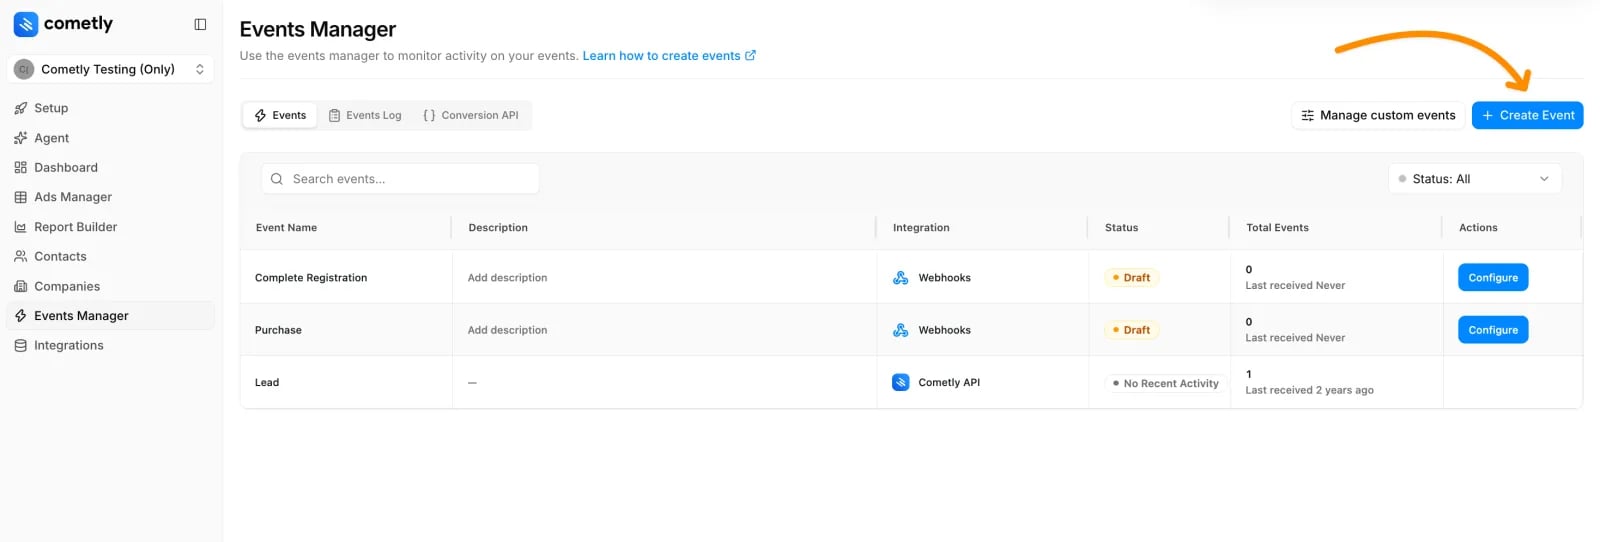
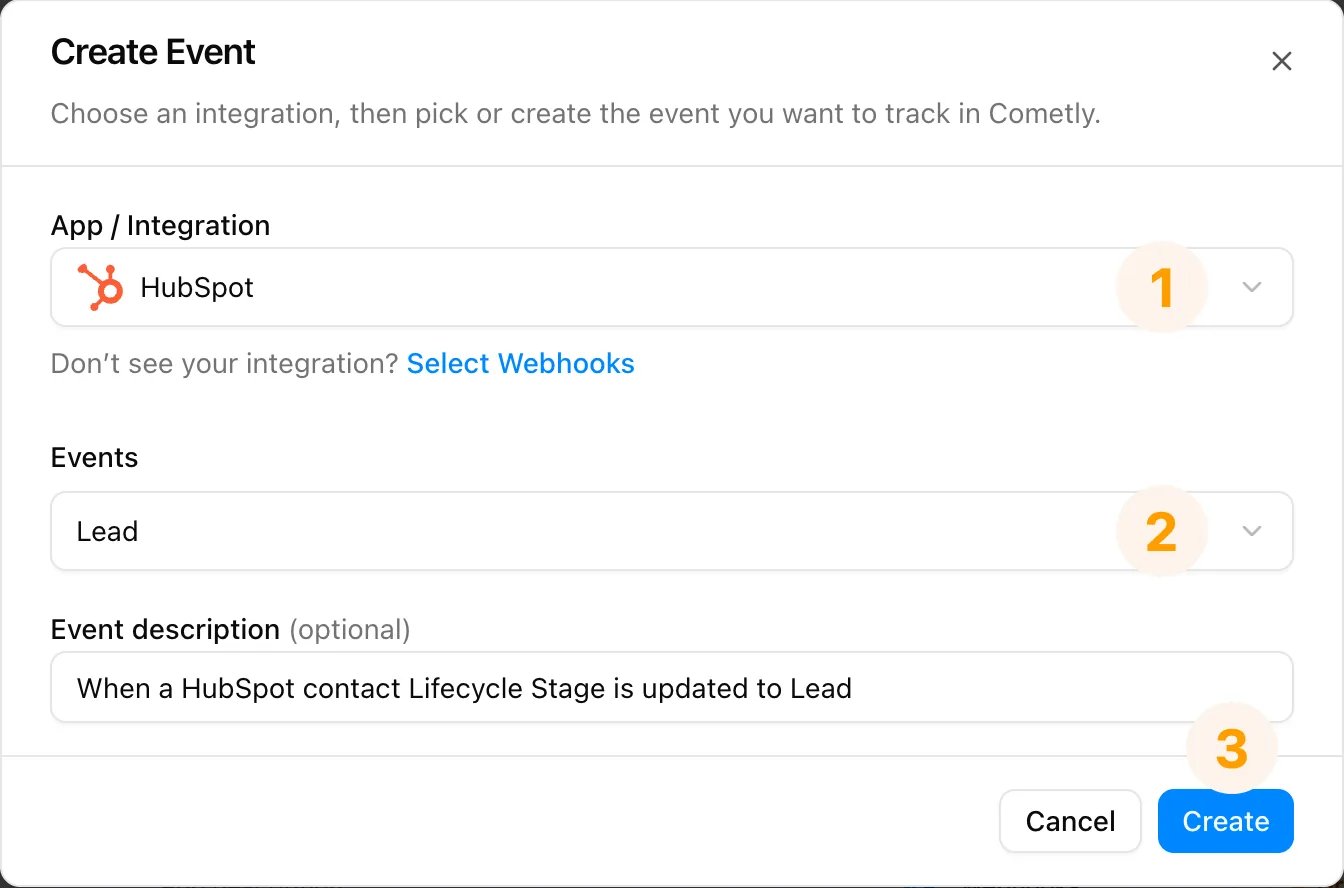
- Under App / Integration, select HubSpot.
- Under Events, choose a standard event, or click Create New Event to make a custom one.
- Click Create.
Step 3: Configure the event and the HubSpot connection
Click Configure next to the new event to start setting up the HubSpot integration.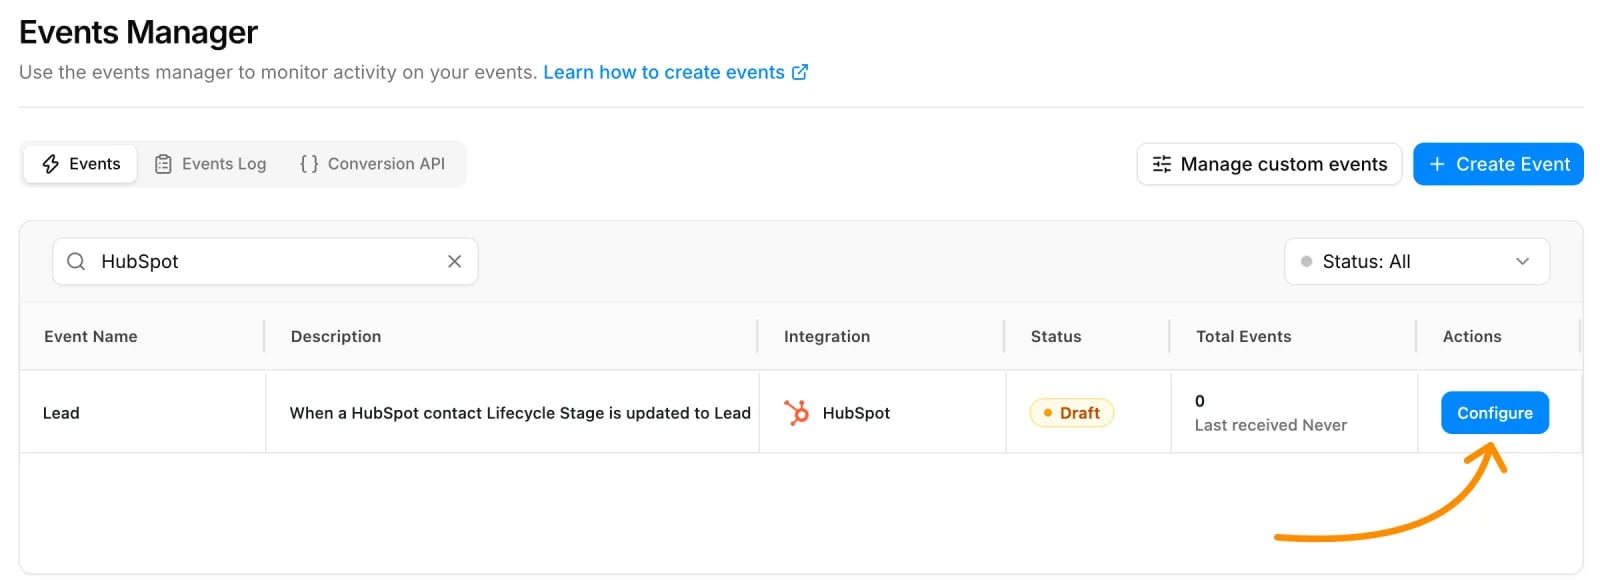
- App: pre-selected as HubSpot.
- Account: click Select an account and pick the HubSpot account you want to use. If this is your first time connecting HubSpot to Cometly, click Connect new account to add your HubSpot connection.
-
Trigger: click Choose trigger and pick one of the available triggers. Depending on the trigger, more fields appear:
-
Property Name (Contact Property Change and Deal Property Change). Choose the specific property to watch, such as Lifecycle Stage, Lead Status or any custom property you use. Whenever that property is updated, the trigger fires and sends the event to Cometly. For example:
- If you select Lifecycle Stage and a contact moves from Lead to MQL, an MQL event can be sent to Cometly.
- If you select Lead Status and it changes from New to Qualified, a Qualified Lead event can be sent.
- Pipeline and Pipeline stage (all four deal triggers).
-
Property Name (Contact Property Change and Deal Property Change). Choose the specific property to watch, such as Lifecycle Stage, Lead Status or any custom property you use. Whenever that property is updated, the trigger fires and sends the event to Cometly. For example:
- Click Continue. The button stays disabled, and tells you what is missing, until every required field is selected.
Retrieve data for your trigger
To test the integration, make the trigger fire in HubSpot, then click Check for Data in Cometly. Follow the steps for your trigger type:Contact Created trigger
Contact Created trigger
This trigger fires when any new contact is created in your HubSpot account.
- Create a test contact in HubSpot. Go to your HubSpot account and manually add a new contact.
- Click Check for Data. This fetches the most recent contact records from HubSpot. If no data appears, double-check that your test contact was created, then try again.
- Select your event record. Choose the record that matches the test contact you just created.
- Click Continue With Selected Record.
Contact Property Change trigger
Contact Property Change trigger
This trigger fires when a specific property (such as Lifecycle Stage or Lead Status) is updated on any contact.
- Update the property on an existing contact. In HubSpot, open any contact and change the property you are tracking (for example, change Lifecycle Stage from Lead to MQL).
- Click Check for Data. This pulls the latest contact property change events from HubSpot. Make sure you changed the exact property selected in your trigger. If no data appears, update the property again and retry.
- Select your event record. Choose the record that shows the recent property change.
- Click Continue With Selected Record.
Deal Created trigger
Deal Created trigger
This trigger fires when a new deal is created in your HubSpot account.
- Create a test deal in HubSpot. Select the pipeline and stage defined in your trigger and manually create a new deal. Associate a contact with it.
- Click Check for Data. This fetches the most recent deal records from HubSpot. Make sure the test deal matches the selected pipeline and stage.
- Select your event record. Choose the record that matches the test deal you just created.
- Click Continue With Selected Record.
Deal Property Change trigger
Deal Property Change trigger
This trigger fires when a specific property is updated on a deal.
- Update the selected deal property. Open any deal in the selected pipeline and stage in HubSpot and change the exact property you selected in the trigger (for example the deal type or a custom property).
- Click Check for Data. This fetches the most recent property change events from HubSpot. Make sure you changed the correct property and that the deal is in the selected pipeline and stage.
- Select your event record. Pick the record that reflects the recent property update.
- Click Continue With Selected Record.
Deal Stage Updated trigger
Deal Stage Updated trigger
This trigger fires when the stage of a deal is updated in the selected pipeline.
- Update the stage of a deal. Open a deal in the pipeline you selected and move it to a different stage.
- Click Check for Data. This pulls the most recent deal stage update events. Make sure the deal is in the correct pipeline and the stage was actually updated.
- Select your event record. Choose the record that shows the stage update.
- Click Continue With Selected Record.
Deal Closed Won trigger
Deal Closed Won trigger
This trigger fires when a deal reaches the Closed Won stage in the selected pipeline.
- Move a deal to Closed Won. In HubSpot, open any deal in the selected pipeline and move it to the Closed Won stage.
- Click Check for Data. This retrieves the latest deals that were marked as Closed Won. If no data appears, double-check that the stage was set to Closed Won.
- Select your event record. Pick the record that shows the deal you just closed.
- Click Continue With Selected Record.
Don’t see data yet? This can happen if no events have been sent yet. Click Save & Return When Data is Ready and come back later to map your data once events have been sent.
How deal-to-contact matching works
To keep deal counts in Cometly one-to-one with HubSpot, only one contact is associated with a deal in Cometly. If several contacts are associated with a HubSpot deal, Cometly chooses the contact like this:- If one or more contacts have a
first_conversion_date, Cometly uses the contact with the earliest one. - If none of the contacts has a
first_conversion_date, Cometly uses the contact with the earliestcreatedate.
Requirements for the Deal Created trigger
For the Deal Created trigger to work, your team must create deals in HubSpot in a specific way. Use the instructions below to update your HubSpot settings so deals are always created correctly and data is sent to Cometly every time.Require a contact to be associated when creating a deal
Require a contact to be associated when creating a deal
Deals must have at least one contact associated. You can configure the deal creation form in HubSpot to require an associated contact, so this step is never missed.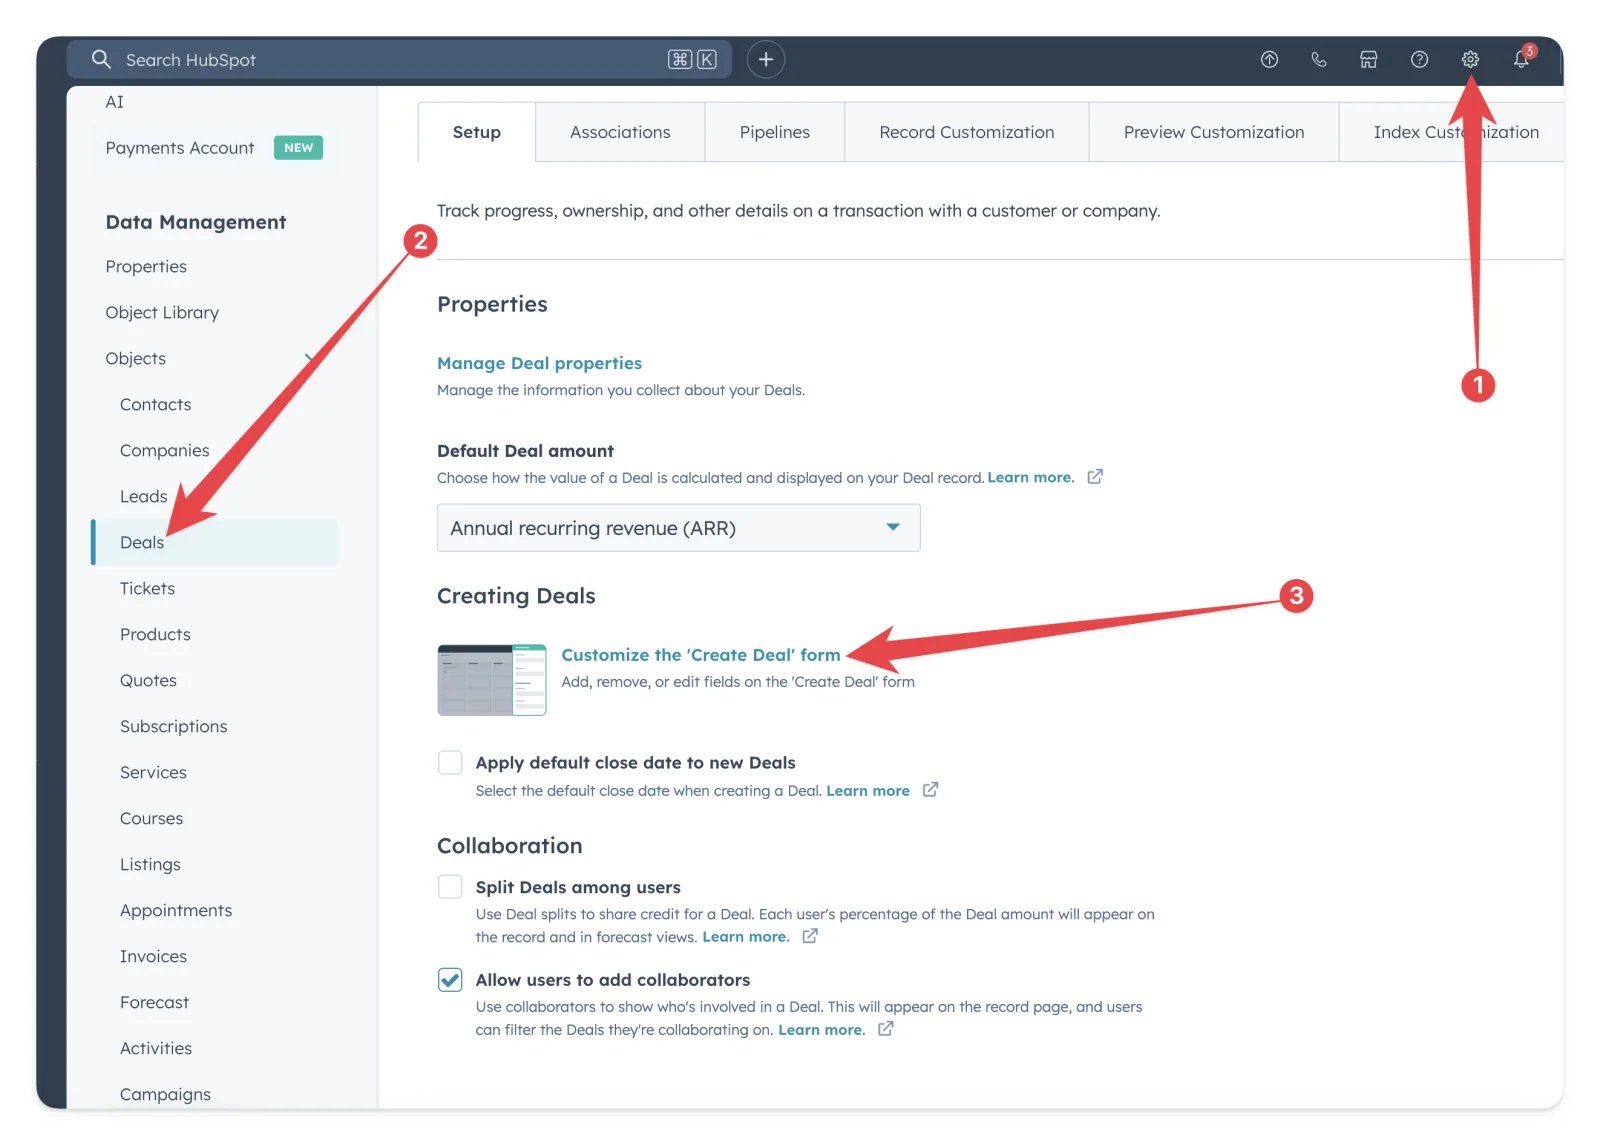
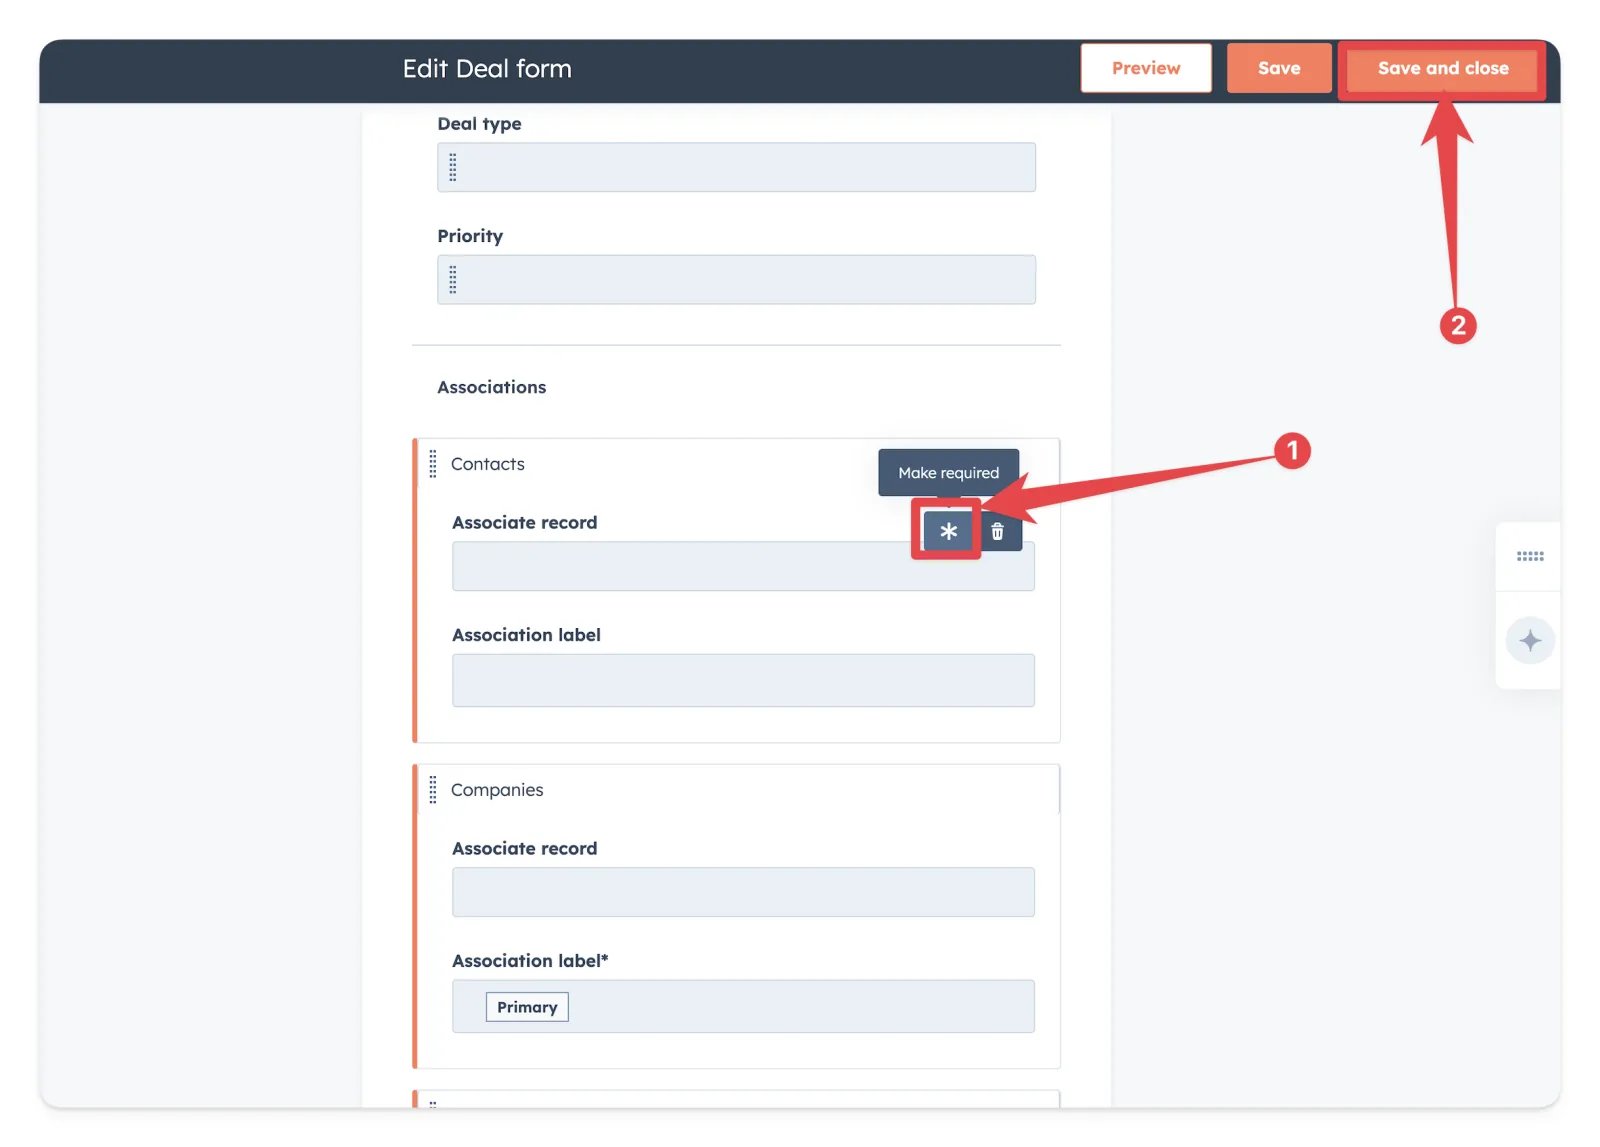
Instructions from the video
- Click the Settings (gear) icon in your HubSpot account.
- Under Data Management > Objects, click Deals.
- Click Customize the ‘Create Deal’ form.
- On the Create Deal form, go to the Associations section.
- In the Contacts association box, hover over Associate record and click the asterisk (*) to make the field required. Then click Save and close.
Require a specific pipeline stage when creating deals
Require a specific pipeline stage when creating deals
Deals must be created directly in the pipeline stage you selected when you set up the Deal Created trigger. You can limit deal creation in HubSpot to that stage.
Instructions from the video
- Click the Settings (gear) icon in your HubSpot account.
- Under Data Management > Objects, click Deals.
- Click Pipelines and select the relevant pipeline.
-
Click Pipeline Rules.
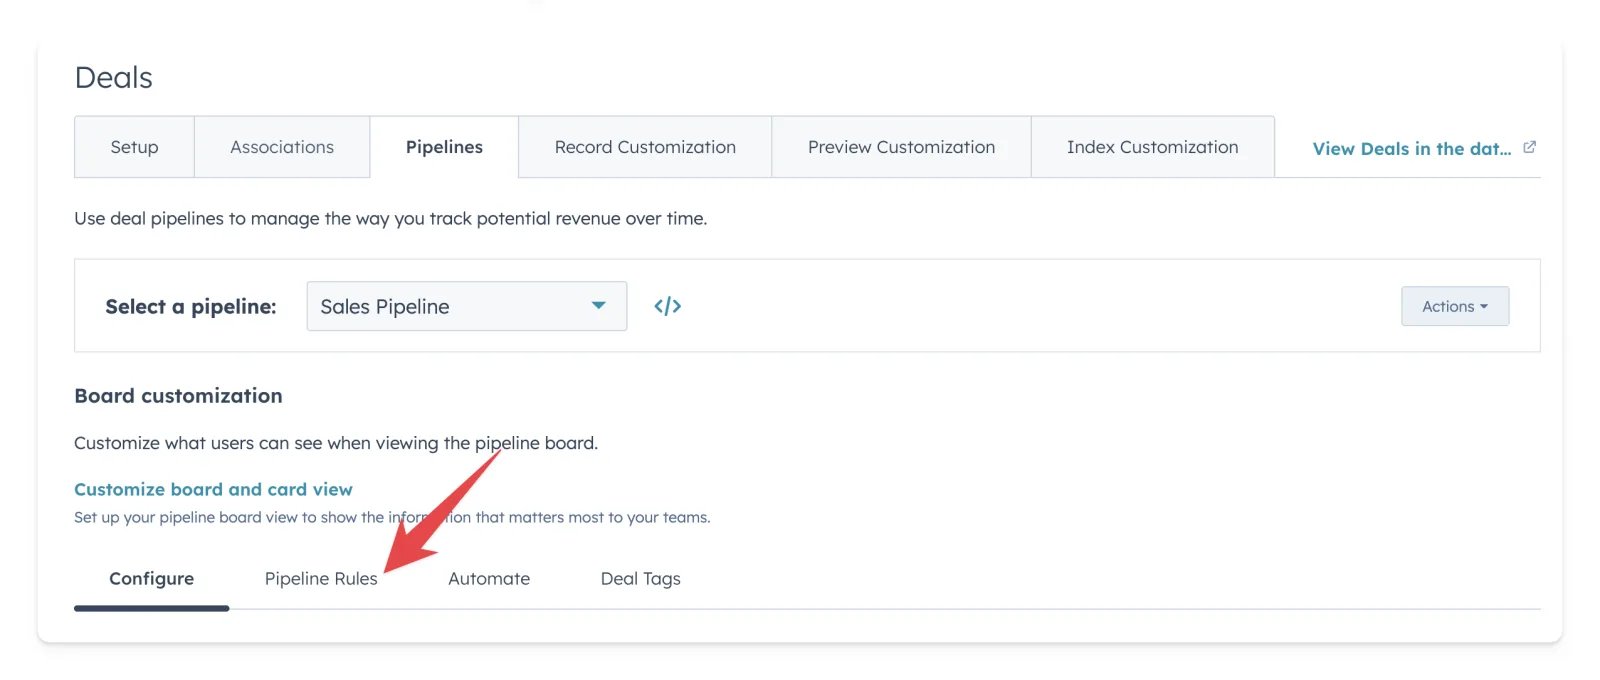
-
Turn on Limit deal creation to specific stages.
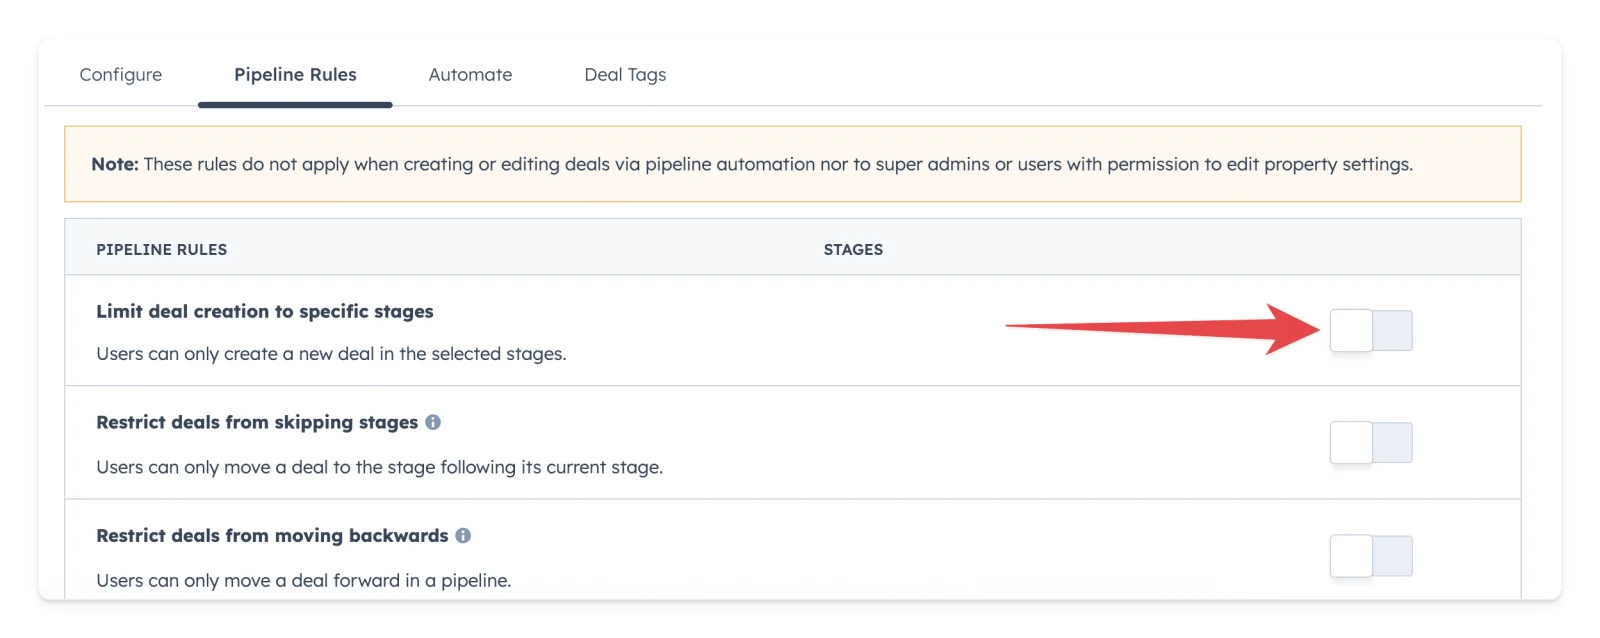
-
Select the stage you selected in Cometly as the pipeline stage, then click Save.
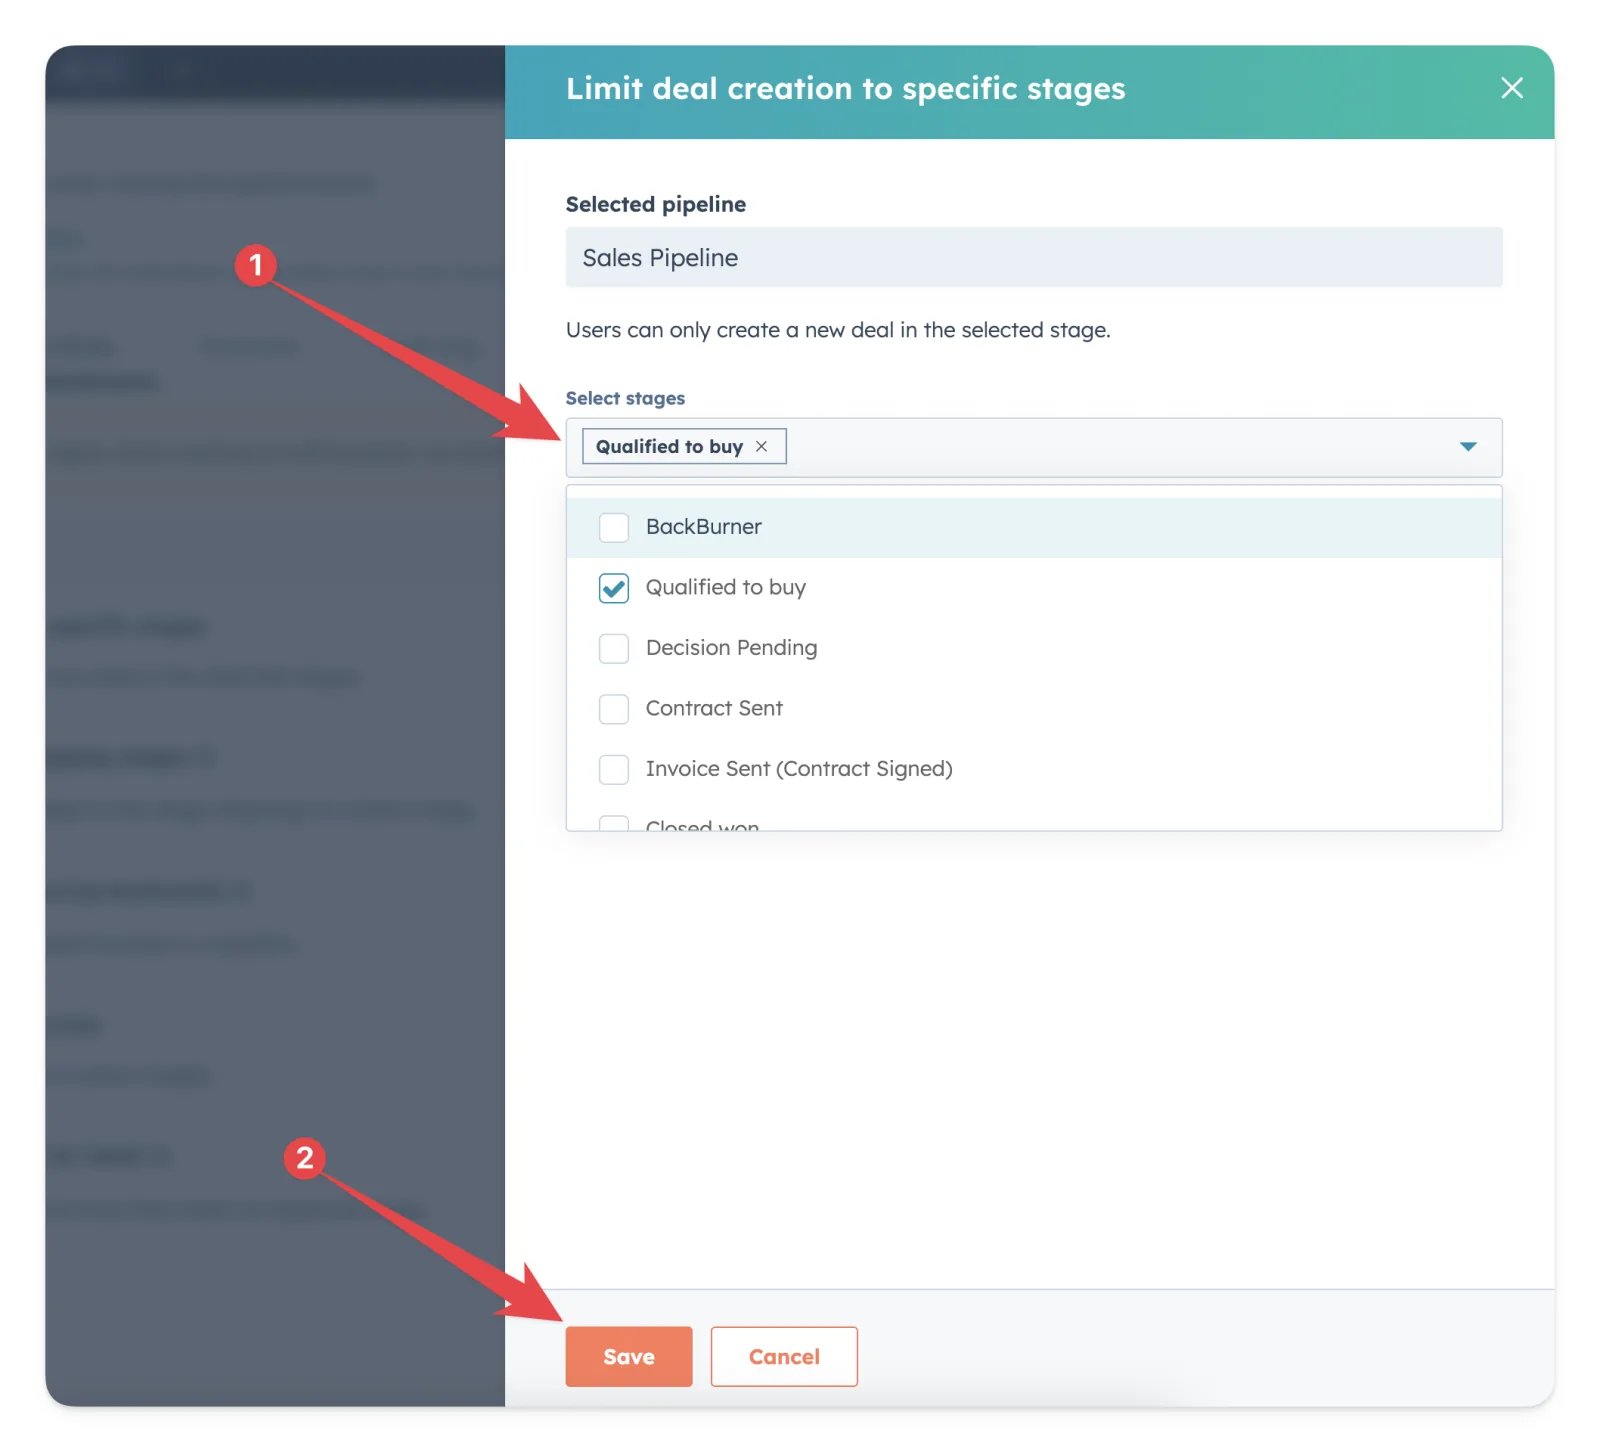
Step 4: Configure mapping
Map the HubSpot data fields to Cometly fields, so the event data you send (email addresses, event times and any other data) lines up with Cometly’s reporting. Email and Event Time are required.- Email: choose the email address field from your selected record (the sample value looks like
email@example.com). - Event Time: choose the dynamic option The time we receive the event.
Step 5: Configure filters and activate the event
Filters control when an event in HubSpot actually records an event in Cometly. This step is optional, but highly recommended when you track changes to a contact property (such as Lifecycle Stage) and only want to send the event under certain conditions. Common uses for filters with HubSpot:- Only send the event to Cometly when the lifecycle stage is MQL.
- Only send the event when a custom property (such as lead score or status) contains a specific value.
- Skip contacts that do not meet your qualification criteria.
- Click Add Another Filter. (For a new event, Cometly has already added one filter that requires the email field to be not empty.)
- Select the field you want to filter by (for example the lifecycle stage, lead score or contact owner).
- Choose a condition (for example (text) is, (text) contains or (text) starts with).
- Enter the value you want to match (for example
MQLorSQL).
- If the record matches, you see Your Webhook would have successfully continued, with PASS next to each filter.
- If the record does not match, you see Your Webhook would NOT have continued, with FAIL next to the filter that stopped it.
Check it worked
In Events Manager, the event’s row now shows the status Active. Make the trigger fire once more in HubSpot, then open the Events Log tab: the new event is listed there, and the row’s Total Events count goes up.Frequently asked questions
Why is my HubSpot deal not showing up in Cometly?
Cometly only records a deal event when the deal has at least one associated contact, because it needs a contact to attribute the deal to. The deal must also match the pipeline and pipeline stage you selected for the event. If no HubSpot events arrive at all, check the HubSpot user permissions of the person who connected the account.Does the HubSpot integration import my existing contacts and deals?
No. The triggers fire when something happens in HubSpot, so Cometly receives events from the moment your event is active. A contact or deal that already existed is sent only if it later fires the trigger, for example when its tracked property changes.Can I connect more than one HubSpot account to Cometly?
Yes. When you configure an event, open the Account list and click Connect new account to add another HubSpot account. Each event uses the one account you select for it.Next steps
- Check incoming events in the Events Log
- Learn how events work in Cometly
- Send your HubSpot conversions back to your ad platforms with the Conversion API
- Fix HubSpot user permissions when events do not arrive
- Send HubSpot events from workflows with webhooks