

Webhooks and Zapier are not the recommended way to connect Stripe to Cometly. Use the direct Stripe integration where you can. For more complex events that you cannot set up with the direct integration, use Stripe webhooks as an alternative.
Before you begin
- Email is required for tracking. Make sure a lead opt-in form earlier in your funnel collects emails. Without a captured email, Stripe events cannot be attributed properly.
- Using Stripe Checkout? Make sure your forms collect email addresses so conversions are tracked accurately.
Step 1: Create the event in Cometly
-
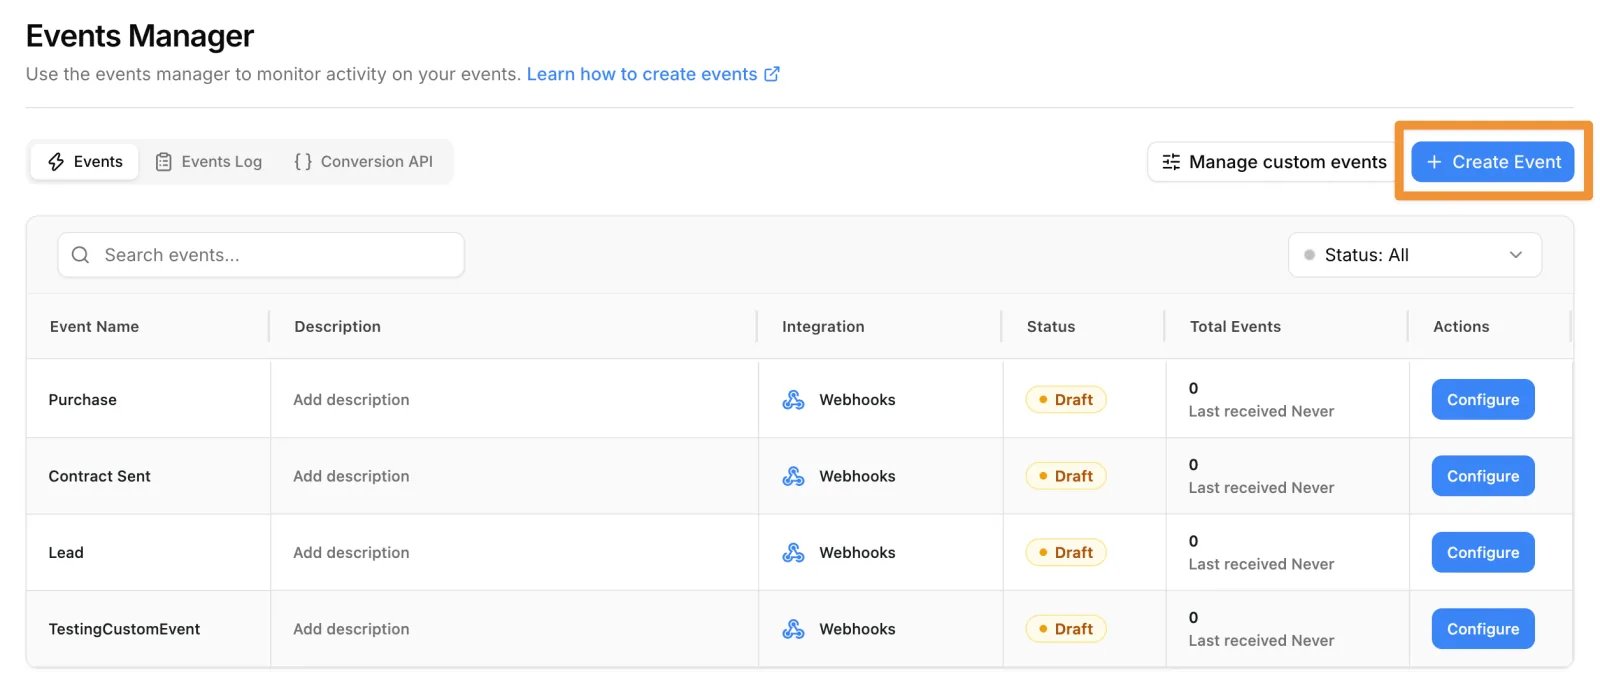
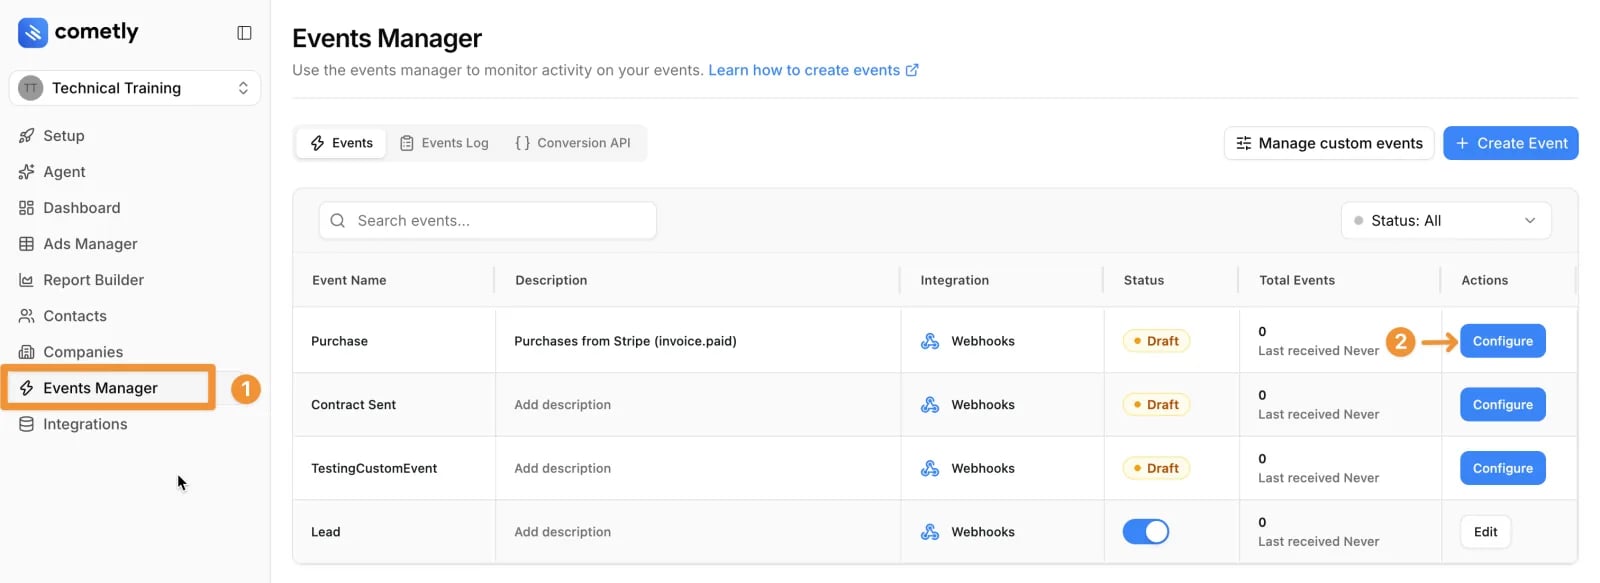
In the sidebar, click Events Manager, then click Create Event. (You can also create the event from Setup, in the step Create conversion events.)
-
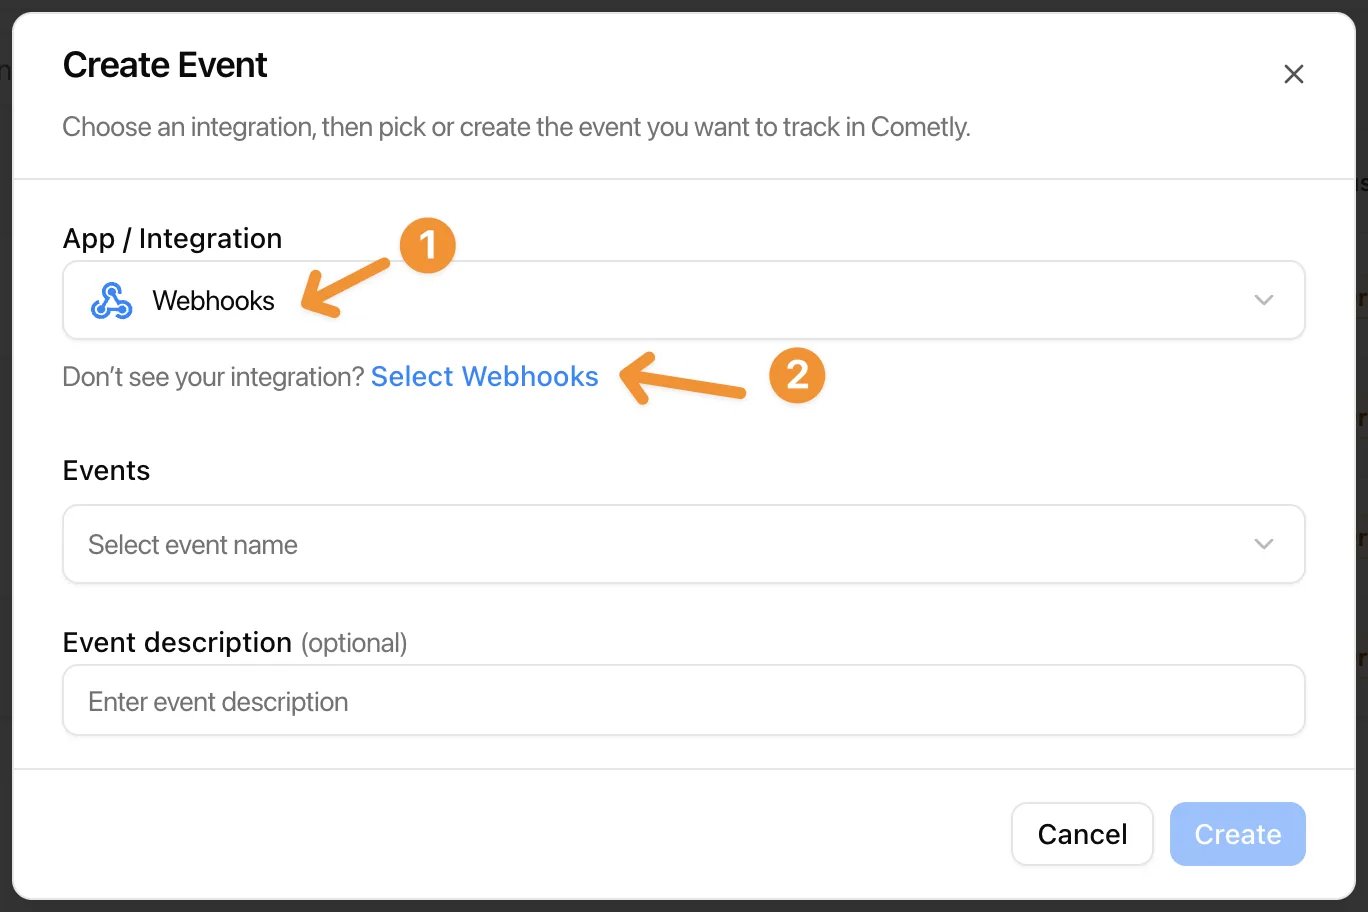
Under App / Integration, choose Webhooks. If you cannot find it in the list, click Select Webhooks below the field.
-
Under Events, choose the event you want to track, or click Create New Event:
- New payments: select Purchase (it is counted in Gross Revenue automatically).
- New trials: select Start Trial.
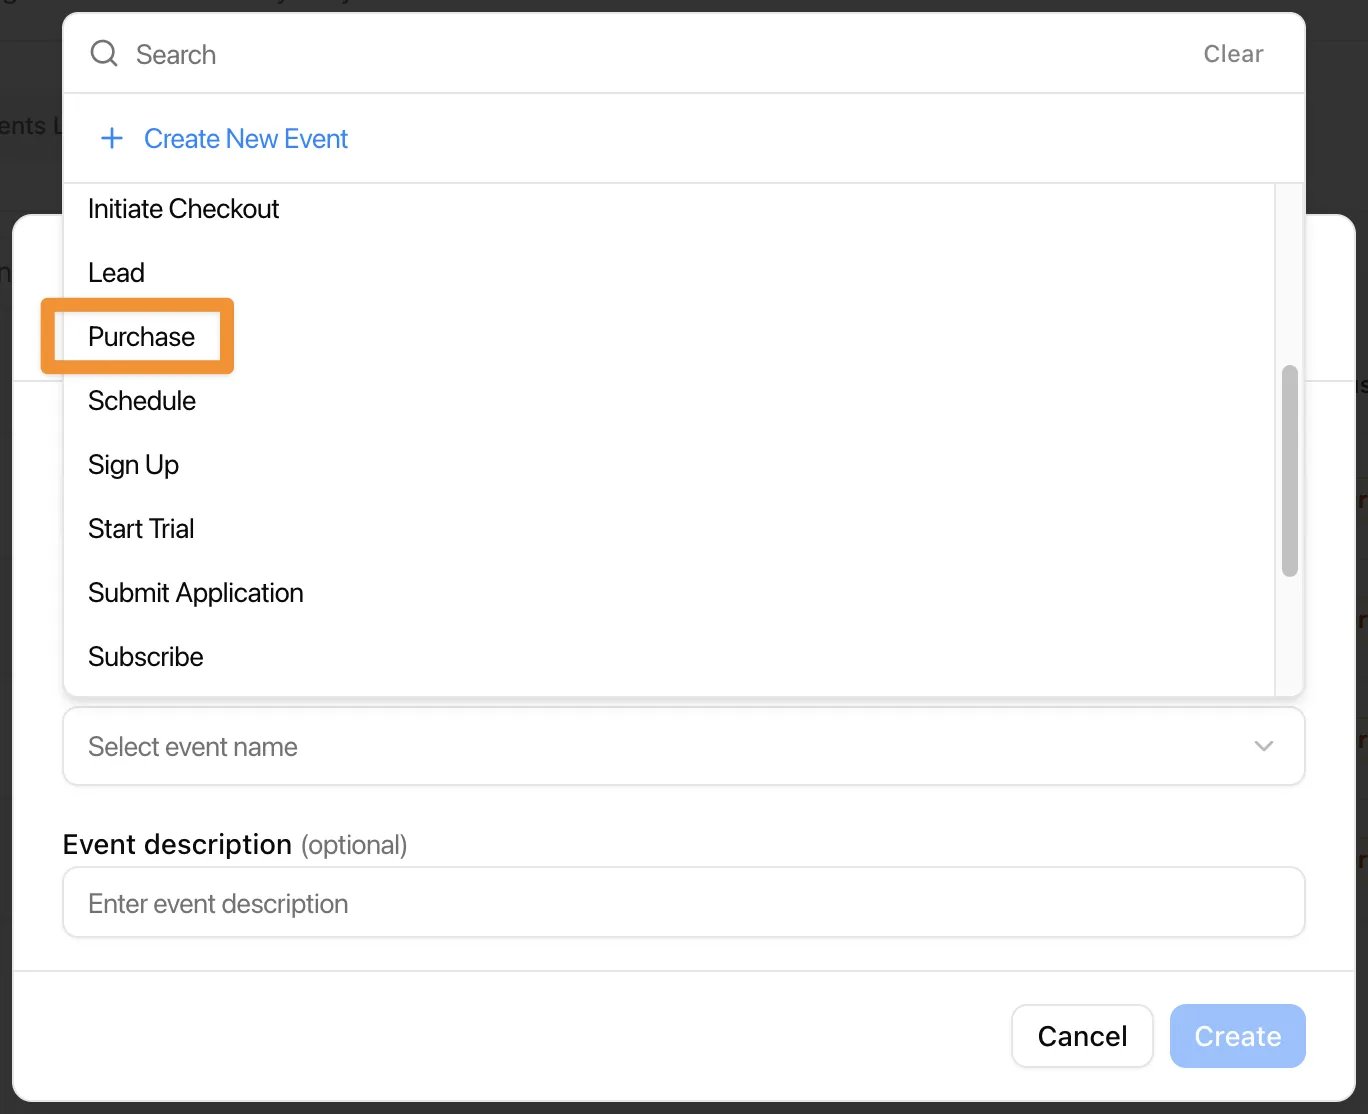
- Click Create. The event appears in the Events Manager with the status Draft.
-
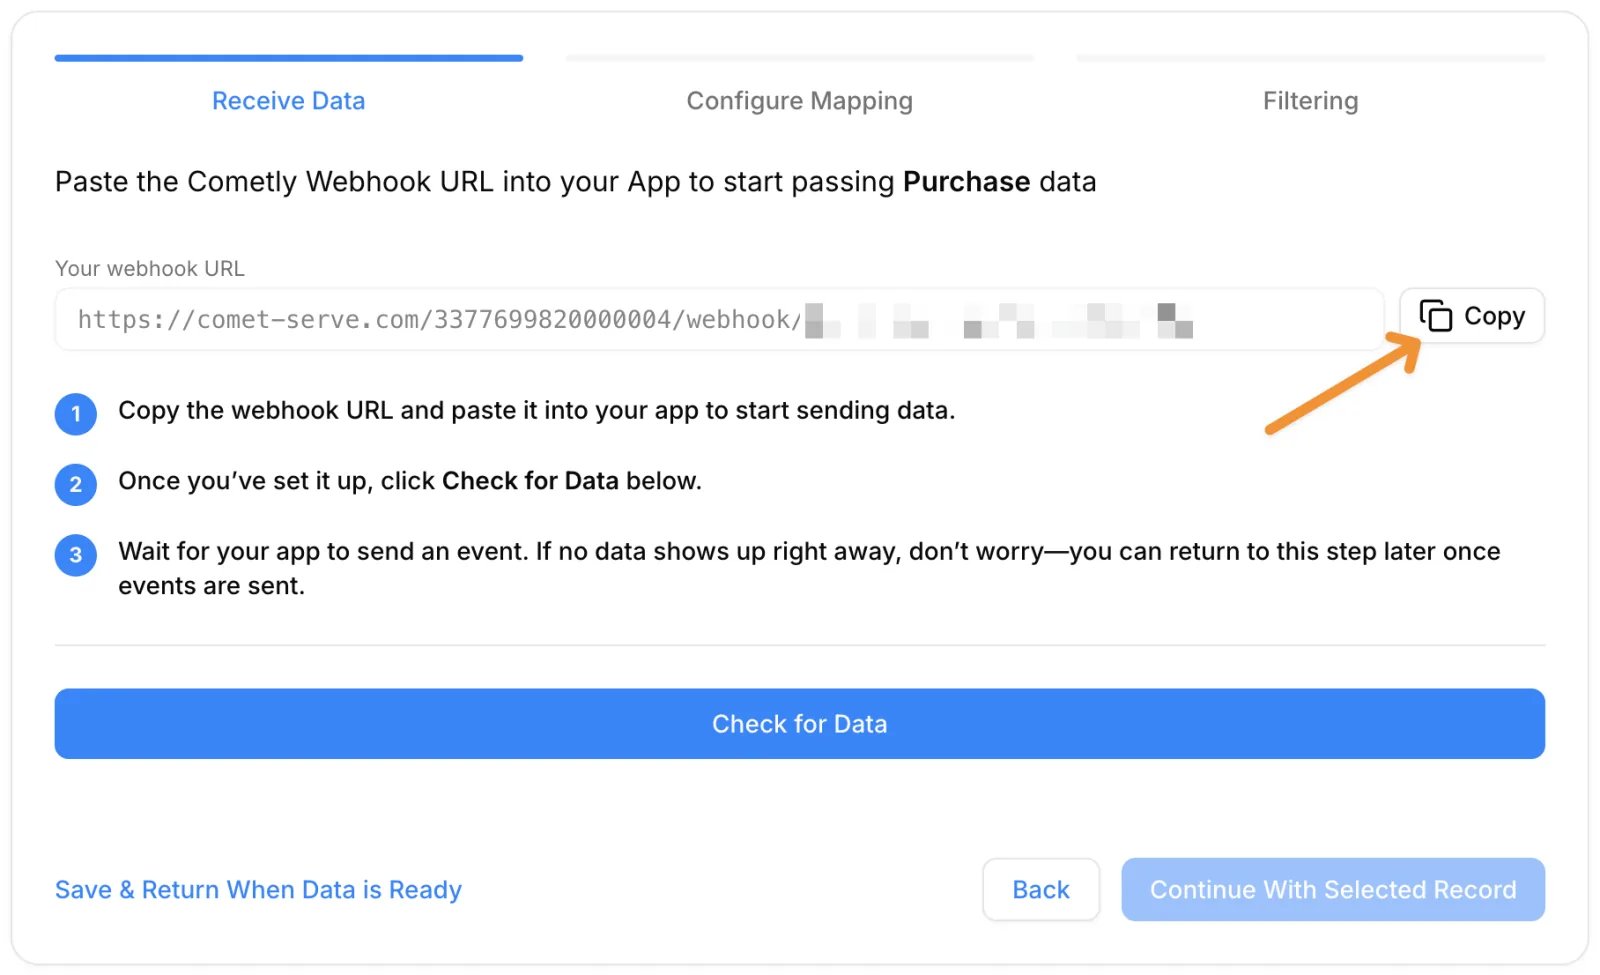
In the event’s row, click Configure. On the Receive Data step, click Copy next to Your webhook URL. You need this URL in Step 2.
Step 2: Add the webhook to Stripe
- Log in to your Stripe Dashboard.
-
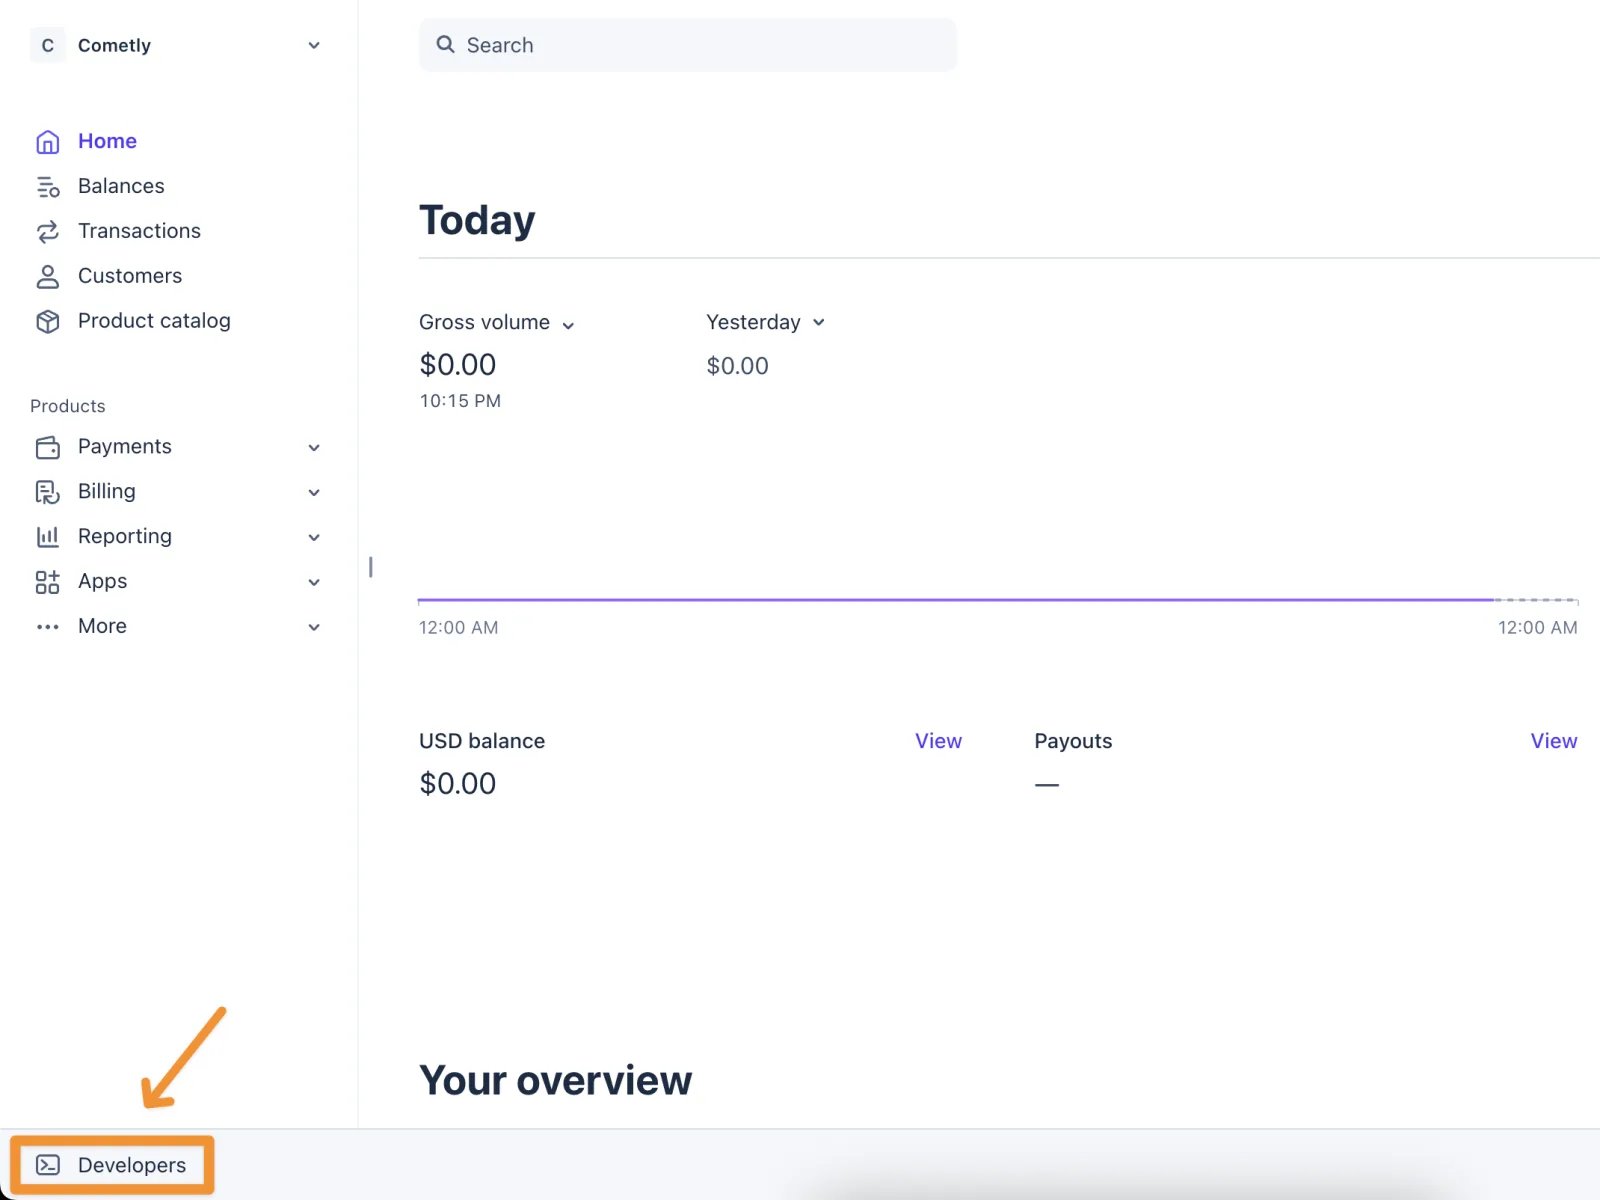
Click Developers in the bottom-left menu.
-
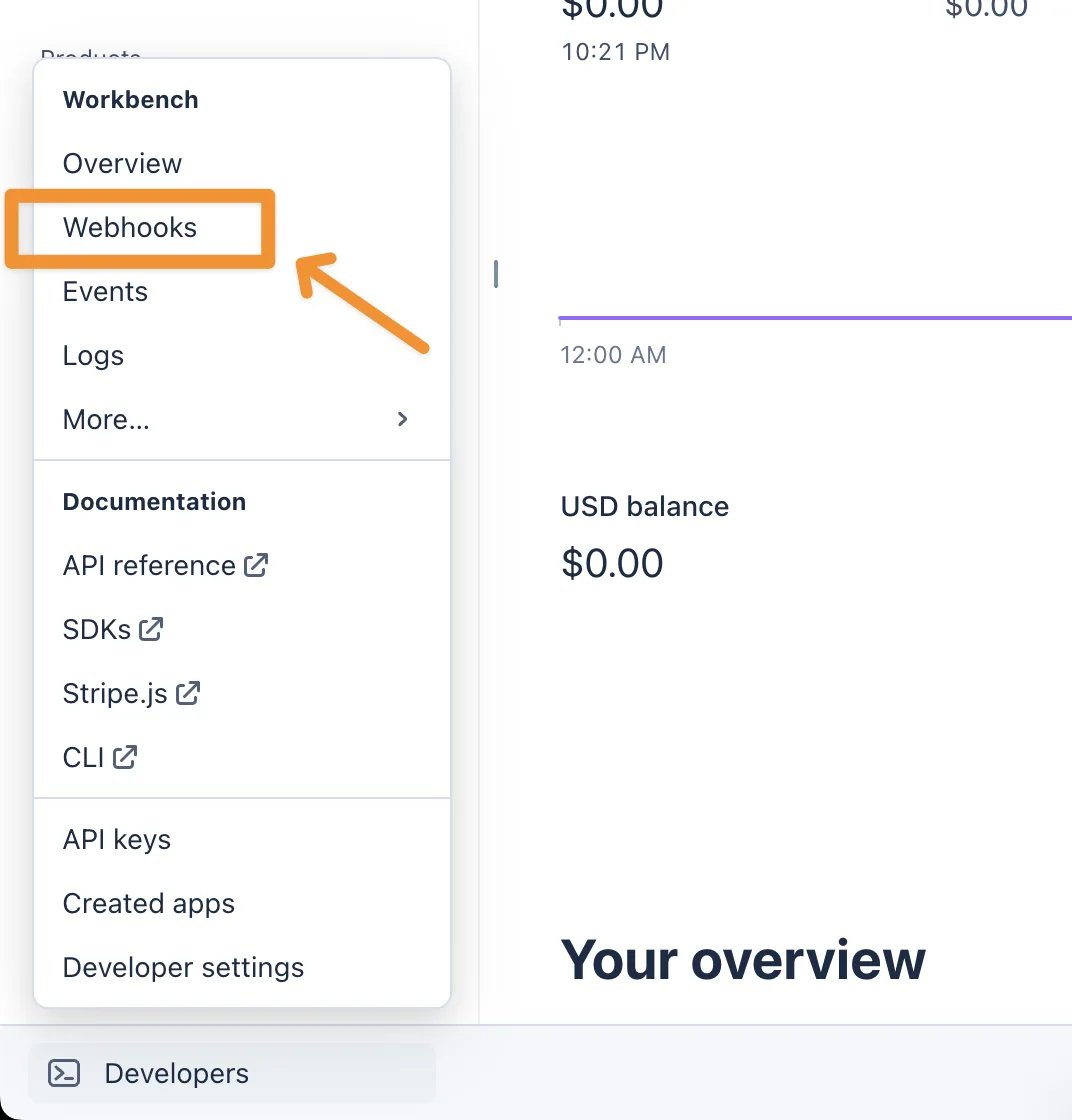
In the menu that opens, click Webhooks under Workbench.
-
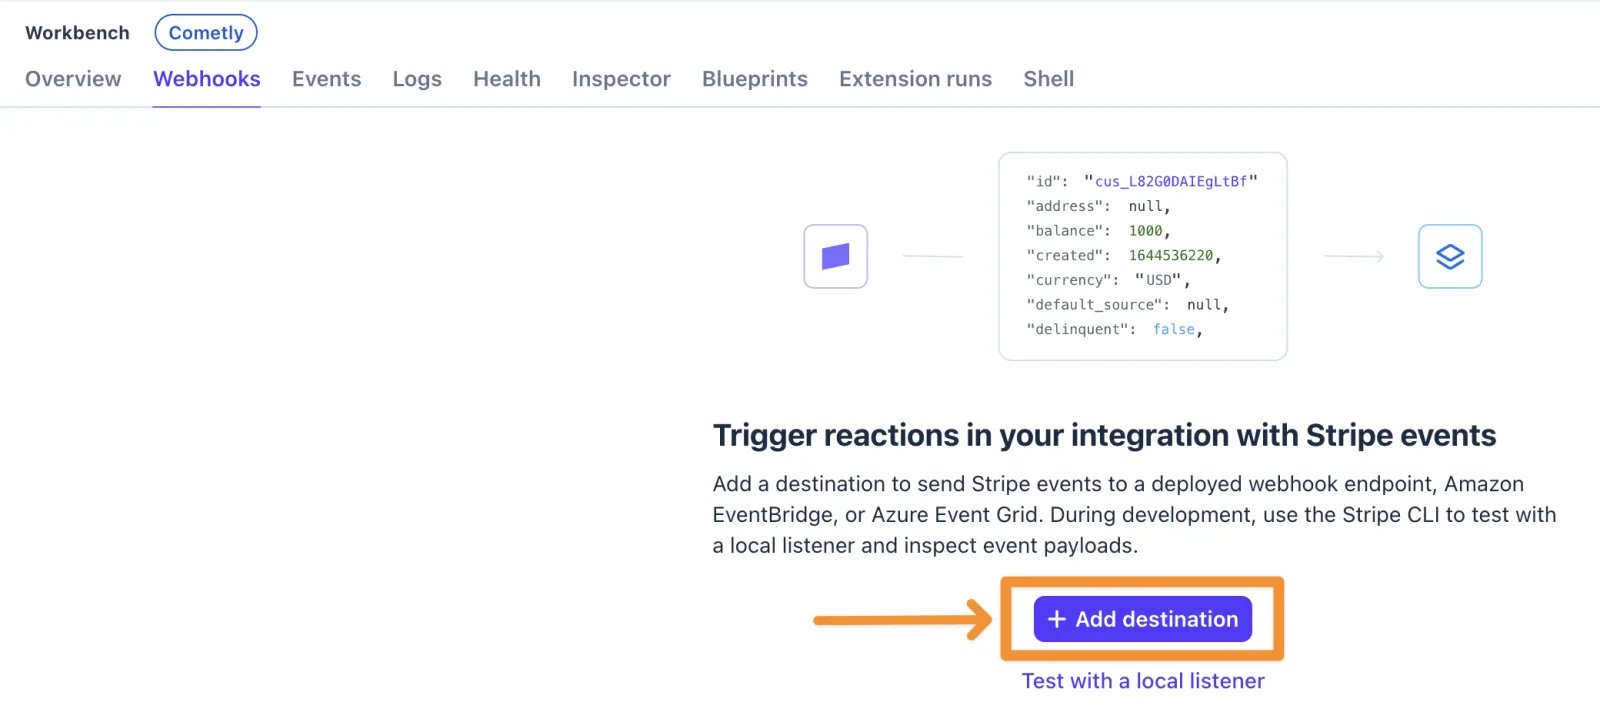
Click + Add destination.
- Stripe asks for the events first, on the Select events step. Pick the event as described in the section below for the event you are setting up: New payments or New trials. You can set up either one or both.
-
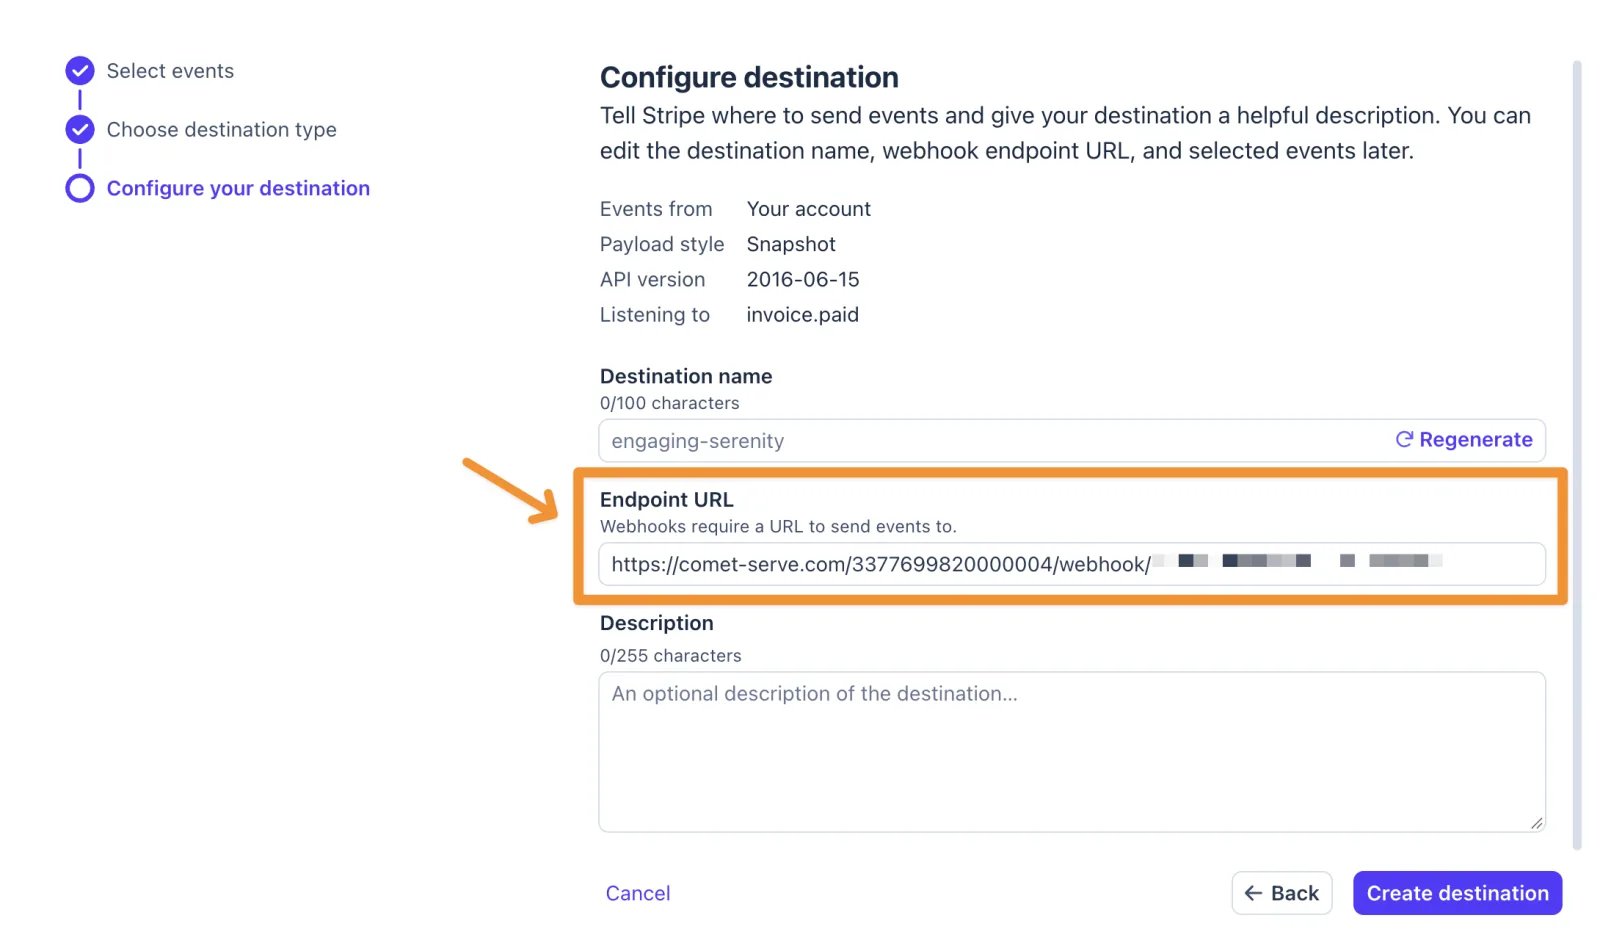
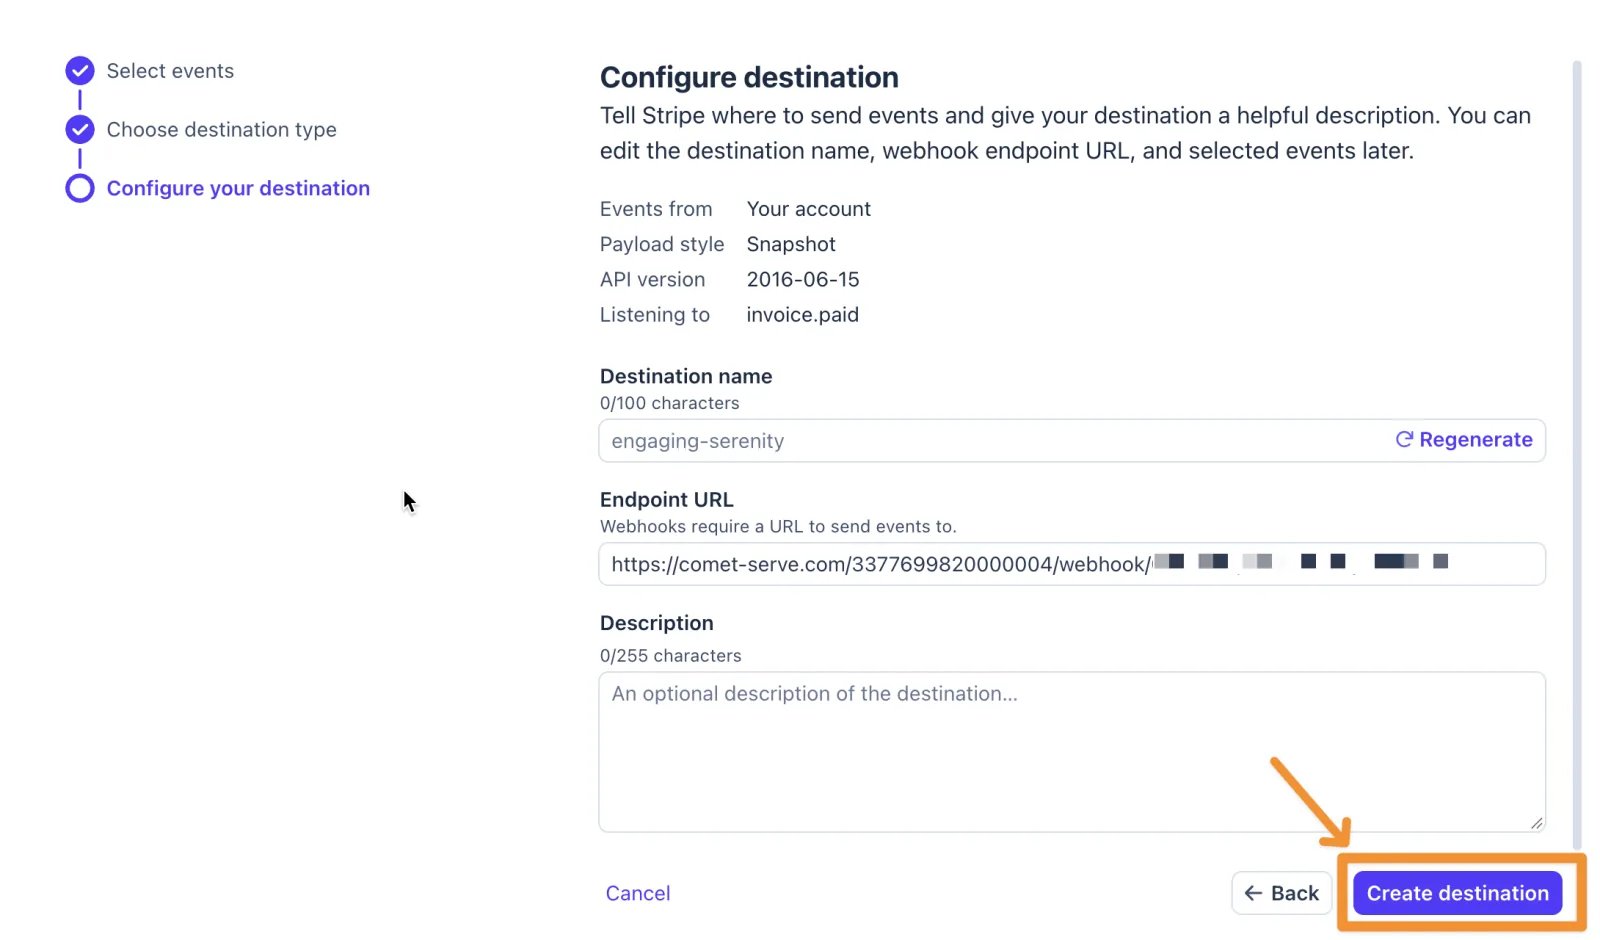
When you reach the Configure your destination step, paste the webhook URL from Step 1 into the Endpoint URL box.
New payments
Tracks successful payments for any payment method (credit cards, ACH, wire, Affirm, Klarna and so on).- Stripe event:
invoice.paid
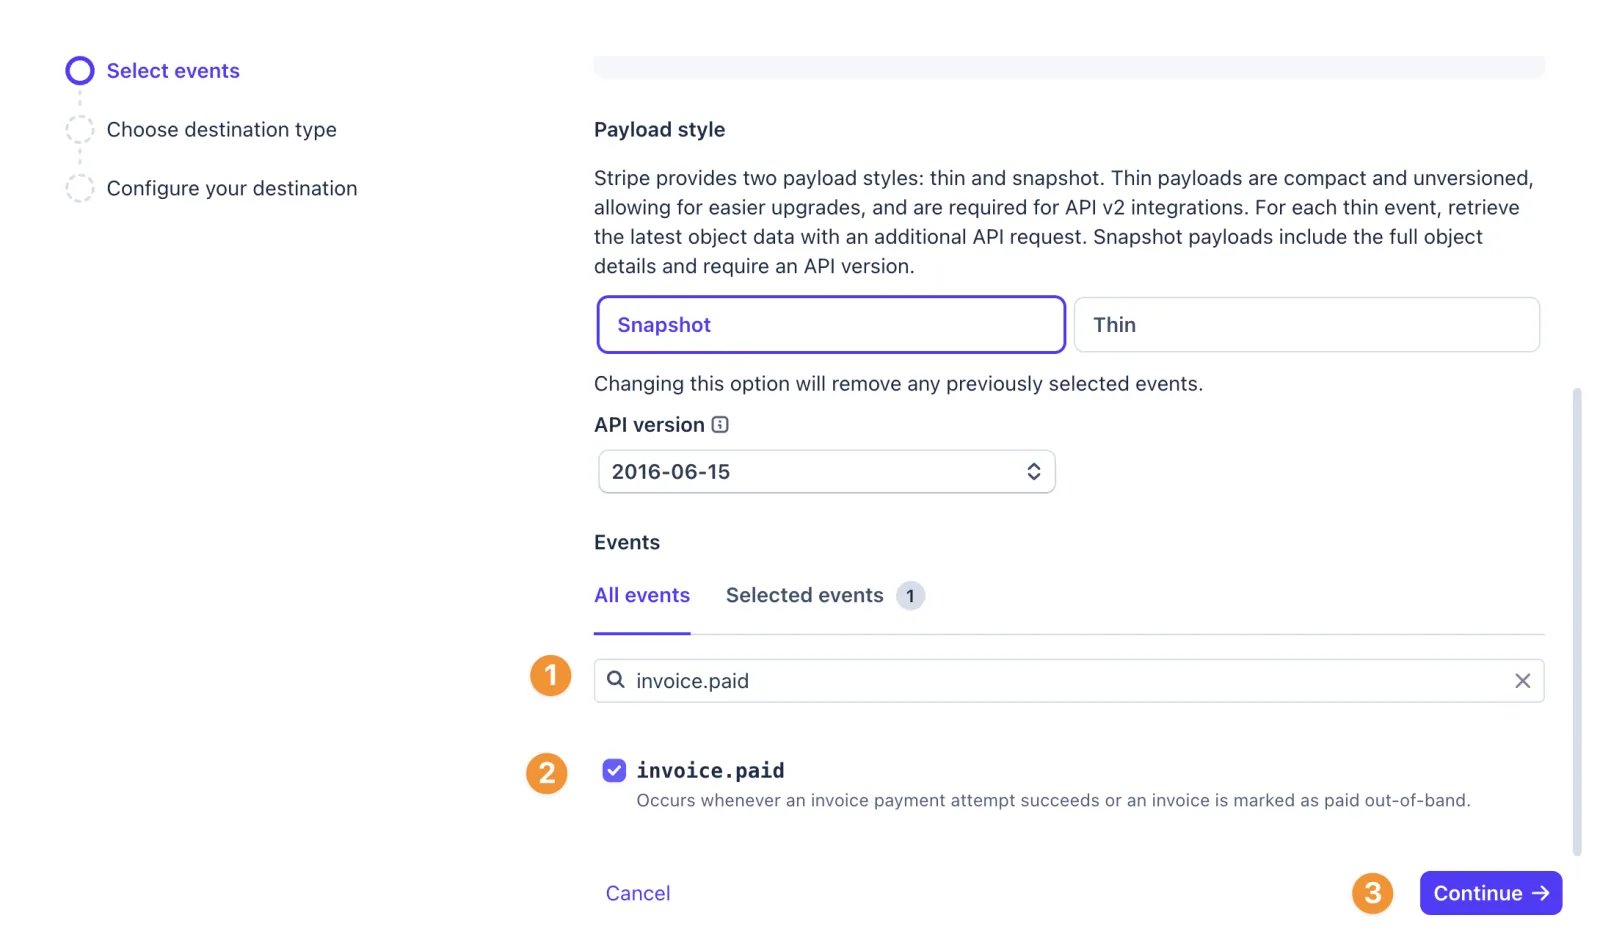
Select the invoice.paid event in Stripe
- Search for invoice paid.
-
Select
invoice.paid. -
Click Continue.
-
On the Configure your destination step, with the webhook URL in the Endpoint URL box, click Create destination.
Check for data in Cometly
-
Go back to the webhook in Cometly. If you left the page, open Events Manager, find the event with the status Draft and click Configure in its row.
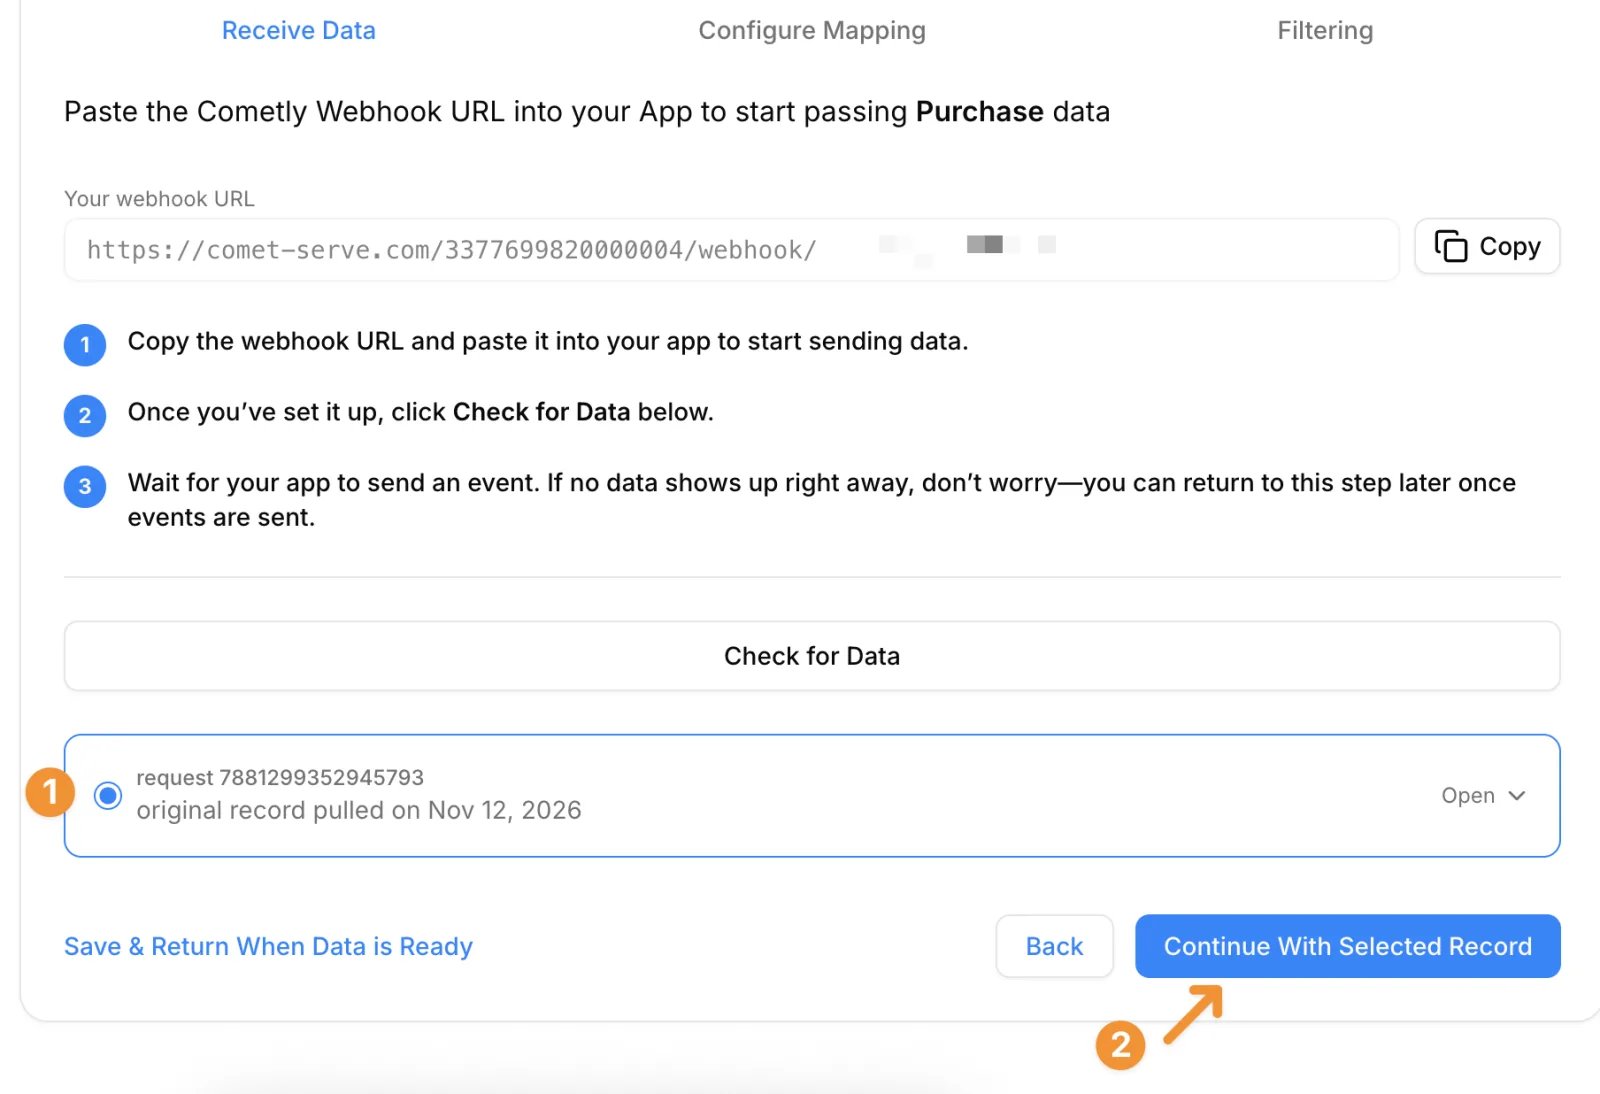
- Click Check for Data. Cometly checks for a few seconds. If no data shows up, don’t worry. Click Save & Return When Data is Ready, then come back and click Check for Data again once Stripe has sent an event.
-
When a recent record from Stripe appears, click it to select it and check that the data is there. Then click Continue With Selected Record.
Map the fields
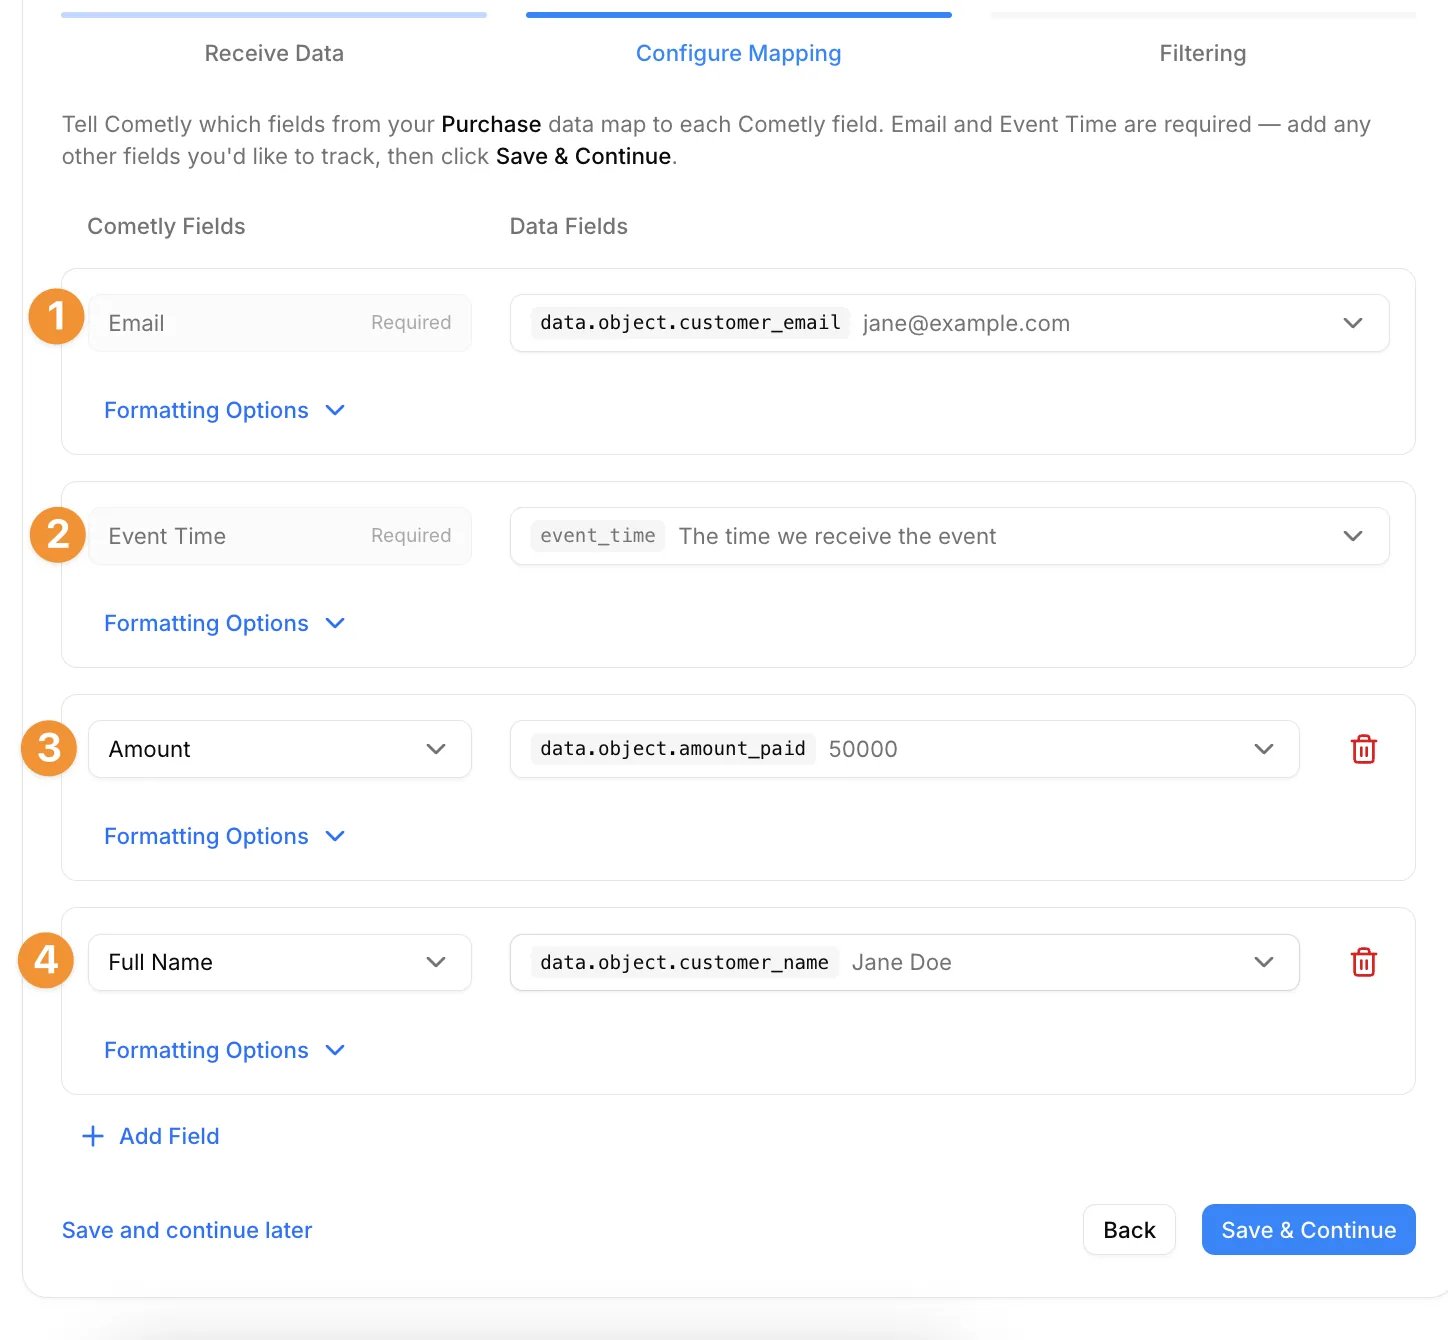
On the Configure Mapping step, match the Stripe data to Cometly fields. Email and Event Time are required and already listed. Click Add Field to add the others.- Email: select
data.object.customer_email. - Event Time: leave it on The time we receive the event.
- Amount: select
data.object.amount_paid. The next section shows how to move the decimal point so the amount is correct. - Full Name: select
data.object.customer_name.
Format the amount
In this example the payment was for 500, but the amount arrives as50000. Use the formatting options to move the decimal point two places.
-
In the Amount row, click Formatting Options.
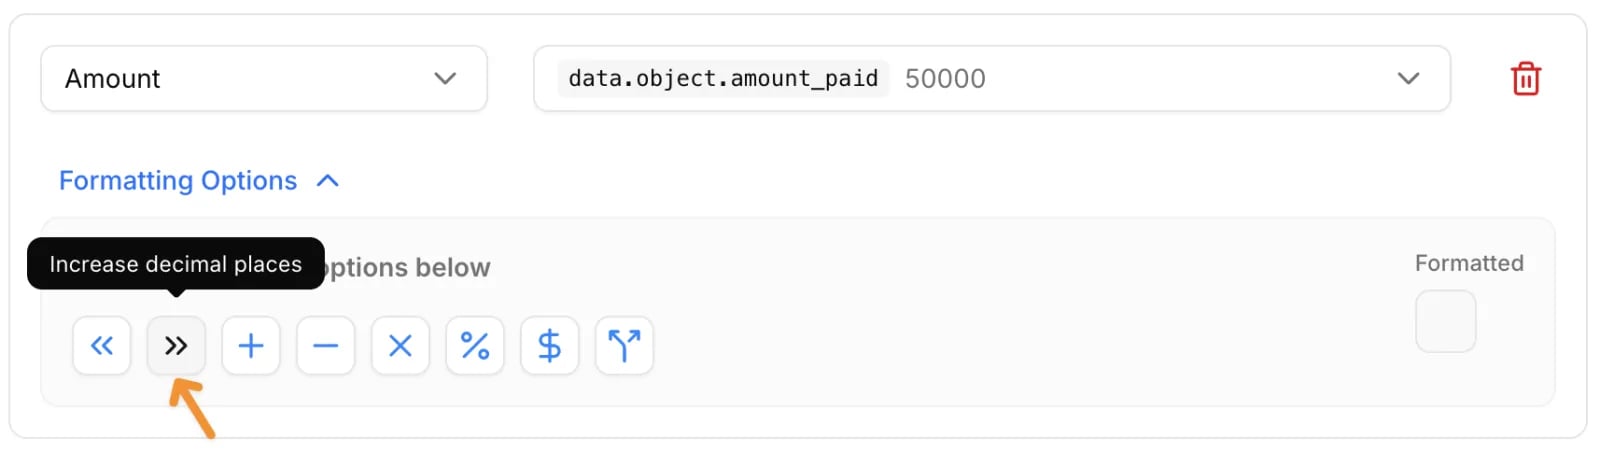
- Click the Increase decimal places button twice. It is the second button in the row, and its name shows when you hover over it. Each click moves the decimal point one place to the left. If you click once too often, click Decrease decimal places to step back.
-
Check the value under Formatted. It should now read
500.00. Click Save & Continue.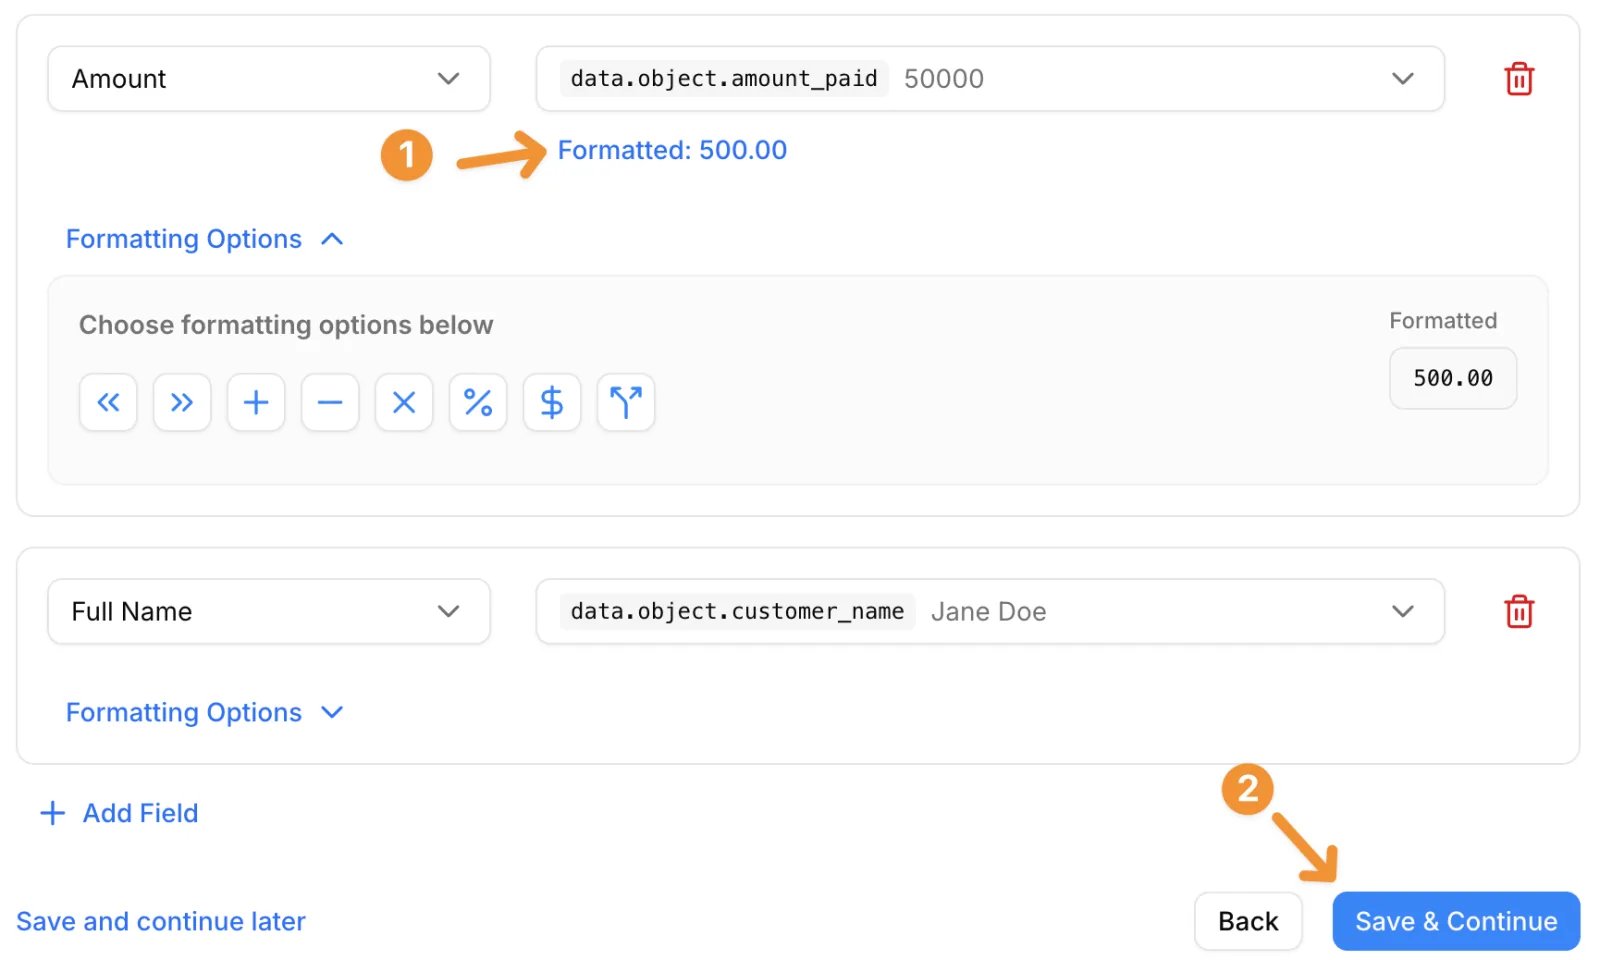
Filter for paid invoices
On the Filtering step, Cometly has already added a filter that skips events with an empty email. Keep it, and add a second filter so only successful payments are processed.- Click Add Another Filter. (The button reads Add Filters when the list is empty.)
-
Type
statusin the search box and selectdata.object.status.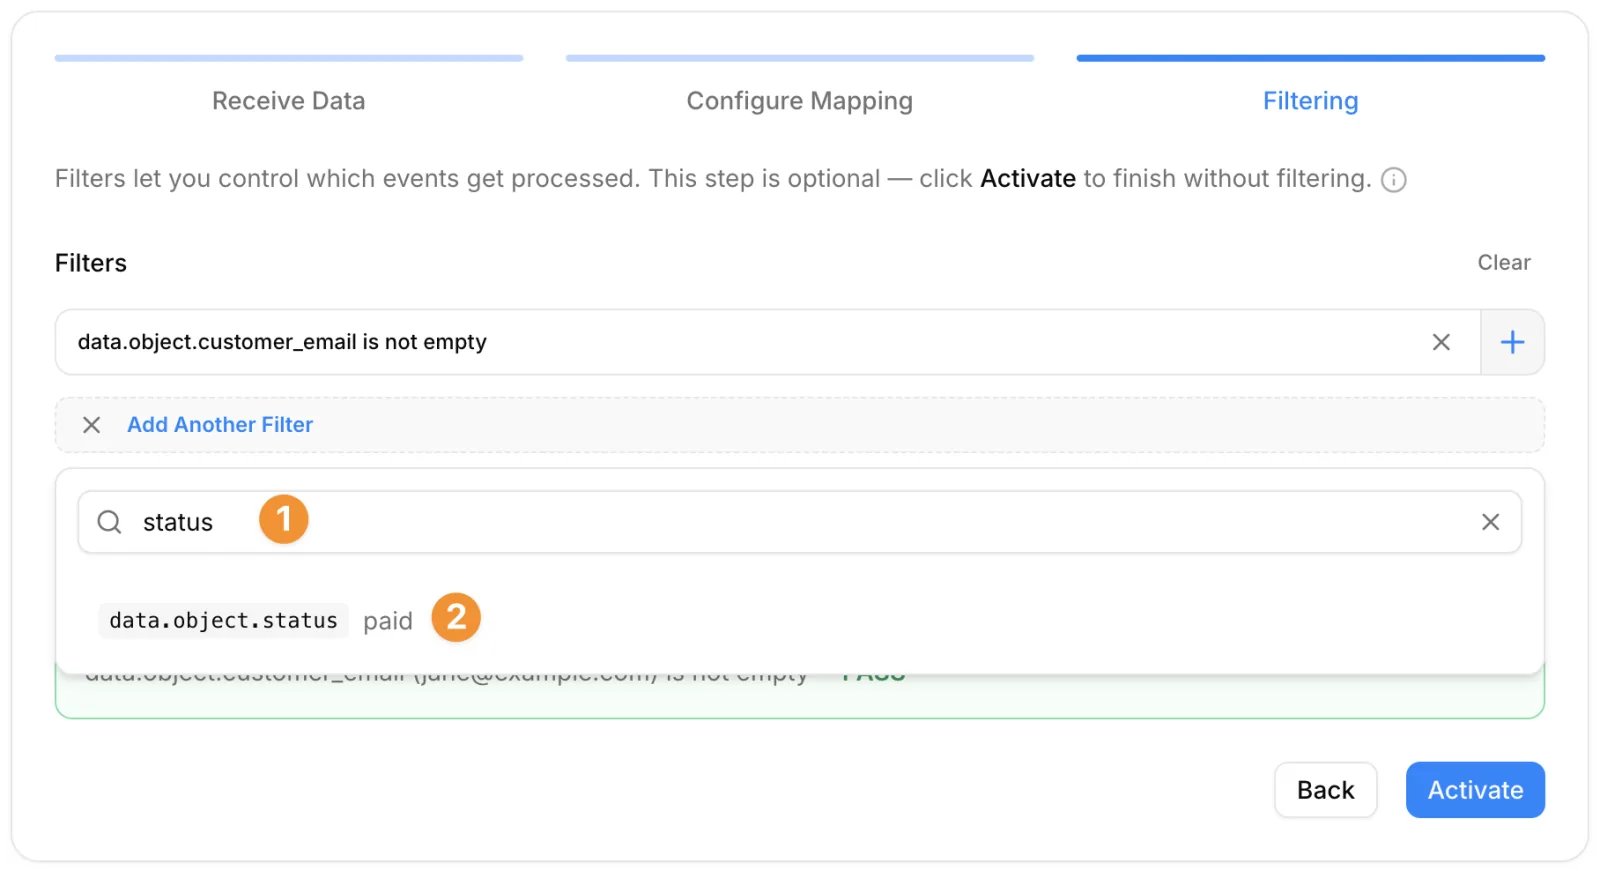
-
Choose the condition (text) contains, enter
paidand click Done.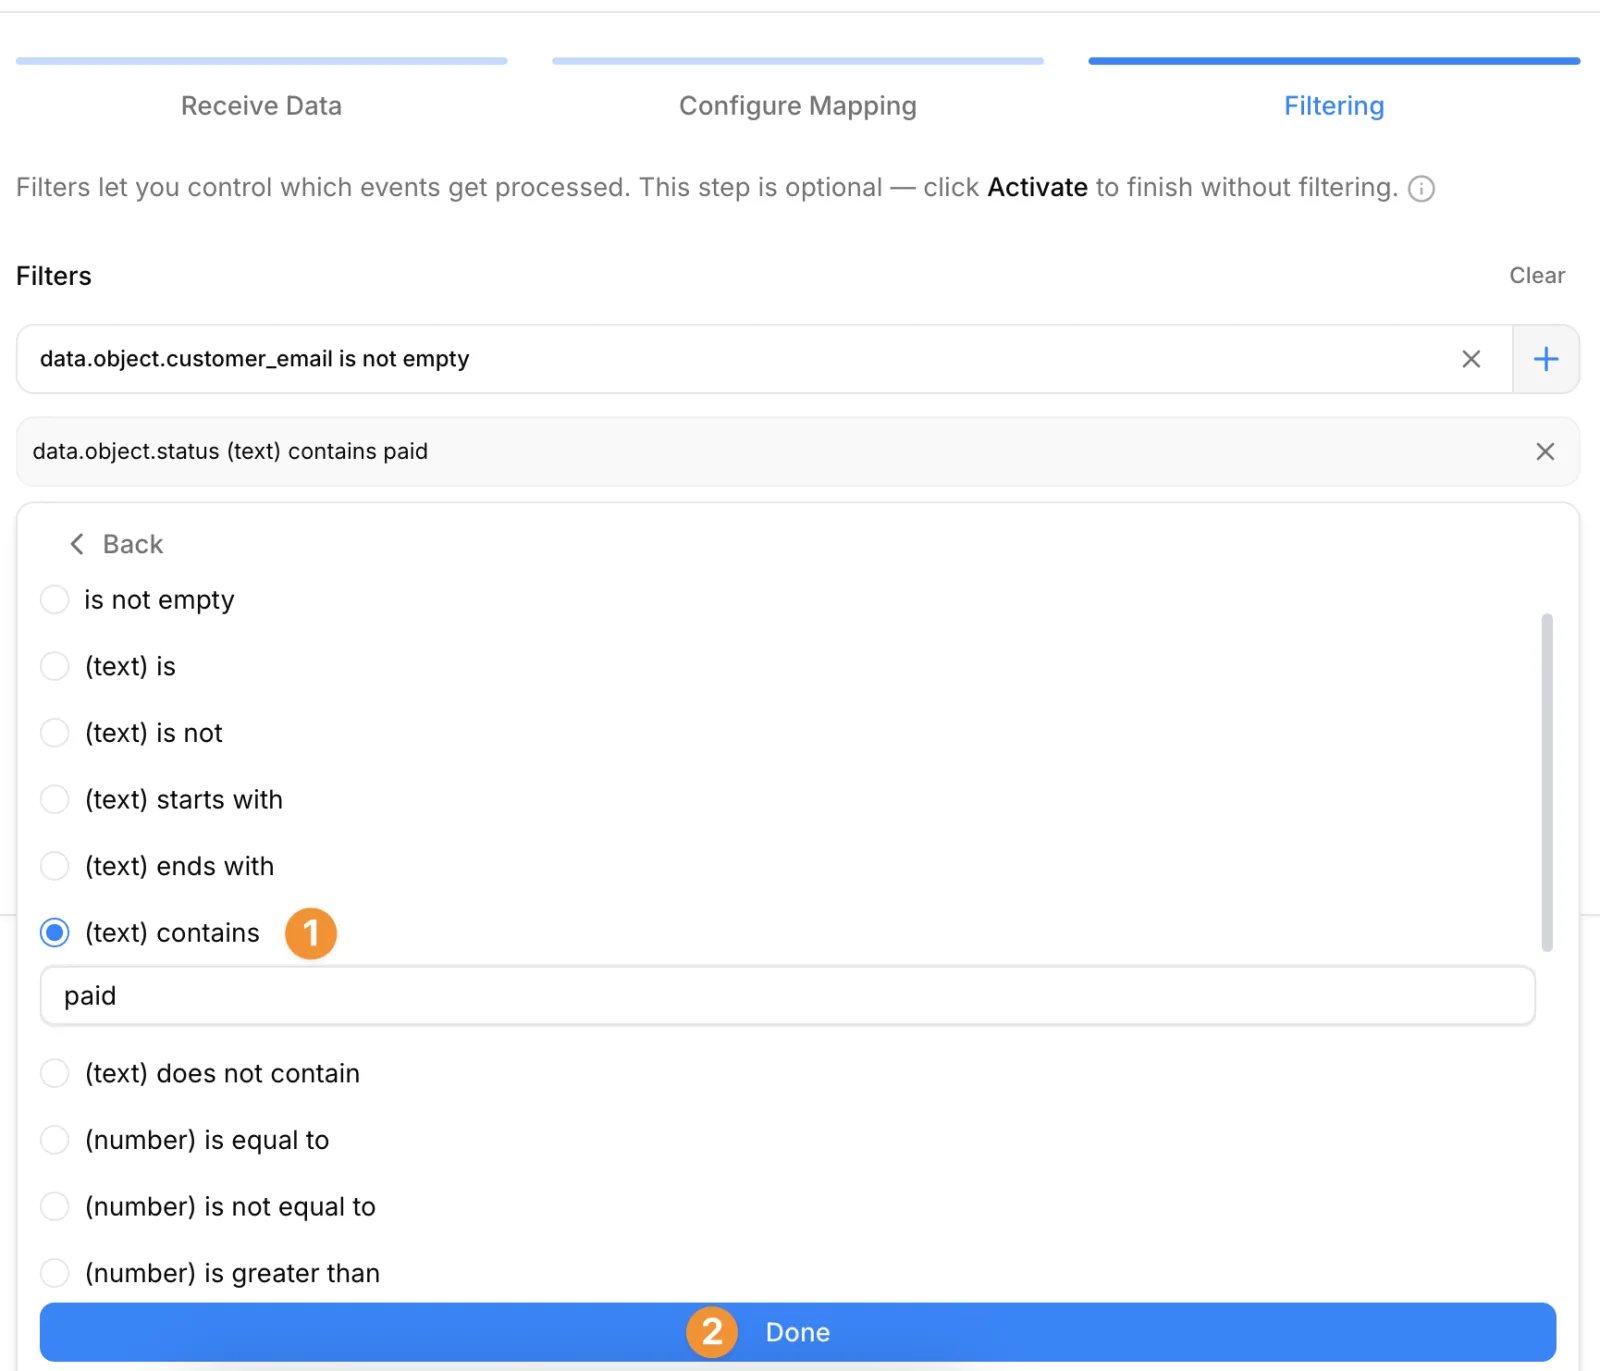
-
Review your filters and click Activate.
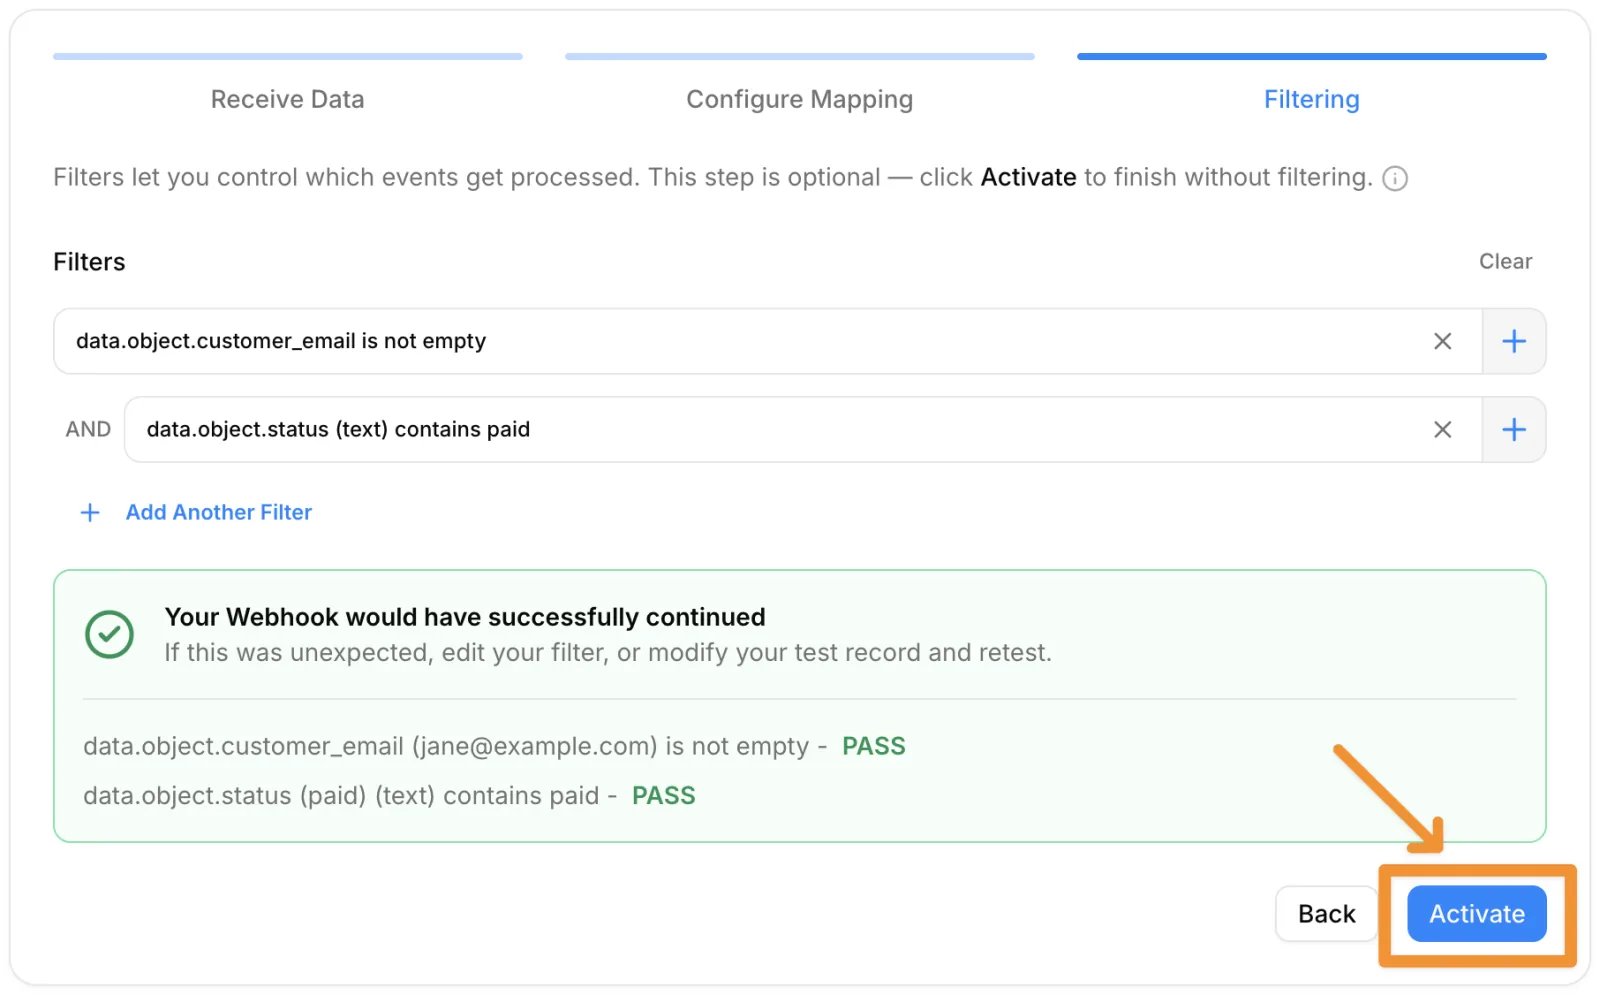
status contains “paid”) and ignores the rest. In the Events Manager, the switch in the event’s Status column is on, which shows the webhook is processing new payments from Stripe.

New trials
Tracks when a customer starts a trial subscription.- Stripe event:
invoice.paid. The filters at the end of this section keep only trial starts: a $0 invoice with the billing reasonsubscription_create.
Select the invoice.paid event for trials
- Search for invoice paid.
-
Select
invoice.paid. - Click Continue.
- On the Configure your destination step, with the webhook URL in the Endpoint URL box, click Create destination.
Check for trial data in Cometly
-
Go back to the webhook in Cometly. If you left the page, open Events Manager, find the Start Trial event with the status Draft and click Configure in its row.
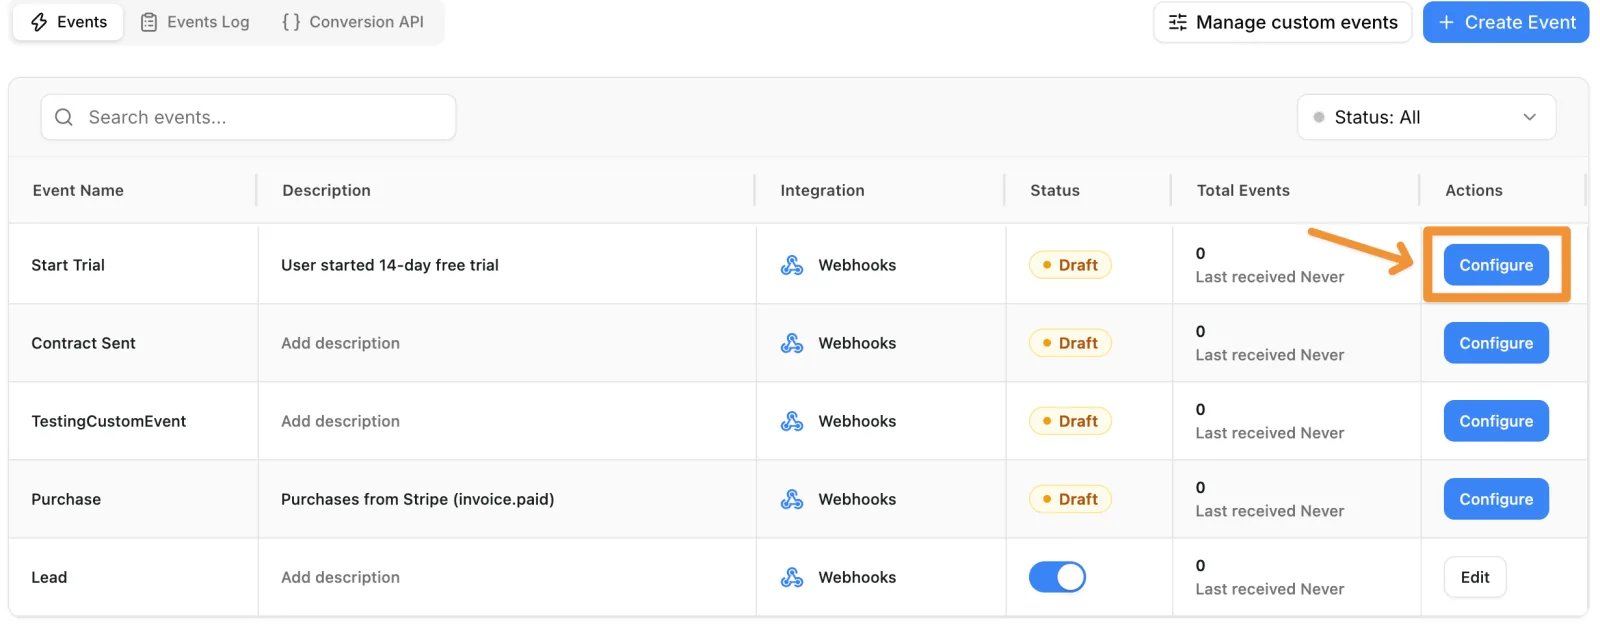
- Click Check for Data. Cometly checks for a few seconds. If no data shows up, don’t worry. Click Save & Return When Data is Ready, then come back and click Check for Data again once Stripe has sent an event.
- When a recent record from Stripe appears, click it to select it and check that the data is there. Then click Continue With Selected Record.
Map the trial fields
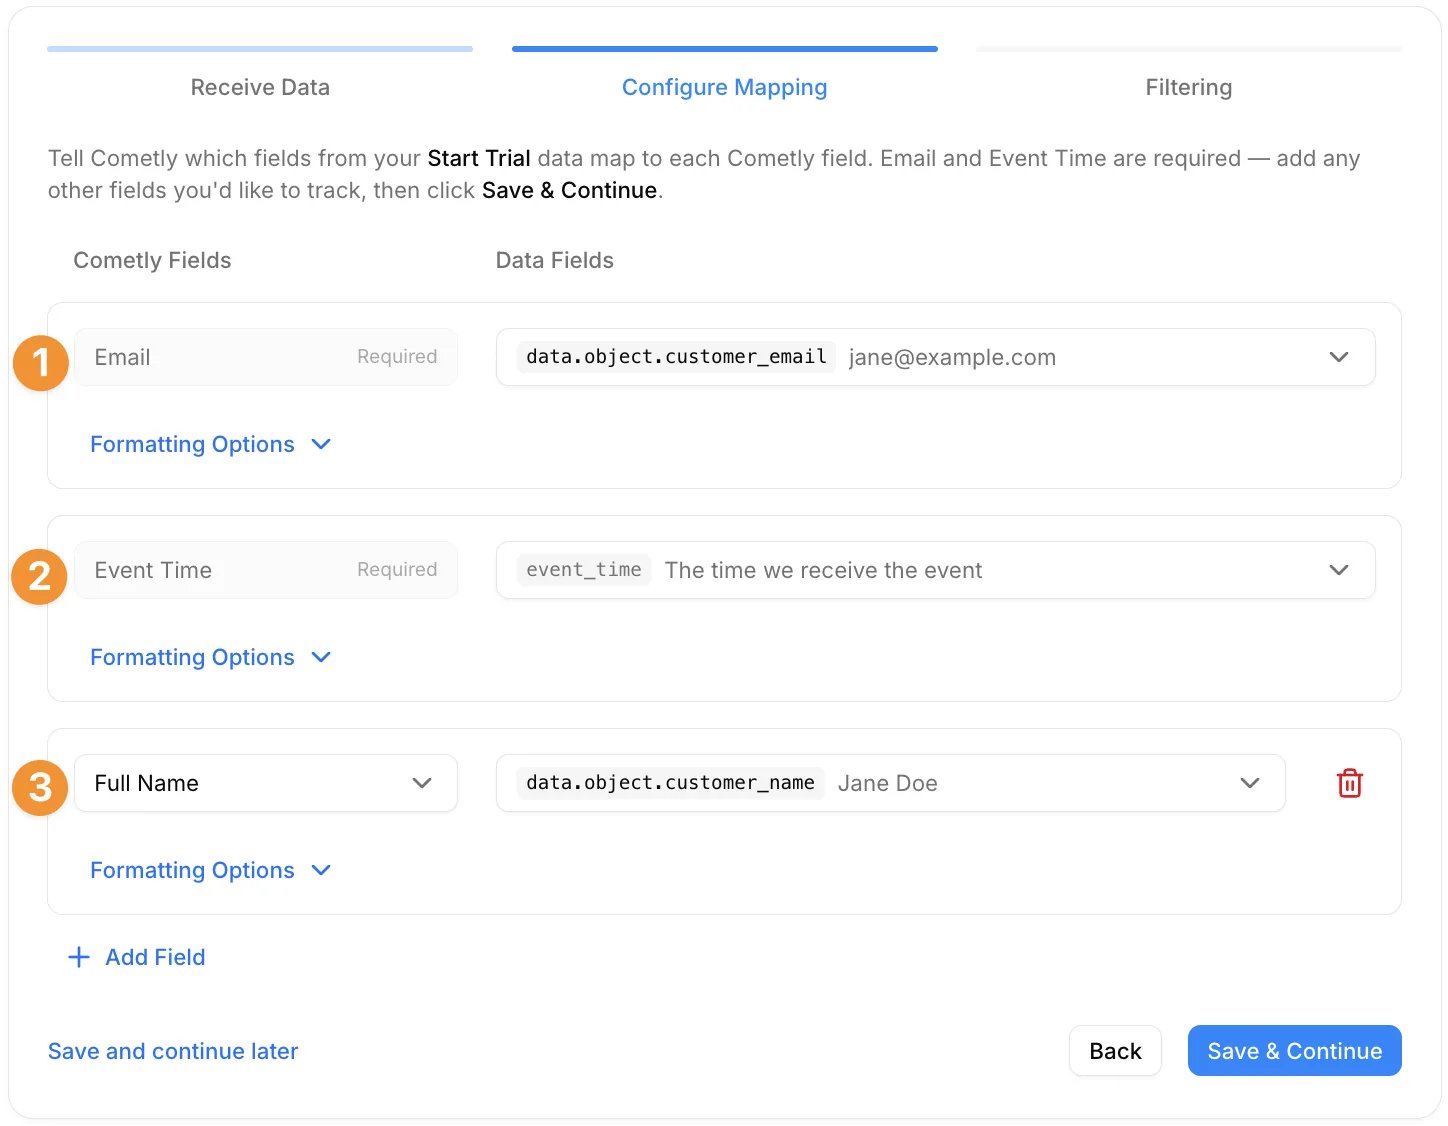
On the Configure Mapping step, match the Stripe data to Cometly fields. Click Add Field to add Full Name.- Email: select
data.object.customer_email. - Event Time: leave it on The time we receive the event.
- Full Name: select
data.object.customer_name.
Filter for new trials
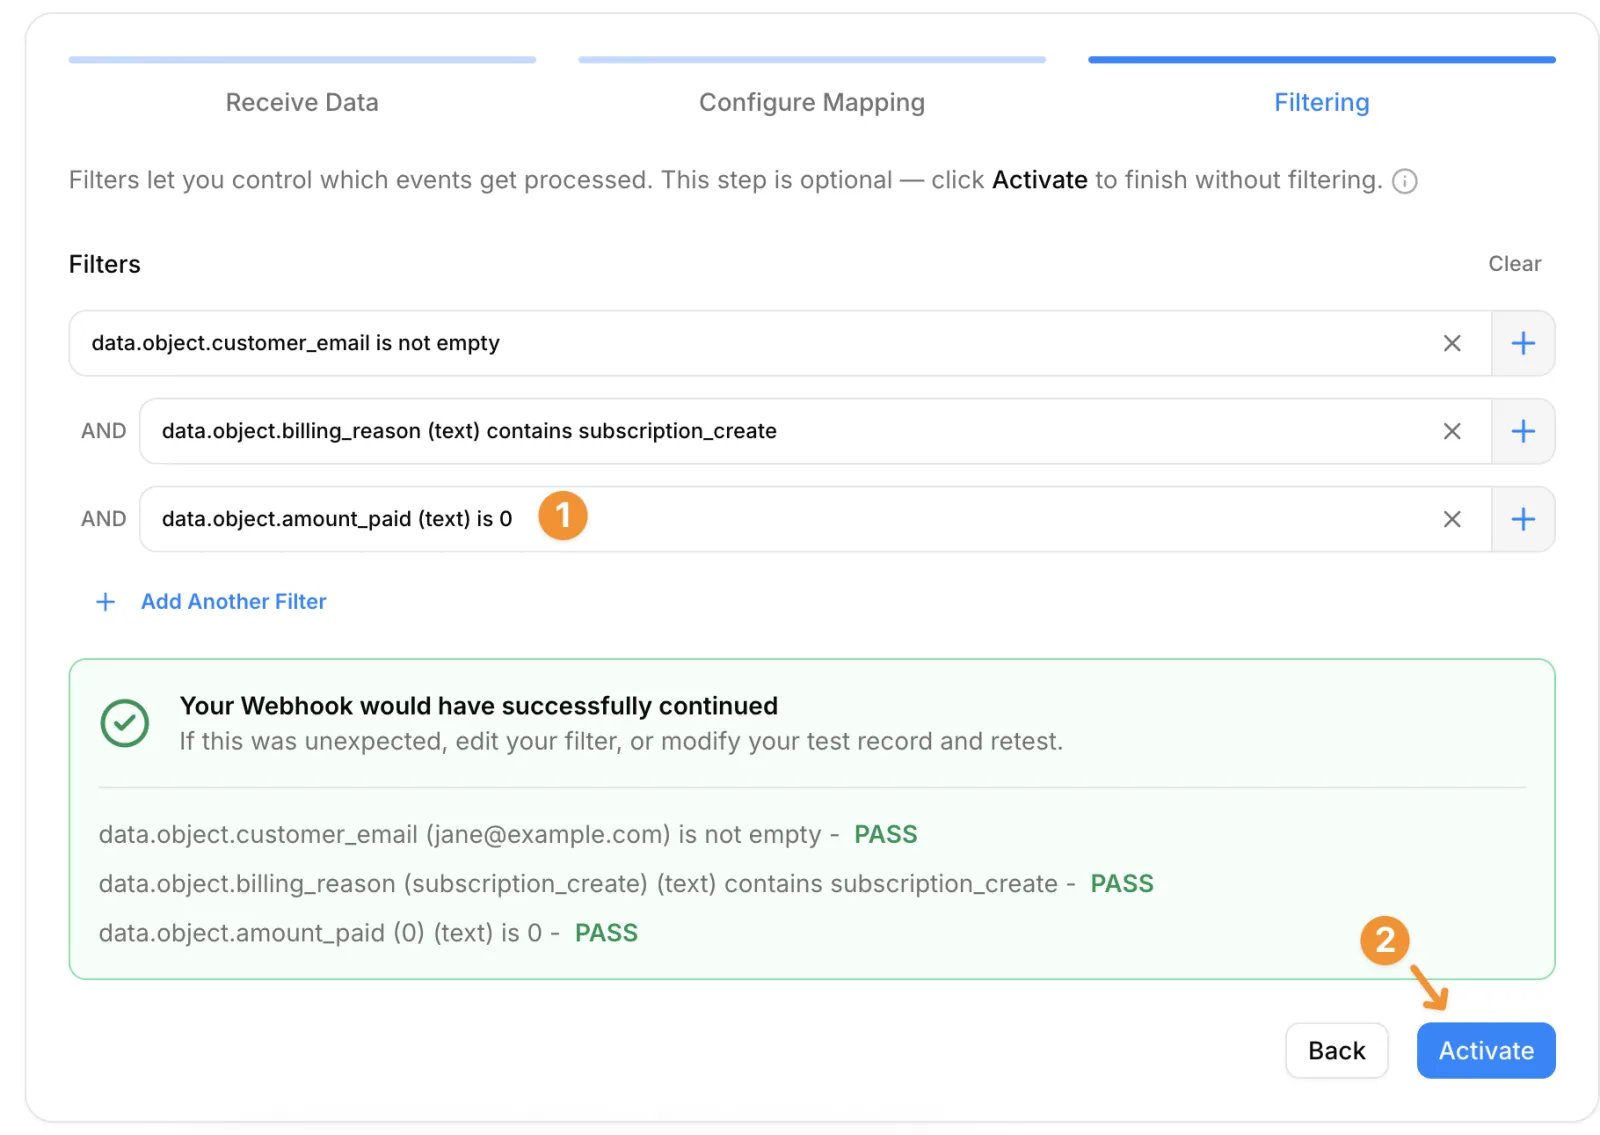
On the Filtering step, keep the filter Cometly added for the email and add two more.-
Click Add Another Filter, type
billingin the search box and selectdata.object.billing_reason. The record you selected must showsubscription_createfor this field, like in the image below. If it does not, create a trial on your end (or wait for the next one) so you can map a record that has it.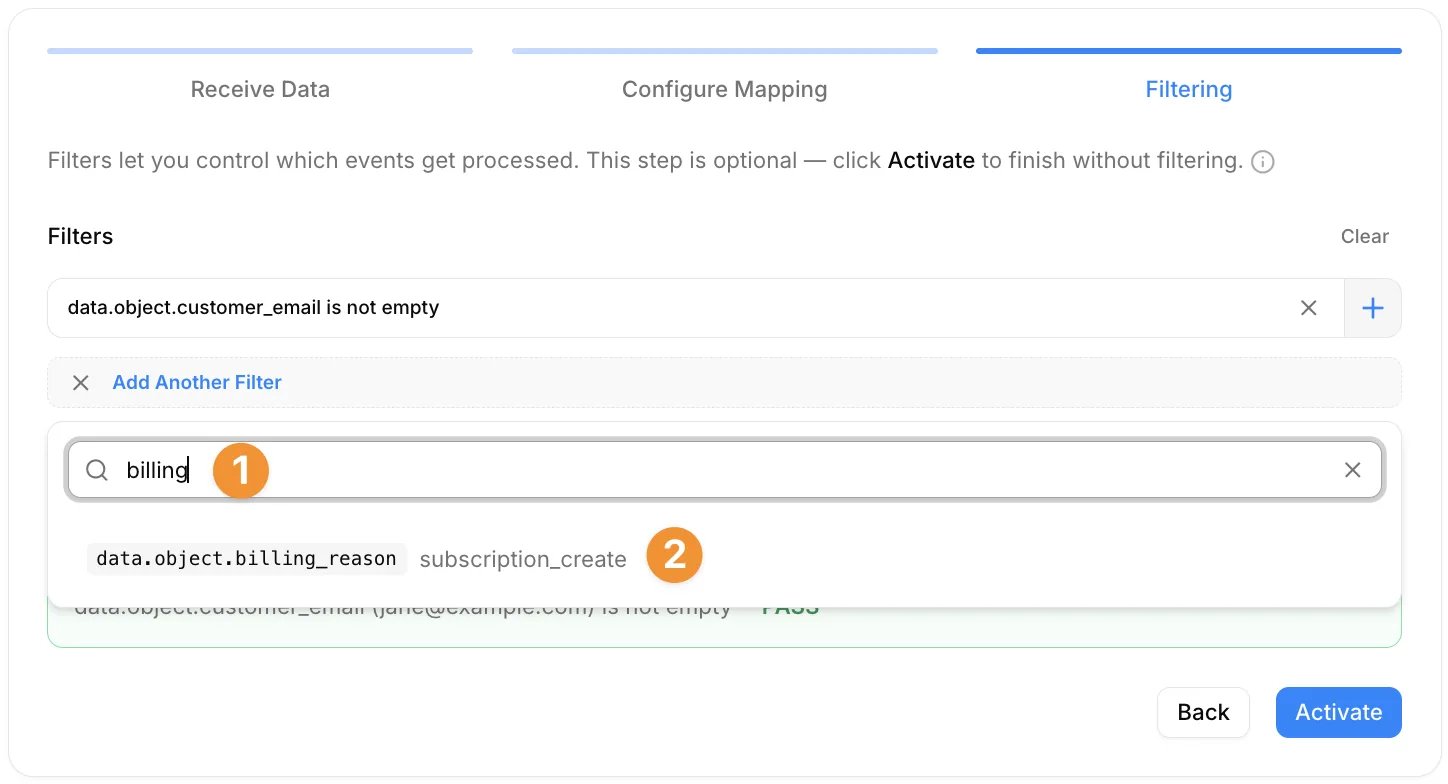
-
Choose the condition (text) contains, enter
subscription_createand click Done. This keeps only invoices created by a new subscription.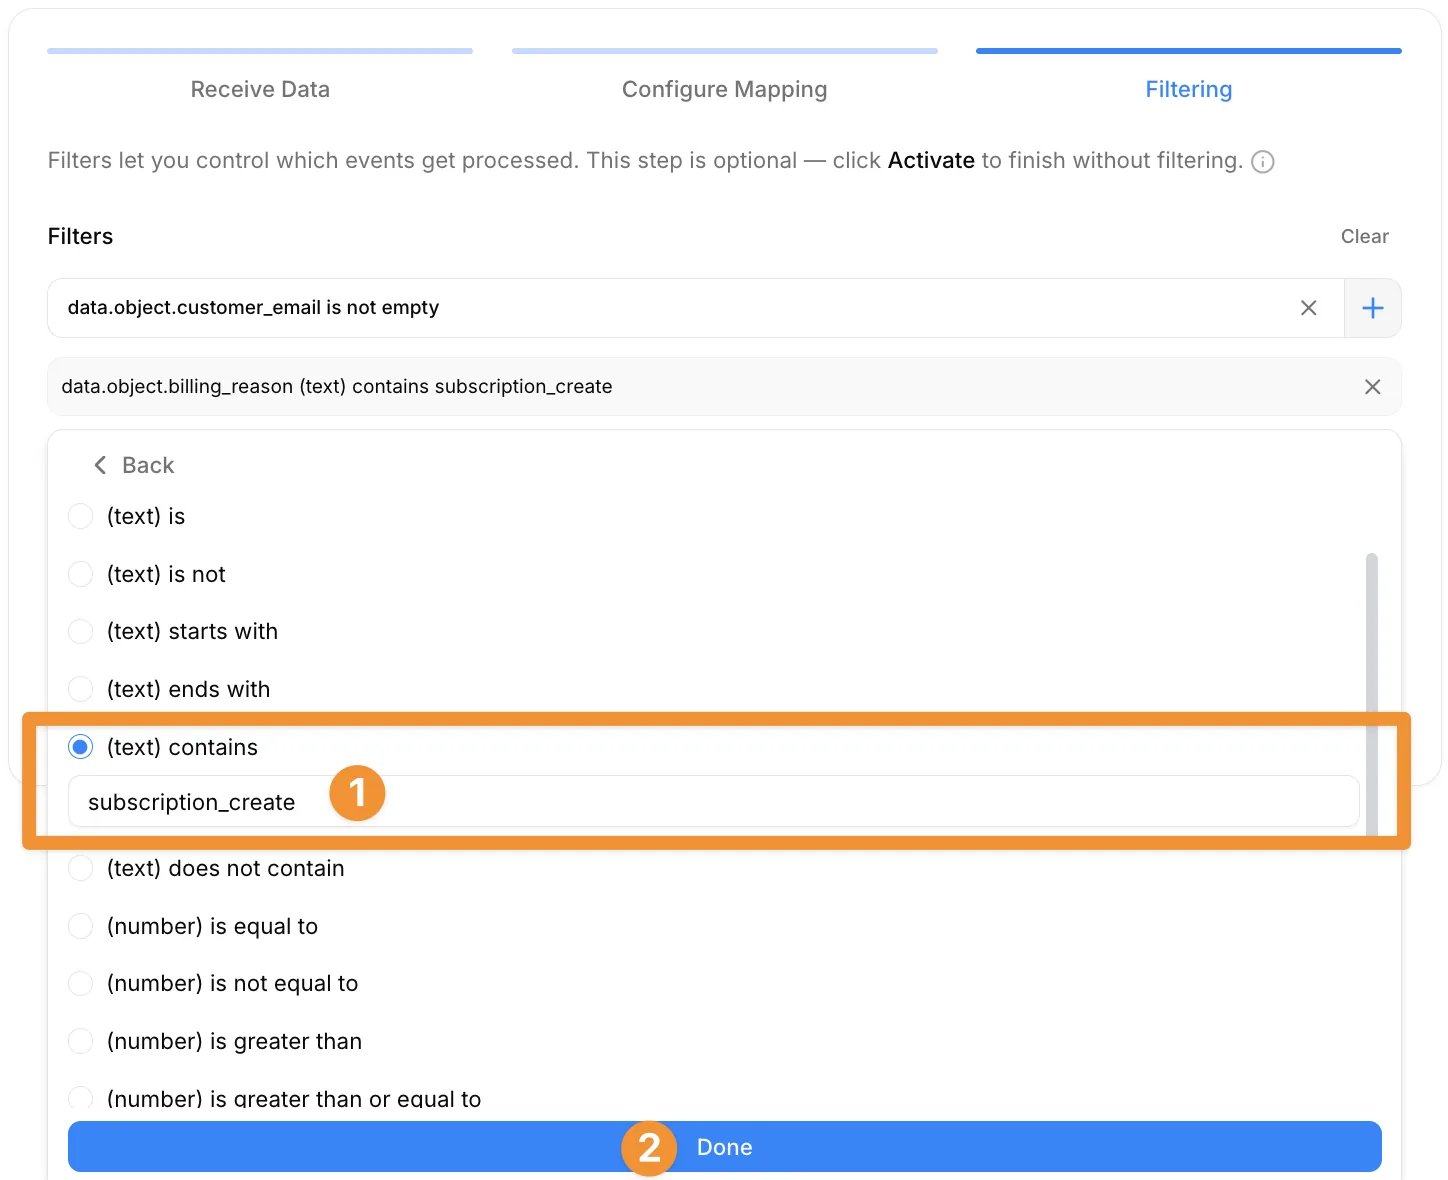
-
Click Add Another Filter again and select
data.object.amount_paid. Choose the condition (text) is, enter0and click Done. This keeps only new subscriptions with a $0 invoice, which means they are trials. -
Click Activate.
Zapier (for Stripe payments)
If you prefer Zapier for tracking new payments, follow these steps. To connect Cometly in Zapier you need a Cometly API token: see the Zapier integration.- Create a new Zap and choose Stripe as your trigger.
- Choose New Payment as the event for Stripe.
- For your first action, select Filter. The filter makes sure only successful payments are sent to Cometly.
-
In the Filter setup & testing section, set the filter to continue only if Status (Text) Exactly matches
succeeded. - Click Continue, test the filter and go to the next step.
-
Choose Cometly as the next action and configure it to send payment events to Cometly.
You must include the following fields: Event Time, Email, Amount and Event.
- Event: select
purchase(required) - Event Time: type
now(required) - Email: choose the email from the Stripe trigger (required)
- Full Name: choose the full name from the Stripe trigger (recommended)
- Amount: choose the amount from the Stripe trigger (recommended)
- Event: select
- Test and publish your Zap.
Check it worked
In Events Manager, each webhook event you activated shows a switch that is turned on in the Status column. After the next payment or trial in Stripe (or after you test the Cometly step in your Zap), open the Events Log tab: the event appears there within 60 seconds, with SUCCESS in the Details column. Test data sent before you activated a webhook event is not processed, so wait for a new one.Frequently asked questions
How long does it take for Stripe webhook events to show up in Cometly?
The event shows in the Events Log within 60 seconds of being sent. It can take up to 15 minutes to appear in the reporting areas, such as the Report Builder or Ads Manager.Why do my Stripe payments show up in Cometly without an ad source?
Cometly needs an email address to connect a Stripe payment to the visitor who clicked your ad. Make sure a form earlier in your funnel collects the customer’s email, so Cometly has already seen that email on your site when the payment arrives. For other causes, see Understanding No Source in reports.How do I track Stripe refunds or canceled subscriptions in Cometly?
Use the direct Stripe integration: it has ready-made triggers for New Refund and Canceled Subscription, along with new subscriptions, new customers and first payments. You pick the trigger when you configure the event, with no webhook to add in Stripe. See Stripe.Next steps
- Use the Events Log to confirm Stripe events arrive
- Map fields, add filters and activate a webhook event
- Connect the direct Stripe integration
- Track first-time and recurring Stripe payments with Zapier
- Send conversions back to your ad platforms