

Make sure Enhanced conversions for leads is turned on in your Google Ads account. It lets Google match conversions by email and phone when there is no click ID. Follow the steps in this article to improve your Google event match rate.
Why use the Google Conversion API
- Send all events, not just Google-attributed ones, so Google’s AI has more to learn from.
- Each conversion carries the contact details Cometly has collected for that visitor (hashed email and phone), plus the Google click ID when there is one.
- Better match quality gives Google better signals for bidding and reporting.
Before you start
- Connect your Google Ads account to the space (a space is a workspace in your Cometly account, with its own tracking, ad accounts and reports). See Connect your ad platforms.
- Make sure your events are tracking accurately in Cometly. The Conversion API page recommends waiting at least 7 days after events start flowing before you turn data sharing on.
Step 1: Create your offline conversion actions in Google Ads
To receive Cometly events in Google Ads, start by creating offline conversion actions.-
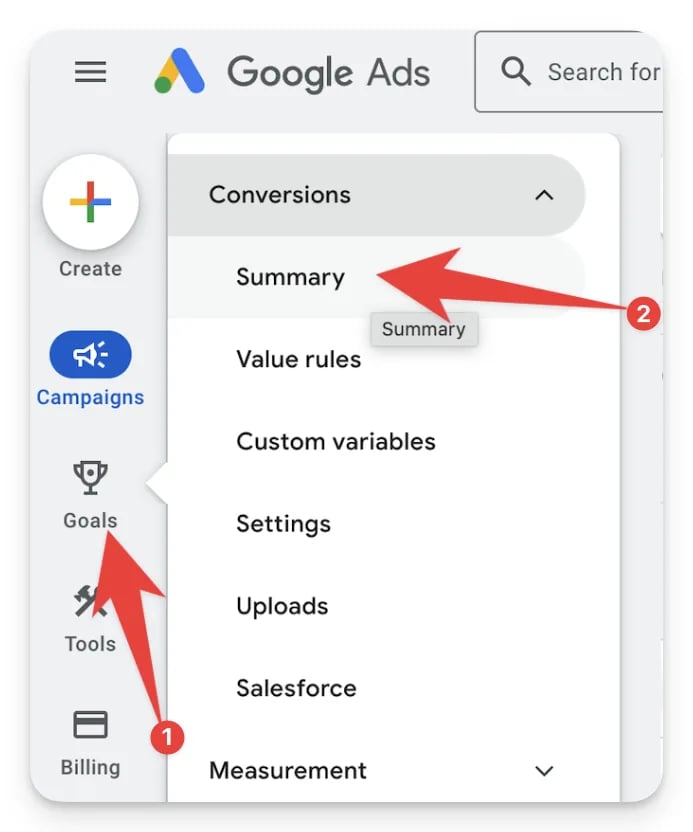
Log in to Google Ads and go to Goals > Conversions > Summary.
-
Click + New conversion action.
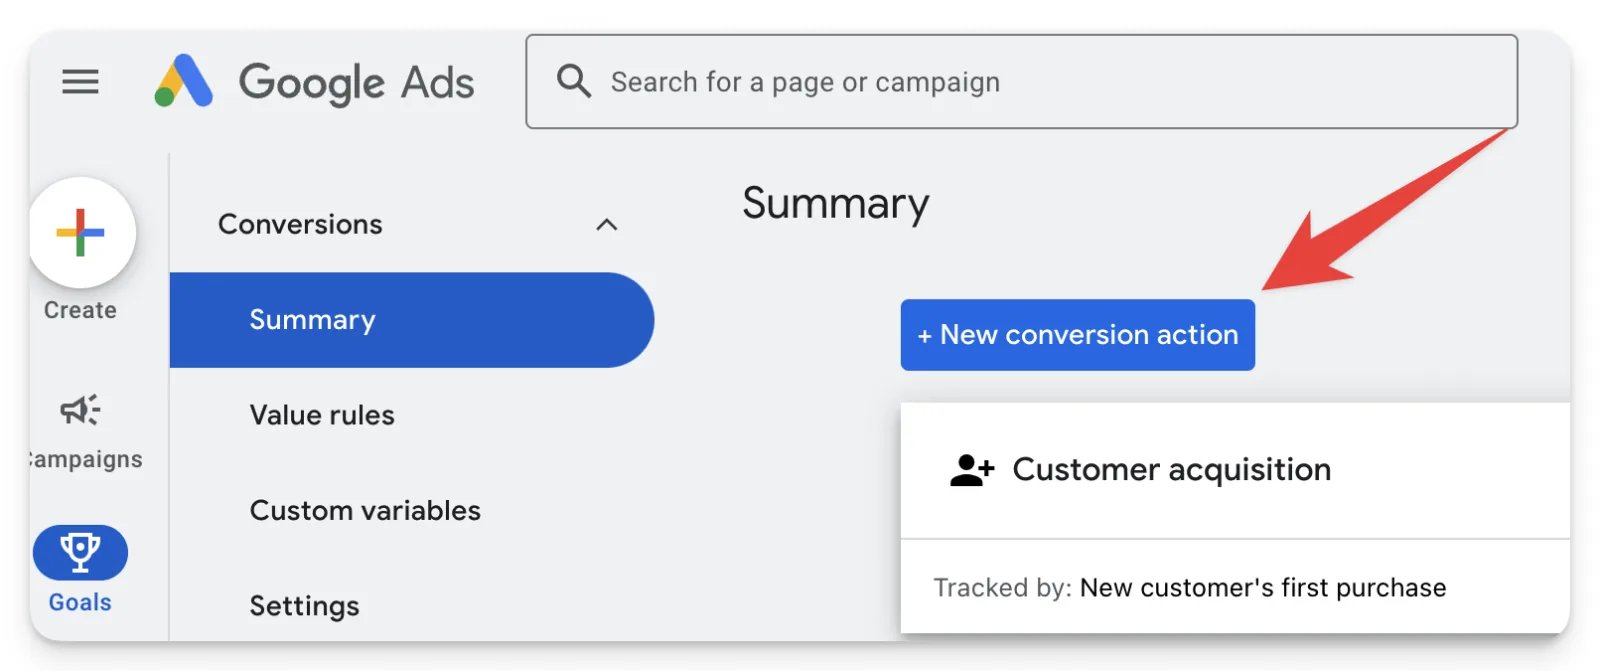
- Choose Import, then CRMs, files, or other data sources.
- Under Data source, select Skip this step and set up a data source later. You do not need to create or configure a data source. Cometly sends the data once your events are mapped.
Configure the conversion action settings
Configure the conversion action settings
Name the conversion action anything you want, for example “Qualified Lead” or “Closed Deal”. The name is for your own reporting.Choose a goal category that best matches your event, such as “Qualified lead”, “Purchase” or “Submit lead form”.Next, choose whether the conversion is Primary or Secondary:
In the example below, we selected “Qualified lead” and set it as a Secondary conversion action that is not used for bidding optimization.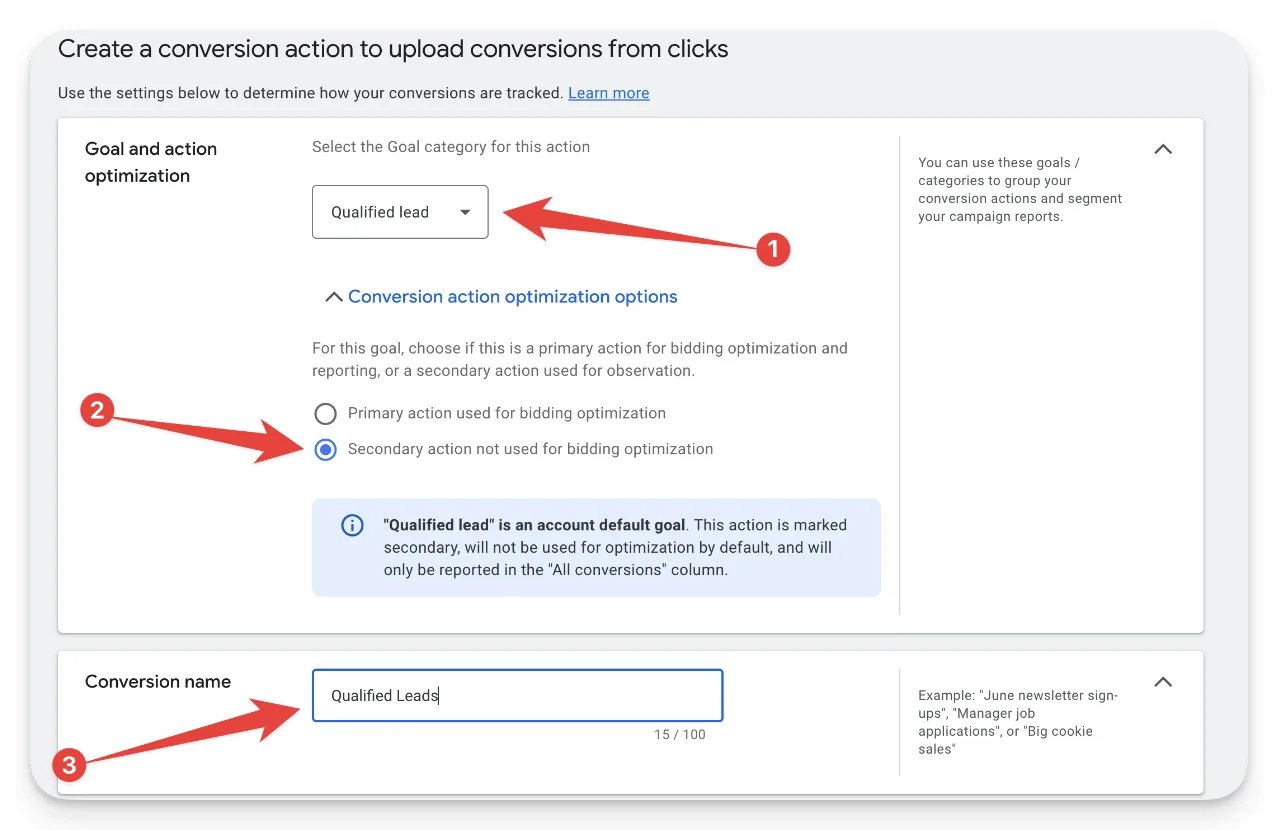
- Use Secondary if your campaigns are set to account-level goals. This stops the new conversion from affecting existing campaign optimization.
- Use Primary only if your campaigns use campaign-specific goals and you want this conversion to be part of bidding optimization.
- If it says Account goals, choose Secondary.
- If it uses Campaign-specific goals, you can choose Primary if you want.
How to check if you are using account goals or campaign-specific goals
How to check if you are using account goals or campaign-specific goals
Value settings
This setting defines how Google Ads values your conversions.If Cometly is not sending a value:- Choose “Don’t use a value” (not recommended).
- Or choose “Use the same value for each conversion” and enter a static number (for example $50 per lead).
- Choose “Use different values for each conversion”.
- Enter a default fallback value (for example $650) so conversions still track in the rare case that no value is received.
Count settings
This setting controls how many conversions are counted per interaction:- Choose “One” for leads, sign-ups and similar actions (only the first instance matters).
- Choose “Every” for purchases or revenue-based actions (each conversion counts).
Attribution settings
- Set the click-through conversion window to 90 days.
- Set the engaged-view conversion window to 3 days.
- Choose “Data-driven” attribution.
If Google shows you a different setup screen
If Google Ads shows you a newer conversion action setup view than the one above, follow these steps instead:- Go to the Conversions page.
- Both Conversions on a website and Conversions offline are disabled. Click Continue.
- On the next page, select the category you want to use for offline uploads. For example, if you select Purchase, click Add an event to this category.
- Choose Offline data sources.
- Click Settings next to it and adjust the conversion settings as described above.
- Click Done, then Save and continue.
Step 2: Create a custom goal in Google Ads
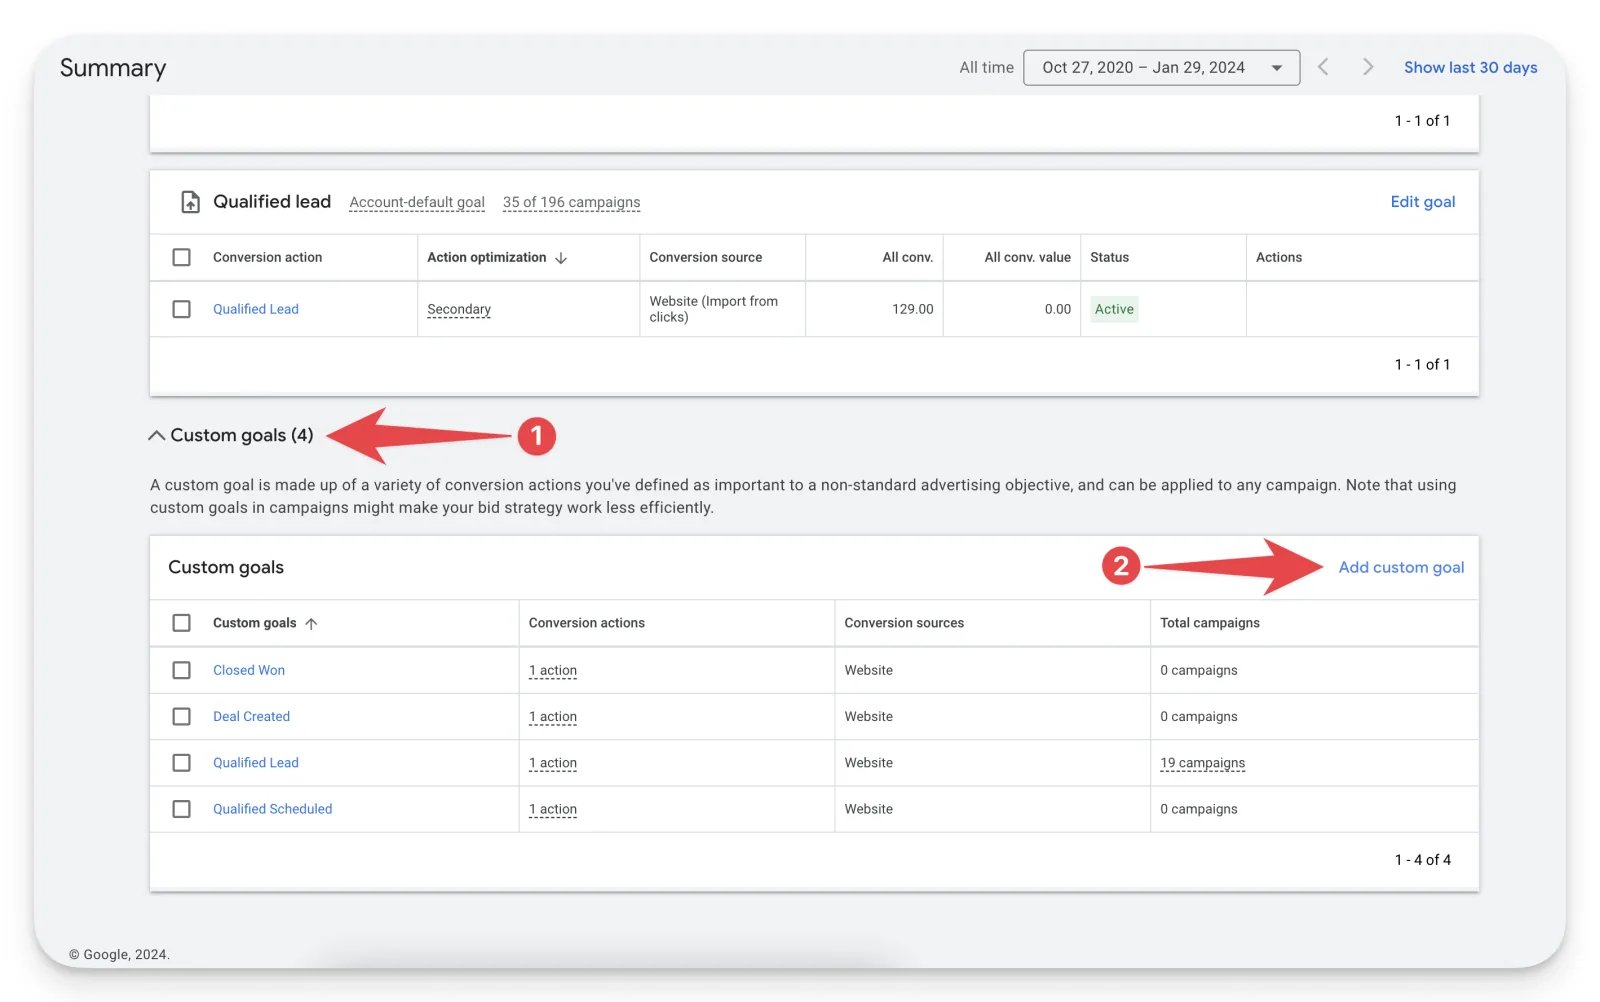
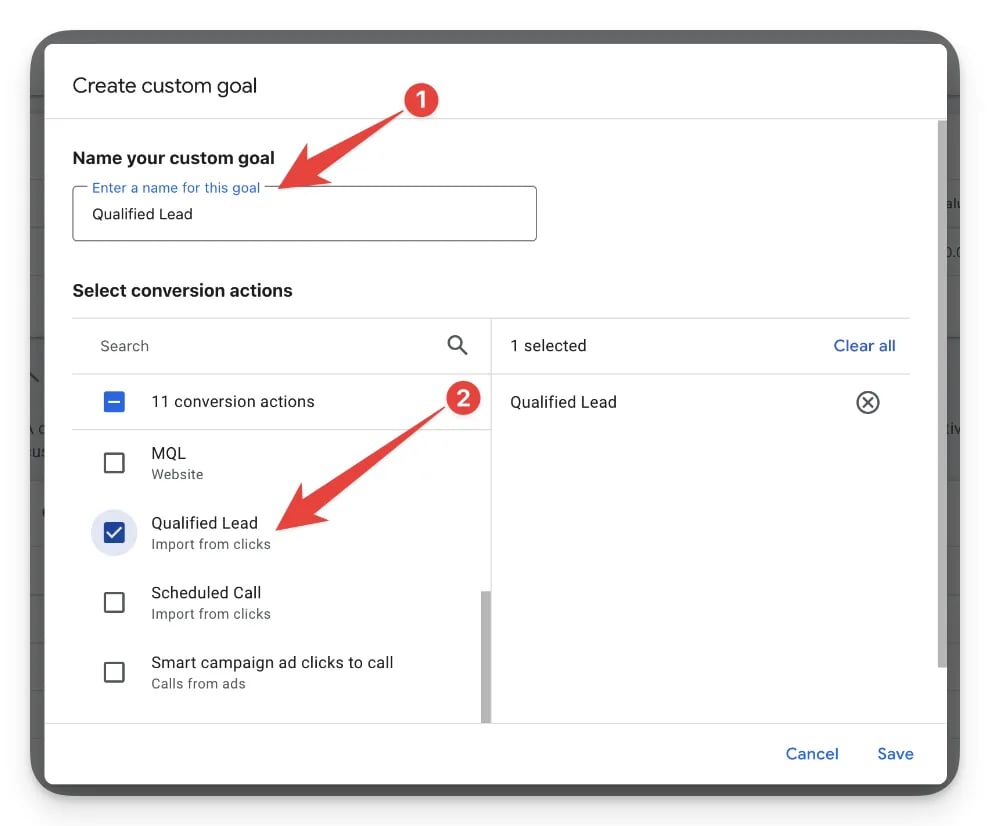
After your offline conversion action is set up, group it into a custom goal so you can use it at the campaign level. A custom goal groups one or more conversion actions under a single objective that you assign to specific campaigns. Use it when you want different campaigns to optimize for different outcomes.- Scroll to the bottom of the Conversions Summary page in Google Ads (Goals > Conversions > Summary, as in Step 1).
-
Click Add custom goal.
-
Name your custom goal, select the secondary offline conversion action you want to associate with it, and click Save.
Step 3: Turn on data sharing in Cometly
-
In Cometly, click Events Manager in the sidebar, then open the Conversion API tab.
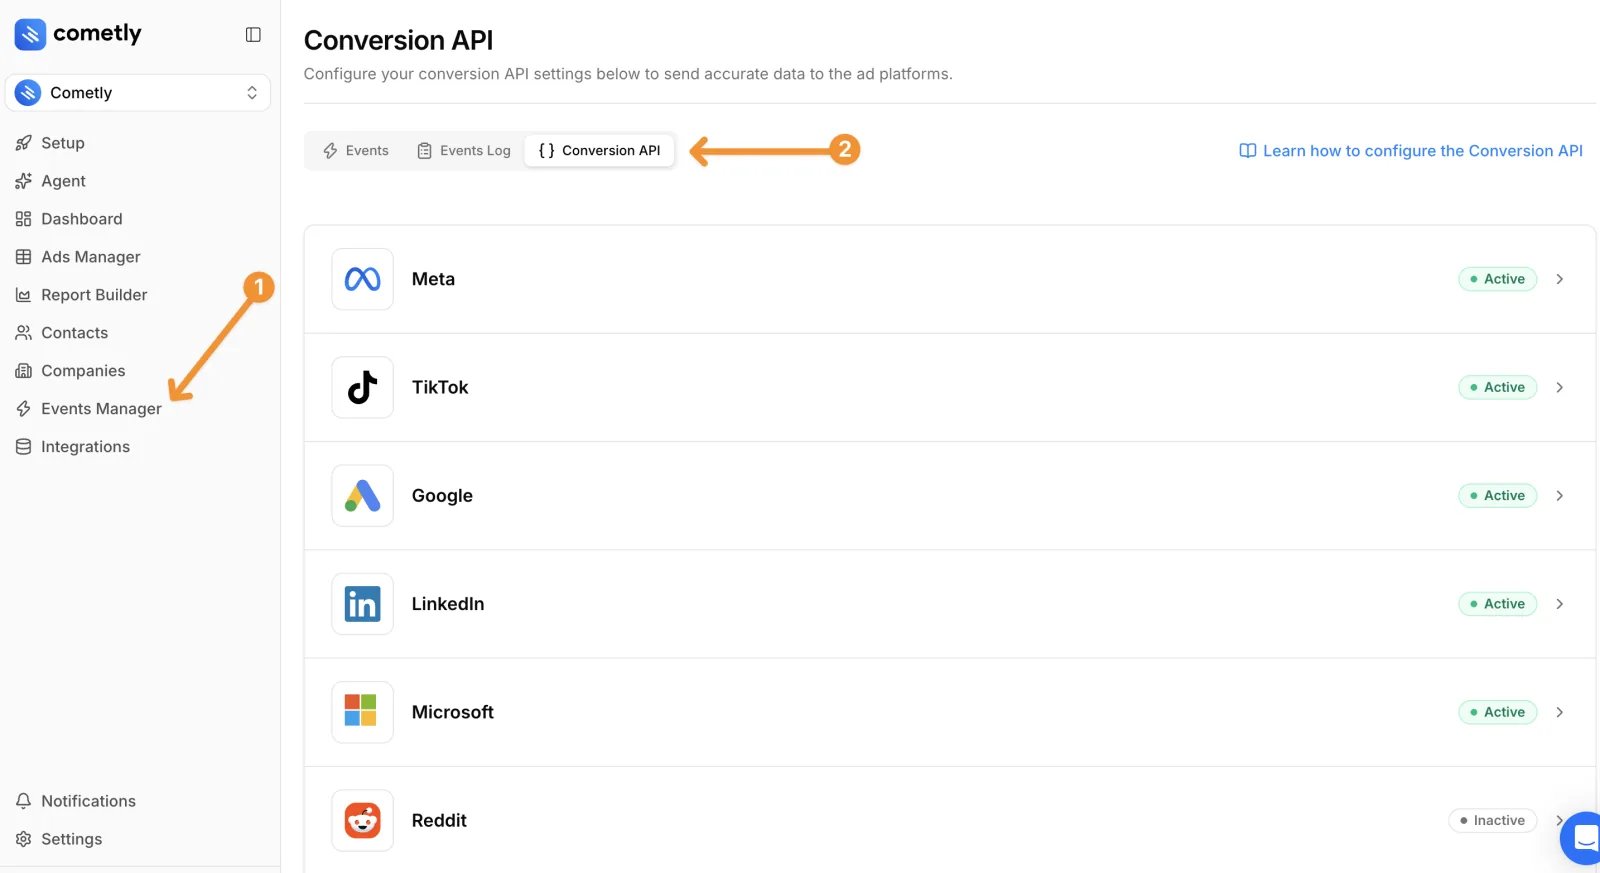
- Click the Google row to expand it.
- Under Manage data sharing, select Turn on data sharing. The change is saved straight away and the row’s badge switches to Active.
-
Expand Setup Offline Google Conversions, read the five statements, and click Acknowledge. You confirm that:
- You have read this setup guide.
- The offline conversion actions you created are set to secondary action optimization, not primary.
- You will wait until you have 35 to 50 conversions on the secondary offline conversion action before testing Google campaigns with the custom goal.
- Your Cometly account is tracking events accurately. If you turn data sharing on before it is, you send inaccurate data to Google.
- You are responsible for the results of changing conversion goals on your campaigns, and you understand it can affect campaign performance.
Step 4: Map Cometly events to Google conversion actions
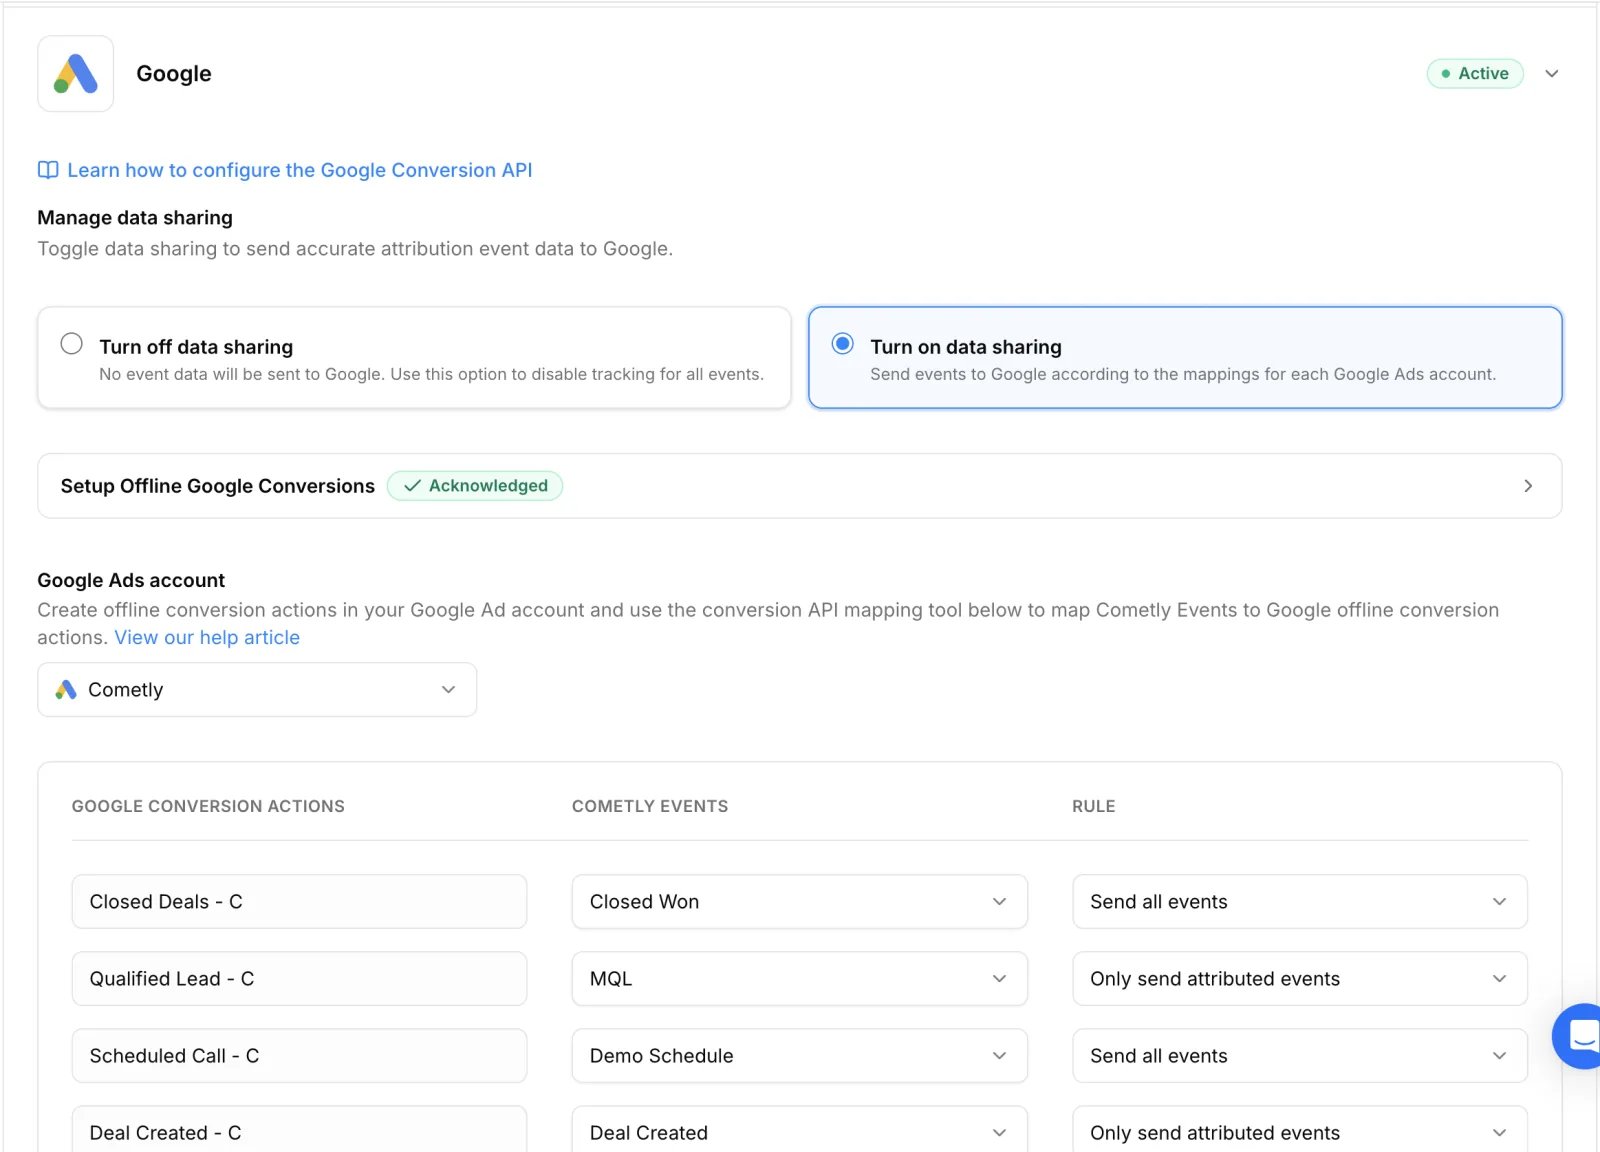
The mapping tells Cometly which tracked event to send to each Google offline conversion action.- Under Google Ads account, select the ad account you want to map. Cometly loads that account’s offline conversion actions (the ones created with Import > CRMs, files, or other data sources). If you see “Selected account doesn’t contain compatible actions.”, go back to Step 1 and create one.
-
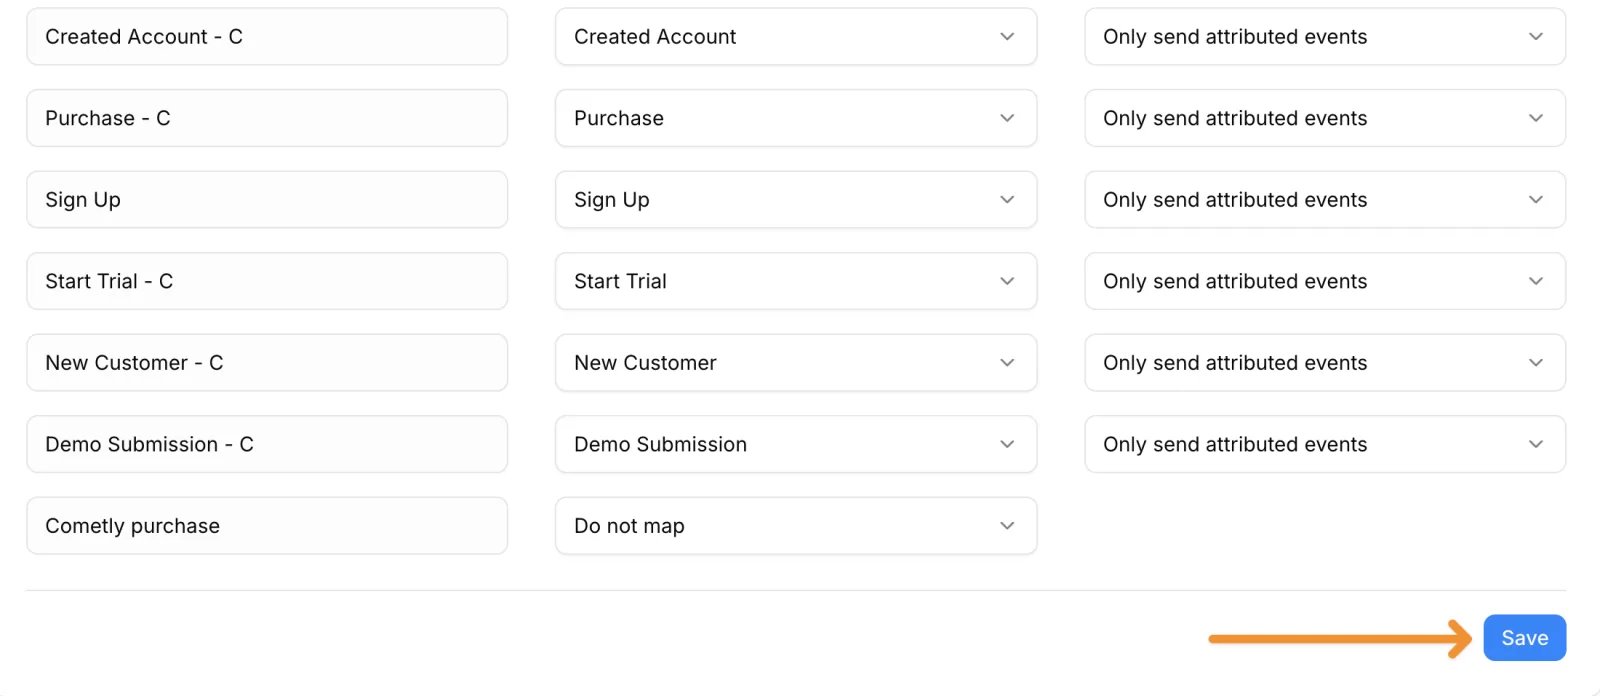
For each row under Google Conversion Actions, pick the event to send under Cometly events. Leave it on Do not map for actions you do not want Cometly to send to.
-
For each mapped row, choose a Rule:
- Send all events: sends every occurrence of the event to this Google Ads account, even when it is not attributed to one of its ads. Events without a usable Google click ID are sent with the contact’s hashed email and phone instead. This gives Google’s AI the most data to learn from.
- Only send attributed events: sends the event only when Cometly attributed it to an ad in this Google Ads account and it carries that account’s click ID.
-
Click Save at the bottom of the mapping table.
Step 5: Accumulate 35 to 50 conversions, then launch a campaign with the custom goal
- Accumulate conversions. Wait until Google has received 35 to 50 conversions through your offline conversion action.
- Duplicate or create a campaign. If you have a successful campaign, duplicate it. If you have no campaigns, create a new one.
-
Set the campaign goal. On the duplicated or new campaign, set the campaign goal to your custom goal.
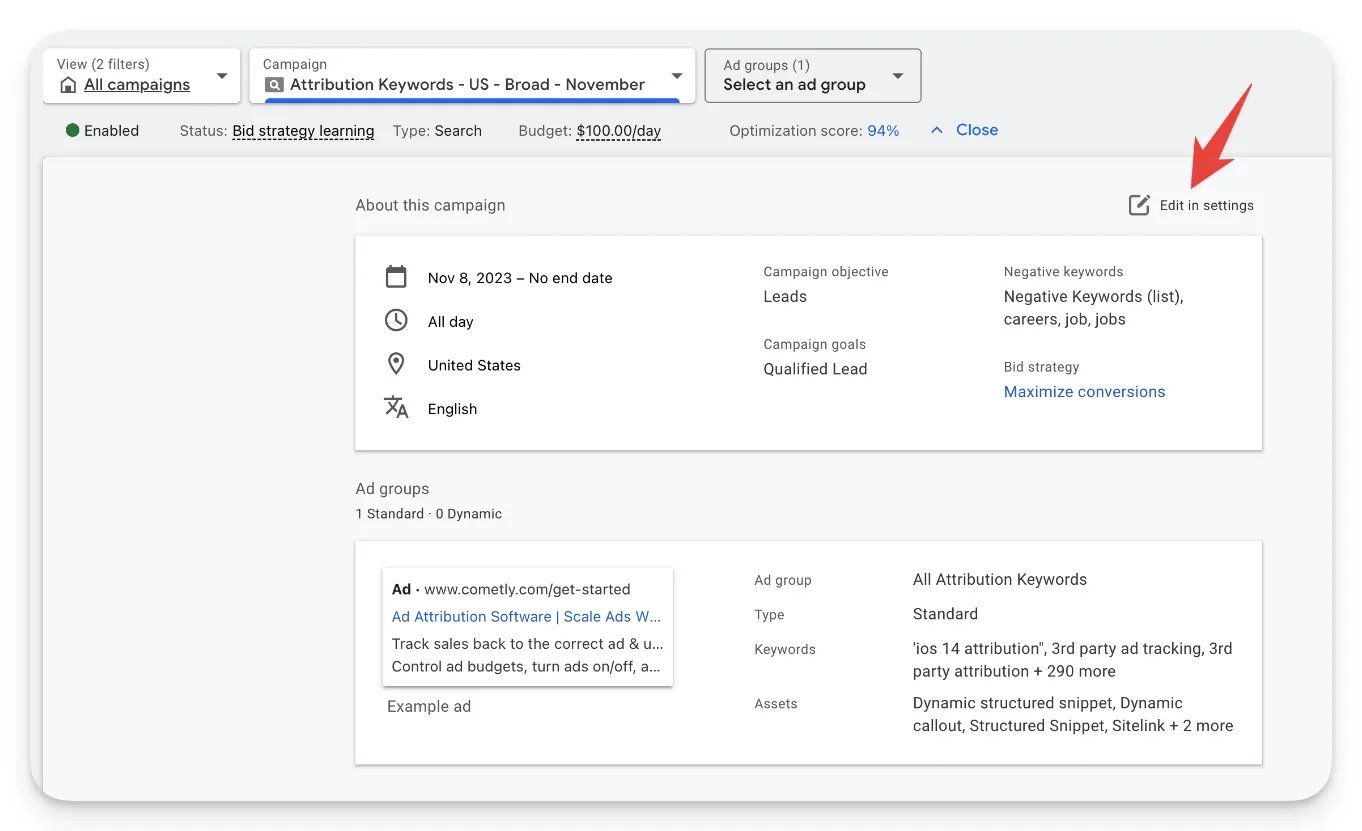
Go to your campaign settings and click Edit in settings:
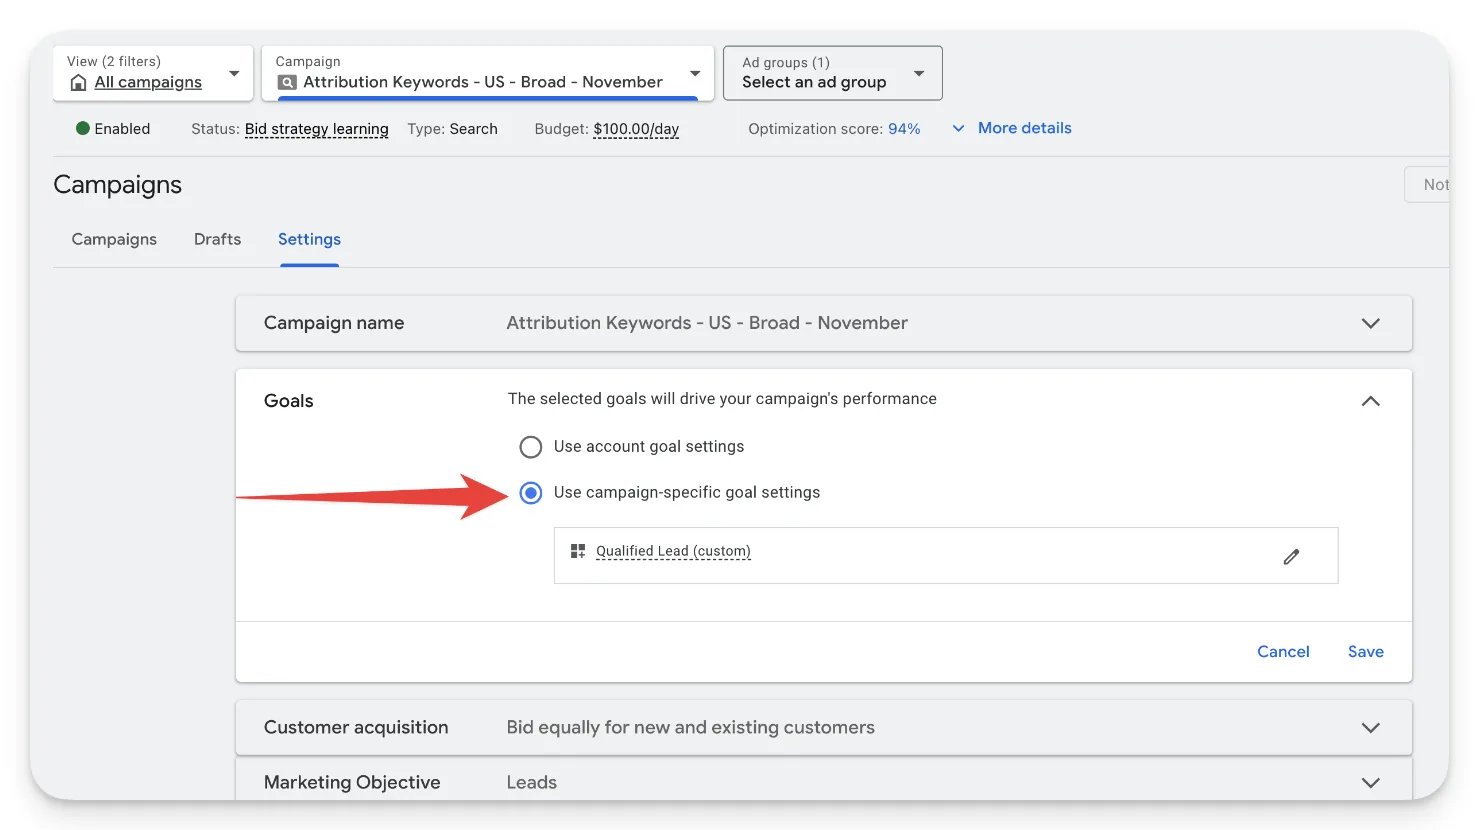
Select Use campaign-specific goal settings and choose your custom goal:
- Leave existing campaigns alone. Do not change the campaign goals of your existing Google campaigns. Changing them can hurt their performance.
- Monitor the new campaign. Check that it works and starts accumulating data.
- Move other campaigns over carefully. Once the new campaign has gathered enough data and shown good results, you can consider switching other campaigns to the custom goal.
Check it worked
In Cometly, the Google row on the Conversion API tab shows the Active badge. In Google Ads, open Goals > Conversions > Summary: conversions start to appear on your offline conversion action once Google has processed them, which can take up to 12 hours after Cometly sends them.Why Cometly and Google Ads numbers differ
When you use the Conversion API, it is normal to see differences between the conversion data in Cometly and in Google Ads. Each platform processes and reports events differently.- Google Ads takes time to process conversions. It can take 12 to 48 hours to fully process conversions sent through the API, so recent conversions may not show up right away.
- Google Ads reports conversions on the click date. If someone clicks an ad today and converts later, Google logs the conversion at the time of the click.
- Cometly reports conversions on the event date. Cometly logs the conversion when the person actually converts.
Frequently asked questions
Can Cometly send a conversion to Google Ads without a gclid?
Yes, when the mapped row uses the Send all events rule. Cometly sends the event with the contact’s hashed email and phone instead of the Google click ID (gclid). Google can only match it to an ad click if Enhanced conversions for leads is turned on and your Google tag captures the email or phone on your forms. See Set up Google Enhanced Conversions for Leads.Why is my Google conversion action not showing in Cometly?
Cometly only lists enabled conversion actions that were created with Import > CRMs, files, or other data sources. Website conversion actions and removed actions do not appear in the mapping table. Create the action as described in Step 1, then select the Google Ads account again in Cometly.Why are my Cometly conversions not showing in Google Ads?
First allow for the delay: Cometly sends each conversion about 15 minutes after the event is tracked, and Google can take up to 12 hours to display it. If nothing arrives after that, check in Google Ads that you have accepted the customer data terms and that Enhanced conversions for leads is turned on, because Google rejects the uploads without them. Set up Google Enhanced Conversions for Leads walks through each setting.Next steps
- Improve your Google match rate with Enhanced Conversions for Leads
- Understand why Cometly and Google Ads conversion numbers differ
- Exclude an event from the Conversion API
- Set up the Conversion API for another ad platform