

js.comet-serve.com. You set up first party domain tracking in three steps: turn it on, add two DNS records, then swap the script on your site.
Ad blockers and browser privacy updates are making it harder to rely on third-party scripts for accurate tracking. When the pixel loads from your own domain, fewer visits and conversions go missing, so your reports tie more leads and sales back to the ads that produced them.
Why this matters
Serving the pixel from your own subdomain gives you:- Higher data accuracy (fewer blocked events).
- Stronger compliance and trust (events look like they are coming directly from your site).
- Tracking that holds up as browsers continue to limit third-party cookies and scripts.
Before you start
- You need access to the DNS settings of your domain.
- Add at least one domain under Setup > Install the Cometly pixel > Add domains. The First Party Domain Tracking switch is disabled until you do.
- Pick a subdomain that is not in use. After setup it is dedicated to serving the tracking script and no longer serves its current content.
Step 1: Turn on First Party Domain Tracking
- Click Setup in the sidebar and open the step Install the Cometly pixel.
- Under Pixel options, turn on First Party Domain Tracking.
-
Enter the subdomain you want to dedicate to tracking (for example
e.yourdomain.comordata.yourdomain.com).- Do use a subdomain like
e.yourdomain.comordata.yourdomain.com. A root domain such asyourdomain.comis not accepted. - Avoid subdomains like
t.,track.ortracking., as they may be blocked by ad blockers. - The subdomain becomes dedicated to Cometly tracking only.
- Do use a subdomain like
- Click Configure Domain. Cometly now sets up the certificate and the domain, and the domain shows Setting up…. This takes less than a minute on average. Click Check Status to refresh until the DNS records appear.
Step 2: Add the required DNS records
After you configure your domain, Cometly generates two CNAME records to add at your DNS provider. If they are hidden, click Show DNS.- Certificate Validation: proves ownership of your domain.
- Domain Validation: points your subdomain to Cometly’s infrastructure.
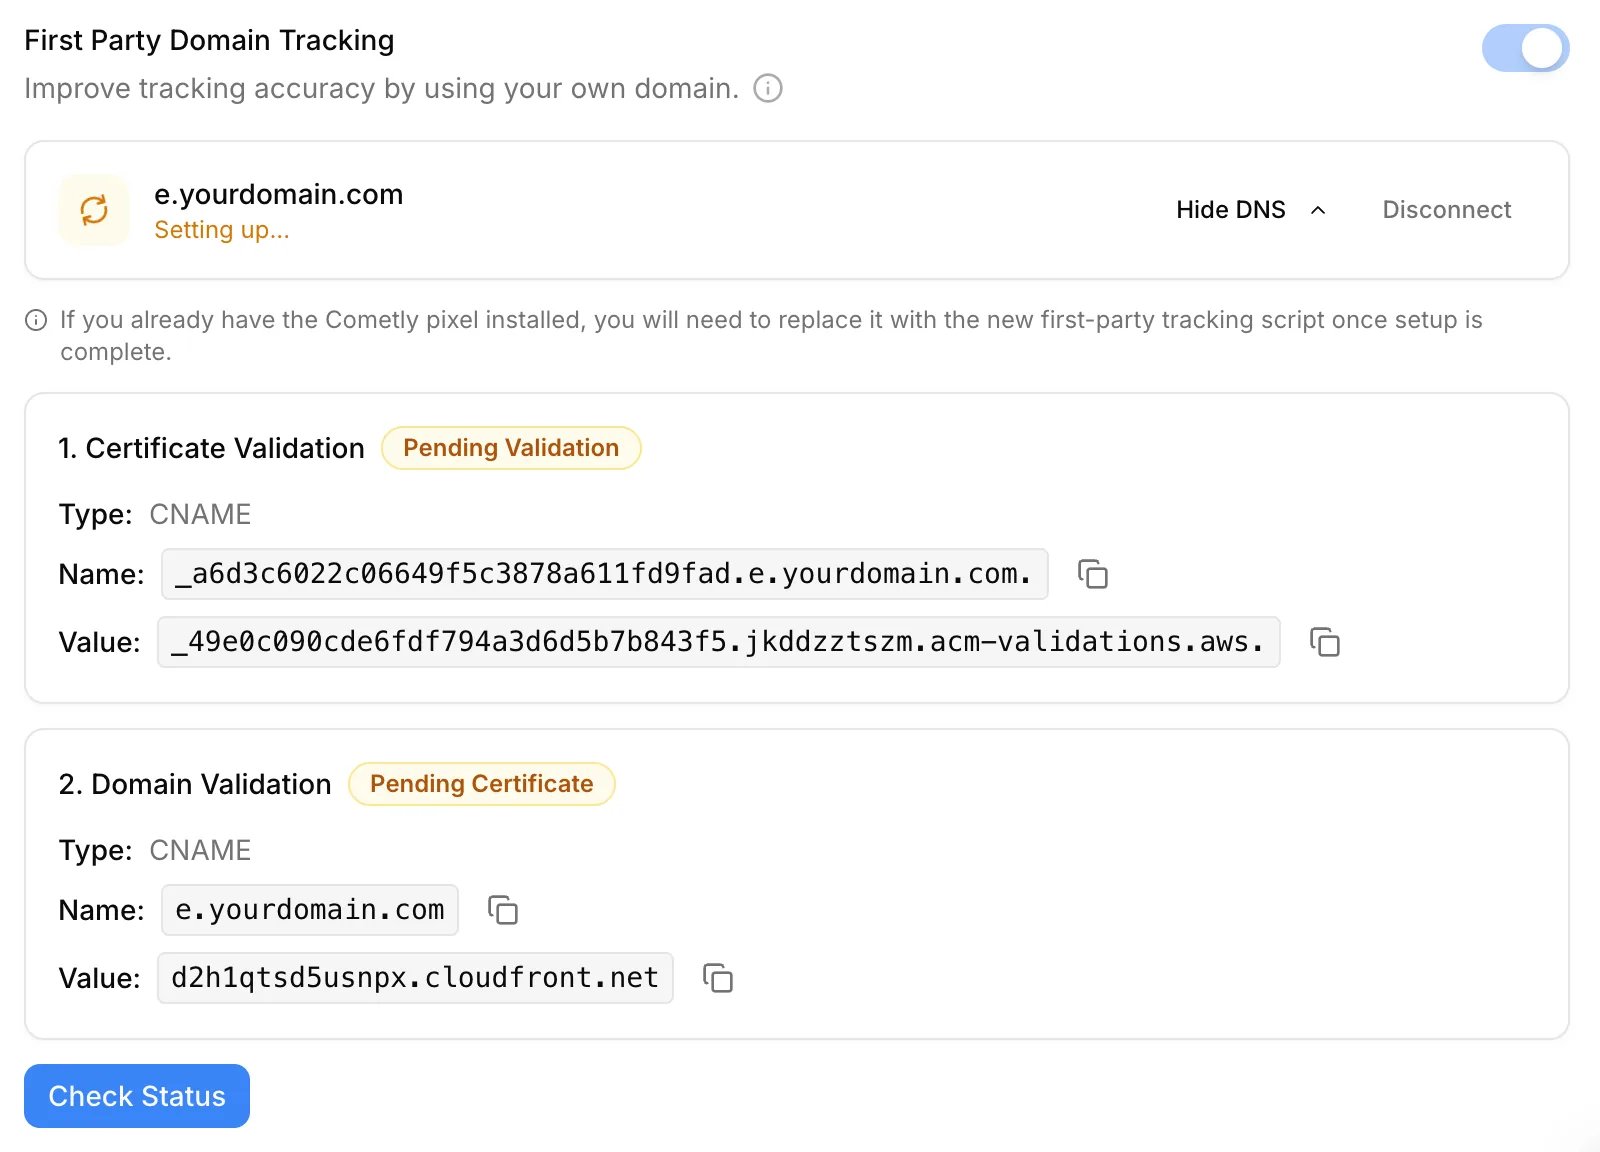
- It is normal for Certificate Validation to complete first.
- When both show Validated, the domain shows Configured and active and your first-party pixel script is ready to copy.
DNS provider setup guides
Open your provider below for instructions:Cloudflare
Cloudflare
- Log in to your Cloudflare dashboard.
- Select your domain.
- Go to DNS → Records.
-
Click Add Record and choose CNAME.
-
Name: Enter the subdomain (in the example below:
m).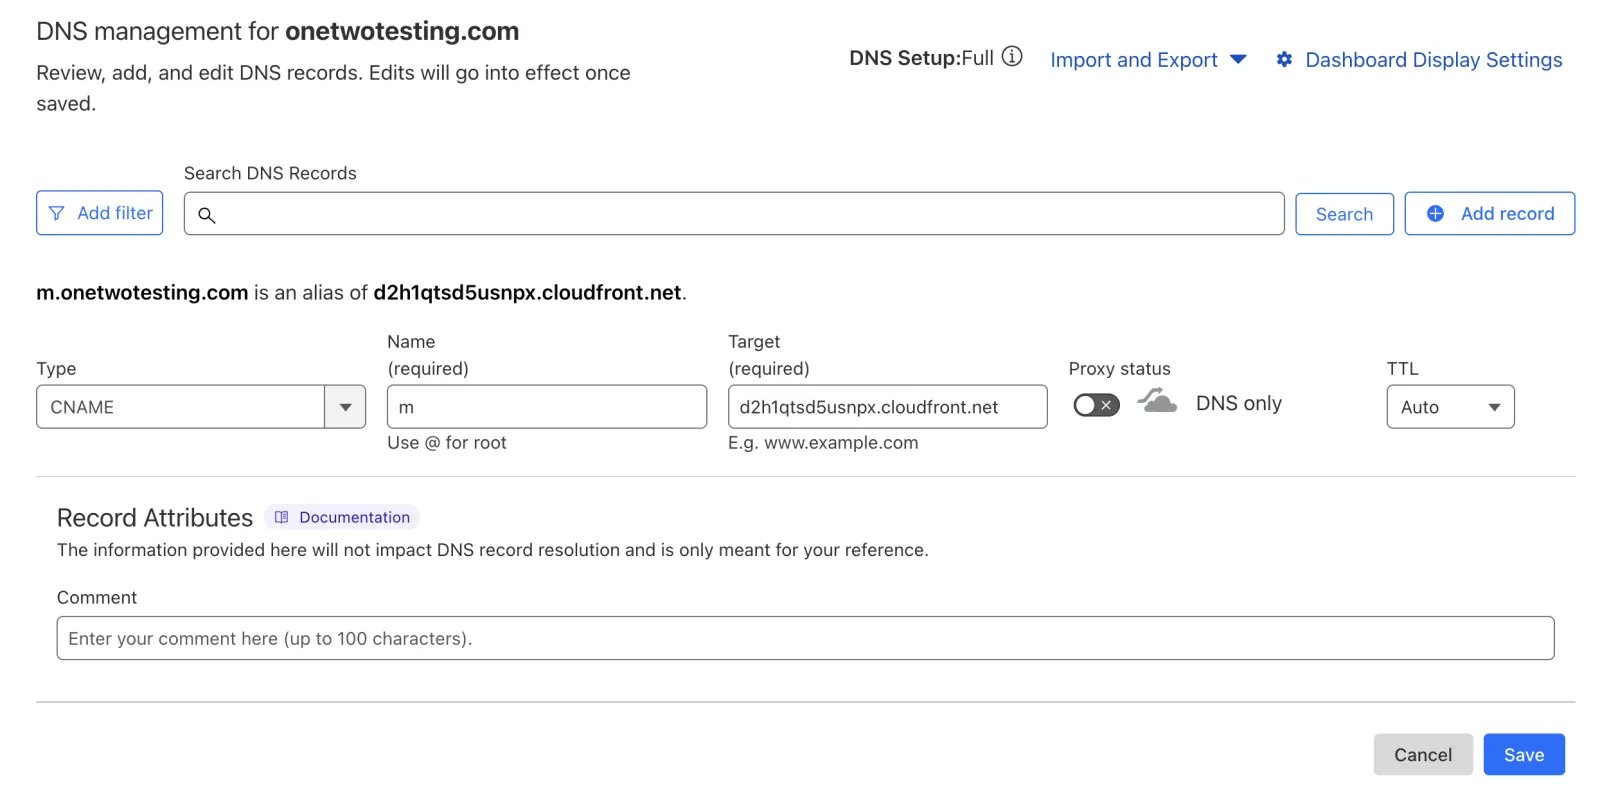
-
Target: Enter the value provided by Cometly.
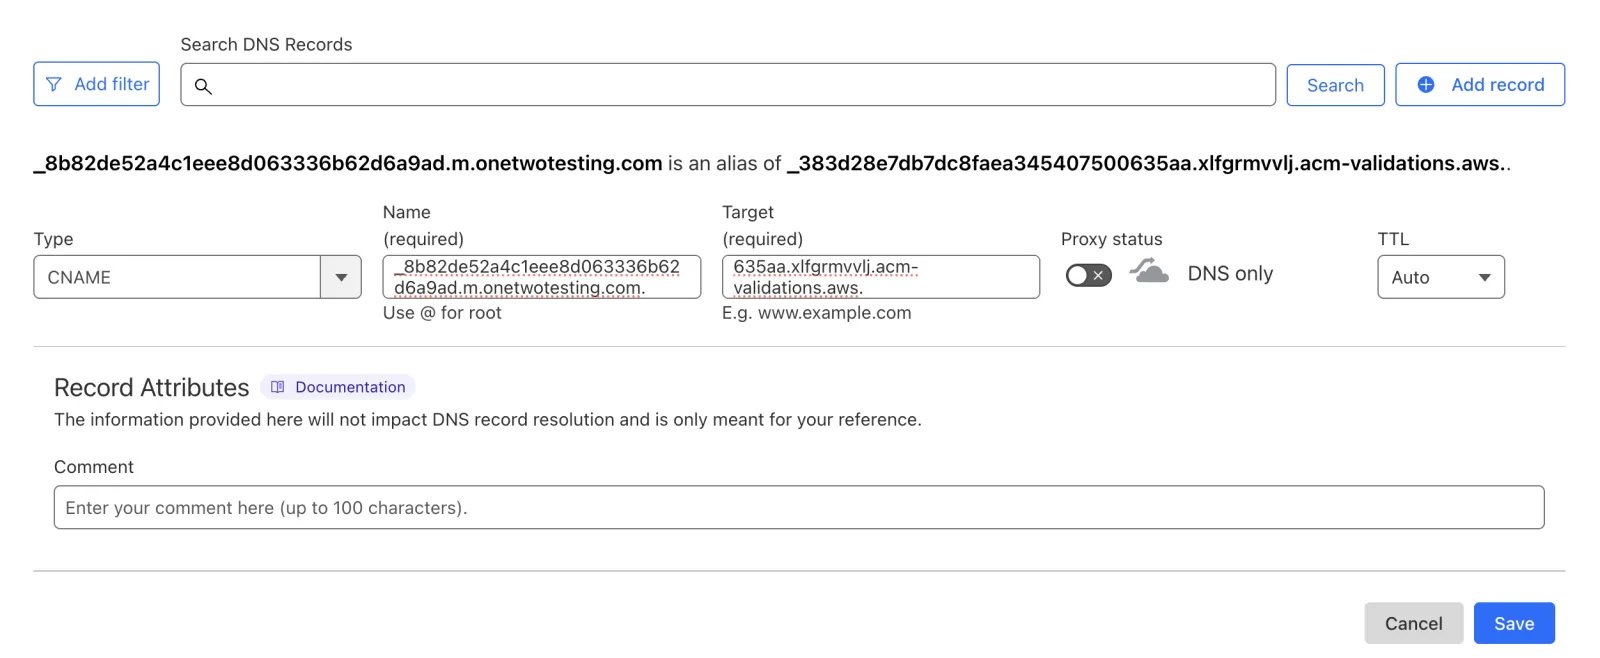
-
Name: Enter the subdomain (in the example below:
- Make sure Proxy Status is set to DNS Only (gray cloud).
- Save the record.
- Repeat for the Certificate Validation CNAME if shown.
GoDaddy
GoDaddy
- Log in to your GoDaddy account.
- Go to My Products → DNS → Manage DNS.
- Click Add.
-
From the dropdown, select CNAME.
- Host: Enter the subdomain (example:
m). - Points to: Enter the CloudFront value from Cometly.
- Host: Enter the subdomain (example:
- Save.
- Add the second Certificate Validation CNAME if required.
Google Domains
Google Domains
- Log in at Google Domains.
- Select your domain and go to DNS.
- Under Custom Records, click Add.
-
Choose CNAME.
- Host name: Enter the subdomain (example:
m). - Data: Paste the value from Cometly.
- Host name: Enter the subdomain (example:
- Save.
- Repeat for the Certificate Validation record if shown.
Namecheap
Namecheap
- Log in to Namecheap.
- Go to Domain List → Manage → Advanced DNS.
- Scroll to Host Records and click Add New Record.
-
Select CNAME Record.
- Host: Enter the subdomain (example:
m). - Value: Enter the CloudFront URL from Cometly.
- Host: Enter the subdomain (example:
- Save.
- Add the second Certificate Validation CNAME as required.
AWS Route 53
AWS Route 53
- Go to your AWS Route 53 console.
- Select your hosted zone (your domain).
- Click Create Record.
-
Choose CNAME.
- Record name: Enter the subdomain (example:
m). - Value: Paste the CloudFront URL.
- Record name: Enter the subdomain (example:
- Save.
- Repeat for the Certificate Validation record.
Bluehost
Bluehost
- Log in to Bluehost.
- Go to Domains → Zone Editor.
- Click Add Record.
-
Select CNAME.
- Host Record: Enter your subdomain (example:
m). - Points To: Paste the CloudFront value.
- Host Record: Enter your subdomain (example:
- Save changes.
- Repeat for Certificate Validation CNAME.
Squarespace
Squarespace
- Log in to your Squarespace dashboard.
- Go to Settings → Domains → DNS Settings.
- Scroll to Advanced Settings.
-
Add a new CNAME.
- Host: Enter the subdomain (example:
m). - Value: Paste the CloudFront value from Cometly.
- Host: Enter the subdomain (example:
- Save.
- Add the Certificate Validation CNAME if required.
Wix
Wix
- Log in to your Wix account.
- Go to Domains → Advanced → DNS.
-
Add a new CNAME record.
- Host Name: Enter your subdomain (example:
m). - Value: Paste the CloudFront value from Cometly.
- Host Name: Enter your subdomain (example:
- Save changes.
- Repeat for the Certificate Validation CNAME.
Step 3: Replace your pixel
Once both records are validated, the script under Install the pixel changes to use your subdomain. Click Copy Code and add the script to the<head> of your site (or through Google Tag Manager or the WordPress plugin). If the default Cometly pixel is already installed, replace it with this first-party script.
Check it worked
Under Pixel options, your tracking domain shows Configured and active and both DNS records show Validated. The script under Install the pixel now loads from your subdomain. Once that script is live on your site, click Verify under Verify your pixel in the same Setup step and look for Pixel detected.Troubleshooting
If validation is not completing or something looks stuck, these are the most common fixes:- DNS propagation delay: DNS changes can take up to 24 to 48 hours, though most resolve in under an hour. Check back after some time.
- Proxy enabled in Cloudflare: Make sure your CNAME record’s Proxy Status is set to DNS Only (gray cloud). Proxied records (orange cloud) block validation.
- Incorrect record type: Make sure you added a CNAME record, not an A or TXT record.
- Extra characters in the DNS entry: Check for trailing spaces, missing dots or cut-off values in your DNS panel.
- Certificate validation first: It is normal for the Certificate Validation record to complete before the Domain Validation record. Wait until both show Validated.
- Wrong subdomain: Make sure the record uses the exact subdomain you configured in Cometly. If you set up
m.yourdomain.com, the CNAME must match it exactly. - Certificate validation failed: If the domain shows Certificate validation failed, click Request New Certificate. The new certificate has different DNS validation values, so replace your current validation CNAME record with the new values shown. If the message says your domain’s CAA records blocked issuance, first add a CAA record with the value
0 issue "amazon.com"at your DNS provider. - Fallback: If setup takes longer, keep using the default pixel (
js.comet-serve.com) until validation is complete.
Disconnect a first-party tracking domain
You can remove your tracking domain from the same place you set it up.Before you disconnect
- The tracking domain stops serving the pixel immediately.
- The domain is removed from your space.
- You need to reconfigure DNS records if you want to use this domain again.
- To prevent data loss, switch your site back to the default Cometly script before you disconnect. The confirmation dialog shows that script so you can copy it.
How to disconnect
- Go to Setup > Install the Cometly pixel > Pixel options.
- On your tracking domain, click Disconnect.
-
In the Disconnect tracking domain? dialog, copy the general tracking script, then click Disconnect Domain.
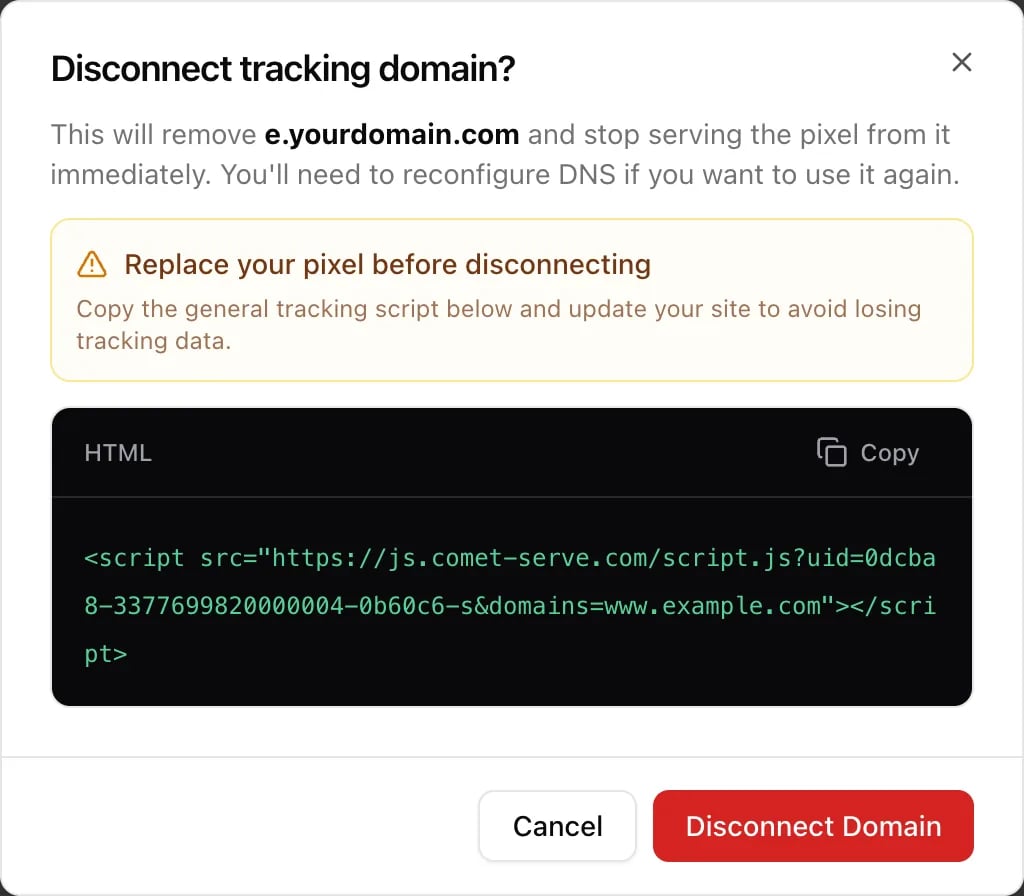
- Update your website to use either the general Cometly pixel or a new first-party domain if you are reconfiguring.
Frequently asked questions
What happens if I don’t add the DNS records right away?
Cometly waits up to 72 hours for the Certificate Validation record. After that, the domain shows a message that certificate validation timed out. Click Request New Certificate and add the new validation values it shows, as described under Troubleshooting above.Does my tracking script change before the domain is validated?
No. The script under Install the pixel keeps loading fromjs.comet-serve.com until both DNS records are validated. It switches to your subdomain only when the domain shows Configured and active, so the default pixel on your site keeps tracking in the meantime.
What if requesting a new certificate keeps failing?
After several failed attempts, Cometly pauses automatic retries and the domain shows a note asking you to contact support. Reach out to the team and keep the default pixel on your site until the domain is sorted.Next steps
- Install the Cometly pixel and verify it on your site
- Track visitors across several domains with cross-domain tracking
- Check what the pixel captures with the Pixel Helper
- Fix a pixel that Cometly does not detect